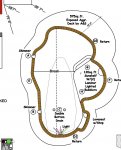
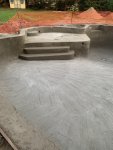
We are at the point of finalizing the locations for two bubblers on our sun shelf. Originally, the steps were NOT attached to the shelf. We decided to change that because the Classic steps that the PB uses take up almost 5 feet of pool with 4 steps.
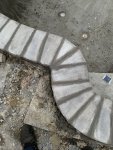
In the picture below, (G) is where one bubbler was originally set. Now that the steps are attached to the shelf, (G) would be in the way of entering and exiting the pool, so we have thought about moving it to (F).
We plan to put two lounge chairs and a small table with an umbrella sleeve through it on the shelf. Knowing that, (F) and (H) would lie away enough from the chairs.
The pool salesman thinks we should leave it at (G) even though it will be in the way of the steps. It’s our pool and we can put it where we want, and we will, but does anybody have any thoughts on where you would locate it? Would the bubbler “action” make it difficult to use the steps?


 . They couldn’t pass the driveway because of septic fields, so they said they could set up at the top of the driveway and hose it in from there. They said it would be dusty and it could get on the house. Or, we could reschedule. I reluctantly said to go for it.

 .
.