Went with an unorthodox solar heater arrangement and don't think it's working optimally

toddrhodes

Active member
Jul 23, 2021
32
South Bend, IN
Pool Size
16000
Surface
Vinyl
Chlorine
Salt Water Generator
SWG Type
CircuPool Edge-40
Couple pics of the setup:
Far panel is the first in the series, near panel is the second in the series and should send water back to the pool from the bottom/outlet port. All inlets/outlets are in the middle of this setup.
7AvpS2Bl.png


Plumbing (In = check valve --> diverter valve --> isolation valve --> far panel inlet --> outlet of far panel to inlet of near panel, on top --> outlet of near panel is at the bottom --> Return is isolation valve --> diverter T --> check valve)
h7ctn86l.png


SIPu8QXl.png


BMwgIqml.png


So I have these side by side, as putting them on top of one another was a bigger challenge than I wanted to tackle.

What I'm seeing, though, is that using my IR temp gun, I believe the input water is basically going right to the output side on the far panel (essentially my "first" panel in the series), to the top/inlet of the second panel). Temp at the first panel input is about 55*, which is about what the pool water is right now. At the OUTPUT of the first panel it's much higher, about 75*, but at the INPUT of the second/near panel, it's back at like 58*. It's a very short path from the output of the first to the input of the second so if the water was flowing as I desired, it should be about the same, but it's not.

I've tried messing with the middle valves in each panel to direct the flow a bit and while I have seen some success, the numbers just aren't matching up to my expectation, that the water would fill panel 1, then flow to the top of 2, and out the bottom of 2.

Hopefully this makes a little sense. I think my options are to try and come up with a way to mount these vertically and use Fafco's recommended plumbing diagram that they sent me, or, run them parallel with T's.

Any thoughts or suggestions are appreciated. I have them running now since this is our first year and I'm trying to learn how they work and how to optimize them before the swimming season really kicks off.

Thank you! If I can provide any further clarification, I will do my best.
Todd
 
Ok, well, you're doin' it wrong! ;)

Sorry, I didn't have time to study exactly what you did. I stopped looking when I saw the inlet and the outlet both on the bottom. Your panels have to be oriented and angled such that they fill from the lowest corner and exit at the opposite highest corner, diagonally. Have a look at the site I'll link below and it'll explain the principles of how the flow should work without trapping any air (which you have to specifically design to prevent). Also, the mini-tubes in the panels should be oriented vertically, not horizontally (again, to eliminate air pockets). They can be horizontal, but when you have the choice, as you do, vertically is going to be less problematic.

You'll probably regret using the inexpensive parts (PVC ball valves and PVC check valves), but if that was a budget concern then it is what it is.

And thirdly, it looks like you'll be operating this manually, which is fine, but the efficiency of a computer controlled system and automated solar valve, which are not prohibitively expensive, will pay for themselves in short order in terms of energy efficiency and a warmer pool.

Sorry to say, if you want this plumbed correctly, you pretty much have to start over. Read all the pages here that describe how a solar heater should be designed and assembled. Watch the animations, especially how the panels are slightly skewed (not just angled to the sun) so that the water flows through them properly:

 
Last edited:
  • Like
Reactions: toddrhodes
If you want to post a sketch of your next attempt before you try it, I'd be happy to take a look at it before you redo everything. Sort'a a second set of eyes that might spot something helpful...
 
Here's a link to a complete control system, just to give you an idea. There are many competing brands of these, so shop around, then check back in here before you buy. We'll make sure everything is compatible. In the Google search results the price reads about $325, but the actual page now lists it at $550! And they're out of stock. Freakin' supply chain.

In the meantime, please fill in your signature so we know what we're dealing with. Something like my signature helps us help you better.

And welcome to TFP! Sorry if you might not be hearing what'cha came here for...

 
A lot to respond to but first - thank you.

I'm not worried about redoing something to make it work properly. I wouldn't have posted the question if I weren't prepared to hear I'd done it wrong :) I thought I had done enough research but I've never seen that site you linked and if I had, I'd not have done this the way that I did. So, from that standpoint - it's all good. I have a month or so to fix it before we can do any serious swimming.

As far as automation goes - I do plan to do that but until I could get it working and really understand the how/why, I didn't want to overcomplicate things with electronics that also themselves have a learning curve. Same reason my SWG isn't running right now (and yes that is plumbed after the heaters and there's a check valve between those systems). So, essentially I'm learning to crawl before I walk.

I think the next step is to figure out a way for me to mount these differently. And I'll have a lot of spare 1.5" PVC at least :)

I could technically "drape them" from the roof of the shed, over my fence. They'd still get full southern sun and would be oriented more optimally, however I'm not sure if it is a good idea to not have them perfectly flat? They would essentially pitch off the roof and then over to the fence. Question - when they are mounted that way, does the output still need to be skewed so that it is the highest point? Wouldn't require much skewing I gather, but just trying to make sure I understand the physics involved.

I will say that probably my first step here is to take the near panel completely out of the system until I can find a better way to mount these. Just run the one, and skew it on the PVC so the output is angled up, and that's something I can do relatively easily and have one panel that is closer to optimum, versus two panels working against one another.
 
  • Like
Reactions: Dirk
I have a month or so to fix it
Yep, no hurry. I'm in the middle of redoing some stairs. I knew while doing them the first time they may or may not work. Oh well. Live and learn. Still ahead of the curve cost-wise by doing it myself.
So, essentially I'm learning to crawl before I walk.
Good plan.
I could technically "drape them" from the roof of the shed, over my fence.
That might not work long term. The tubes, and even the larger manifolds, all expand and contract in the sun. Plus, they're all full of water, which is heavy. And then there is wind to consider. That is a lot of opposing forces going on. Solar panels have two primary failure points: where the manifolds connect, and where the tiny tubes connect to the manifolds. You'll really be stressing the tube connections by just hanging them and letting them droop. My panels' tubes are supported about every foot with a little spacer that suspends them away from the roof. That's how they came, so that tells me the manufacturer saw the need for that kind of support.

How I've seen ground mount done is to have a complete structure, pretty much like a roof. Some sort of solid underlayment (like plywood), and then that supported by framing. I realize that significantly complicates the build (and cost) but that's the right way to do it to protect the panels long term. You could even use roofing material to waterproof the underlayment. An alternate material that might work, if properly supported, is corrugated roofing material. I did my patio covers with that, and back then that material was surprisingly cheap. I was able to order the custom lengths I needed, from Lowes, and it came pre-painted. Framing for it was pretty simple, as the panels have some inherent structural support built in.

Keep in mind, as I said, that the panels are expanding and contracting during the day and night. Everywhere the tubes touch is a wear point. Depending on the roughness of the surface, that can impact their longevity. Those little spacers I mentioned are attached to the tubes, so they move with the tubes, and keep them from touching anything. Maybe your panels have something similar? You definitely would not want to drape the tubes over the top of a fence, where they will bend and rub, if that's what you were describing.

Question - when they are mounted that way, does the output still need to be skewed so that it is the highest point?
Yes.
Wouldn't require much skewing I gather, but just trying to make sure I understand the physics involved.
That's correct. The rule of thumb is 1/4" per 1' for water drainage. So a 4' wide panel would need to skew about 1", though you might have to correct or compensate for any sagging pipes.
I will say that probably my first step here is to take the near panel completely out of the system until I can find a better way to mount these. Just run the one, and skew it on the PVC so the output is angled up, and that's something I can do relatively easily and have one panel that is closer to optimum, versus two panels working against one another.
I think if you do that, and plumb it correctly ("in" at the bottom, "out" at the opposite top), you'll find your temperature readings vastly improve.
 
  • Like
Reactions: toddrhodes
Well, I'm glad I asked :)

Will require more work and a good bit more thinking on how to best orient all of this in the parameters of my fence/shed/backyard, but I think I can do it and I now have a much more clear image in my head of the right way, not just the "well, it works" way. I certainly wouldn't have been able to without all of this input, and I can't say thank you enough for the time you've taken to help.

Todd
 
  • Like
Reactions: Dirk
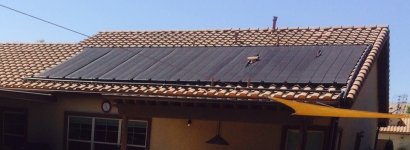
You want the panels assembled in one array, with one input, and one output. You connect the manifolds together, so there is one contiguous one on the bottom, and another at the top. If you look close at the top manifold compared to my roofing tiles, you can just make out the skew. It's not much.

And if you look really close, you can just make out some shadows of the little supports holding the tubing off the tile. They're about 1' apart, they run parallel to the manifolds. Notice how straight and flat the tubing is, all well supported. And the tubes don't touch the tile anywhere. Neither do the manifolds, they are supported off the roof too. The panels expand and contract in all directions, and if allowed to touch the roof, they would saw themselves to pieces in short order.

Also notice how the supply line, running along the bottom, is also skewed. This is so all the water drains out of the panels and the plumbing each night. That's not necessarily possible for a ground mount system, but if you can achieve that, that's the best way to go.

solar panels.jpg
 
  • Like
Reactions: toddrhodes

Enjoying this content?

Support TFP with a donation.

Give Support
Something to consider... since I'm so good at spending your money. You could turn this project into a two-fer. You could build yourself a simple four-post patio cover near the pool, to provide a nice shady spot for you and the family and your guests. Use the corrugated roofing and paint or stain the wood structure. Put a light under it, maybe a nice ceiling fan, with a table and chairs underneath. I guarantee that will be the gathering spot on a hot day. Then put your panels on top of that. That might help you justify the added expense of this supporting structure I'm describing. And instead of the questioning looks you're probably getting from your significant other, you'll get a big ol' hug and a smile! You can't you put a price on that!! ;)

In the pic above, you can barely see my two patio covers, corrogated roof on top, hanging light fixture. Painted to match the house trim. There's a 6' patio table with chairs under it. That's where everybody hangs out. And in my climate it's a nice place to be when the sun is out.
 
Oh, almost forgot. If you plan on draining your panels, you'll need a vacuum relief valve somewhere in the system. I can explain more about that if you can't find references about it on the website I linked.
 
  • Like
Reactions: toddrhodes
All great ideas. Unfortunately the layout of our backyard, where the sun hits, what faces south vs north, and where our fence and mechanicals lie - that's all stuff I have to consider when it comes to placement. If we were to do a patio and enclose it, ever, it would most likely be on the opposite side of where the heaters are now and where the pump is, and would get more North sun than south which up here, is no bueno.

But I think I have a plan... I'll talk it out, and I'm not a very good drawing talent so I can take a stab at a diagram if it might help.

But basically, I'll take the far panel and just lay it flat, on the PVC rack, but use wood to tilt it just enough to get the inlet at the low end, and the opp corner outlet as high as it can be.
Then take the near panel and move it back behind the fence, between the shed and the fence, angled up toward the sun. Go into it at its lowest point (southwest corner/far corner of the shed closest to the fence, and closest to the first panel high spot), then tweak the panel and rack so it tilts up. Exit at its highest point which would put me just above the return line now. Would make for reasonably efficient plumbing, a pretty simple change all in all, but give me the benefits of still getting southern sun and working the physics of the flow of water properly. Also, wouldn't look terrible and would all be tucked pretty well out of sight. Most importantly - it keeps everything on our property, which the back line is weird and angled away from our house.

For now, I actually have the water going in and out on the same manifold end of the one panel in service - was just easiest to plumb while the other one drains and we can move it all to a better physical layout.

The other bit with these is that they are, for whatever reason, not warranted for roof mounting. Not that I have much roof to put them on back there, but that's also a thought. Would be a next year or the year after thing, but basically extend the roof of the shed out and down on the southern side. By that point, they're out of warranty anyway. But that could provide shade for the mechanicals and a solid mount for the solar panels. I just won't have the time or the resources to do any of that this year, so the plan above is the best I've got for an intermediate step that uses both panels in the best way I can, this year.

I'll definitely research a vacuum breaker - I have a good image in my mind of what it does and why it's necessary, and I'll definitely need to drain and blow these out for the winter. They're supposed to be rolled up and put inside for the winter, but they're pretty big and I'm not sure if I'll have shed room for all that...

Also, I updated my signature, hopefully it's got everything covered. My TF-100 kit came in yesterday so I'll be playing with that later this week.
 
To be honest, I can't quite follow your plan (I'd need a sketch). I'll just give you a couple notes:

If your manifolds are not connected together into a single array, as I suggested, then in essence you'll have two arrays, which is fine, but you have to plumb them as two arrays. The website I linked explains how to do that correctly. It's not just a matter of running them corner to corner, in series, if that's what you were describing. I expect that'll work, but maybe not as effectively as the way the website describes. I'll only caution you that deviating from their layouts may or may not work. You've already seen that for yourself. If you've come up with some "other way," then you're rolling the dice again.

My panels are on my north-facing roof. You are a bit farther north than I am, but not by much. Water-heating panels are much more forgiving than electric-generating panels (PV) when it comes to angling them to the sun. It's not any where near as critical. Especially considering they're only used in the summer when the sun is pretty much directly overhead. You're thinking of PV panels, which are most efficient at a very specific angle, and year-round use is part of the equation. Your solar panels can probably go anywhere and be fine, so you can take that out of consideration when you're planning where they can go.

I had originally envisioned you tacking an overhang roof on to one of your out-buildings to create the area you need for your panels, while at the same time giving you some extra storage. Then that idea morphed into the pool patio idea. Either way, the idea was to get you a little extra value and use out of the structure, so we're on the same page there. Odd about the warranty issue. I wonder what that's about. Maybe something to do with the wind. My panels are specifically engineered to withstand a good deal of wind load (it's part of their spec), but I suppose not all are.

I know that the sun exposure more than anything else is going to end my panels someday. Taking yours in for the winter would certainly extend their life. So that's a definite advantage to your setup. You can see my shade sail in my pic, I take that in for the off-season months. I figure that will at least double its lifespan. My panels, not so much! They're just cooking up there all year long. They're not in use more than they are!
 
Last edited:
  • Like
Reactions: toddrhodes
I'm with you - extending the shed roofline seems like the best overall approach. Just have to make it happen, and I can say that's beyond my DIY skills but in that, I know a guy (or three). You're probably right about the wind situation, at least that makes sense to me.

So I could only find a small piece of paper but hopefully this illustrates my intermediate solution:
agaUCGDh.jpg


I would be making a single array, two panels in series. One flat, one standing up, going in at the lowest point of the flat one (S1 in the drawing) and out of the highest point of the one standing up (S2 in my drawing), with the connection between panels maintaining a height disparity. By that I mean, I would work to keep the highest point of the flat panel, which would be the output, lower than the lowest point of the one standing up, which would be the input.

It makes sense in my head, and I fully realize it's not the *best* way to run things, it's just making the most of what I can do in a relatively short timeframe. In any case, I am certain it will outperform the initial implementation, thanks to your help and the resources you've made available.
 
OK, I see it now. That's what I thought you were describing, but that's not what I meant by a single array. A single array would be the pairs of manifolds connected together, end to end. So the top manifold of S1 would be connected to the top manifold of S2 (making one, long single manifold), and the bottom manifolds connected in the same way. So the panels would be side by side. Then you connect the supply line to the lower corner of S1, and the return to the upper, opposite corner of S2. I know, for sure, that is the correct way. The way you're describing might be just fine, I wouldn't know, but that's not the way that website diagrams how to plumb two separate arrays.

I take it you're resisting a single array (turned 90°) to help you obscure the panels from view, or because of available space. That's fine. Ya gotta make it fit, right? If you're losing any heating efficiency by doing it that way, then maybe that's the trade off. And, again, I can't say for sure, it might be just fine that way, especially if it's just temporary.

Keep in mind (you might need a calculator for the math): the square of your new roof will be inversely proportional to the number of six-packs required, times the number of guys, to get it built! ;)
 
  • Like
Reactions: toddrhodes
OK, so you have an AGP. Which means you won't be draining the panels each day. That can work. Just be sure you get it all taken apart before the first freeze! I would still put a vacuum breaker on the unused corner of the highest array. Under certain conditions, without a breaker, the panels can overheat and if a vacuum forms it can deform the PVC. The VRV keeps that from happening.
 
My experience is with vertically-align tubes, not horizontal like yours. But I think any of these three layouts is correct. You could even modify your current layout like the first one, and not have to move the panels at all, just a few pipes. The second layout could work for your plan B, with one panel on the ground and the other more leaned up. Those two connections between the two manifolds don't have to be straight, those could be 45° elbows. Or you could use two short lengths of radiator hose, clamped to the PVC, and get any angle you need.

solar layout.jpg
 
Last edited:
You still have to make sure that the little tubes rise slightly from the supply side to the return side (skew). So that no air is trapped as the panels fill and then flow. Otherwise, even if you get all the air out, the flow can stagnate in one area of the panel and that greatly reduces the heating efficiency.
 
Thinking out loud here, just speculating, because I don't know all the physics involved, but I think this is what's going on. The ideal system sends the same amount of water, at the same pressure and flow, through every tube of a solar array equally, with each tube in the entire system getting the same temperature water at its supply end, and outputting water of the same temperature at the return end. I think that is the optimum, most efficient way of heating water. That's why, in the layouts I diagramed, each panel, and so each tube, gets the same water characteristic (pressure and temp), and can output its heated water directly to the pool, without going through another panel of tubes.

Any tube that doesn't get the same flow, or the same starting water temp, degrades the efficiency of the system as a whole, to some degree (literally, to some degree!).

The way you have them in series, water goes into one manifold, splits into the tubes, heats up, then goes back into a manifold, then into another manifold, then splits up again, and gets reheated, then back into a fourth manifold, then into the pool. That will obviously work, but I suspect not work as well as the layouts I gave you. In all the many diagrams I studied before I built my system, I never saw one that showed multiple panels plumbed in series, corner to corner like that. It's just not done, and whatever the real reason is, it's probably a good one.
 
Last edited:

Enjoying this content?

Support TFP with a donation.

Give Support
Thread Status
Hello , This thread has been inactive for over 60 days. New postings here are unlikely to be seen or responded to by other members. For better visibility, consider Starting A New Thread.