Water Slowly Dripping from Scupper

You can position the INLET on the cap over any of the pipes when you install the cover.

It does not make a difference to the actuator.
 
  • Like
Reactions: DSMinAtlanta
Today I opened the Jandy valve up again to swap out the internal parts hoping to fix this issue. However, when I look at the old internal diverter assembly I really don’t see anything wrong when comparing it to the new one.

So I turned my focus to the valve housing instead. There isn’t anything stuck to the plastic where the seal makes contact. But when I compare the new house to the old, I do see that the lower part of the opening doesn’t have that sharp edge to it. It’s slightly deformed, maybe from excess pvc glue? I wish these were designed so that the seal overlapped more of the opening. I really really didn’t want to resort to replacing the whole thing for many reasons. And it seems like this will require a lot of rework since there isn’t room to cut and just add new pipe and fittings. What do you all recommend as next steps? What should we tell the builder as far as the correct way to fix this?

Picture of the housing and glue:

IMG_5741.jpeg

Equipment pad for reference:

IMG_5742.jpeg
 
Show the builder what you found and ask him to replace the valve housing.
 
I agree with Allen. I understand your distrust in the builder, but replacing that valve will require more comprehensive work.

How many of those cheap ball valves do you have? If it was my pool, I would replace the three ball valves shown in the photo with Jandy 2-ways. It's just a matter of time before those seize up or break. If the builder agrees to replace the defective valve, replacing the others wouldn't add much more work. Maybe use the part you have on hand as negotiation tool? Insist on keeping the old valve's components for repairs.
Those are the only cheap ball valves I have. Everything else is Jandy. Not sure why they went cheap on those but not surprised either. Since replacing the housing will require a lot more work, how does a pool plumber typically tackle this? I assume they have to cut out the old valve and then figure out how to rework the remaining pipes so that there is enough room to install the new housing? I dread having this guy back on my property but I'm also not willing to take this on myself.
 
Lots of different ways you can tackle this. Depends what tools you have and what the plumber is comfortable doing.

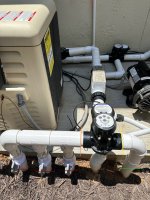
Of you want to replace the ball valves with diverter valves then the work is easy. Cut on the red lines, green line, and blue line and rebuild the entire section.

You can leave the ball valves in place and cut on the orange, green, and blue lines and just replace the 3 way diverter valve.

You really don't have enough room to work cutting at the orange and yellow lines.

A "hub saver" or "socket saver" is a "drill bit" kind of device that allows you to drill out a 1.5" or 2" pipe that is glued inside a valve body or connector.

See this page at plumbingsupply.com for pictures of how their PVC Fitting Savers work.

Home Depot sells a less expensive 1-1/2 in. Socket Saver by JONES STEPHENS.

Pasco has a PVC Ram Bit like the Jones Stephens socket saver.

There are videos on YouTube showing how a socket saver works.[3] See PVC/ABS Socket Saver Instructional Video By: Everything Home TV and 4 GENIUS Ways To Remove Glued PVC Fittings | GOT2LEARN

DSMvalve.jpeg
 
I got in touch with the builder today and they are willing to replace the entire valve. However, I've been trying to find others who may have had a similar problem and came across this thread: Jandy Valve Still Leaking after replacing O-rings

A few people in that thread have said that it may be expected that a small amount of water still flows through these Jandy valves when they are in the closed position. If that's the case, then I don't want to waste anyone's time replacing the whole valve assembly.

@PoolGate and @proavia - What are your thoughts on this?
Have you tried turning off the existing valve with a manual handle instead of the actuator?
Sometimes the automated actuators may not go full throw.

It appears there is PVC glue residue inside the valve area where the diverter sweeps. This is the probable cause of the issue.

My personal opinion is to have the 3-way Jandy valve replaced. I would also replace the three ball valves with 2-way Jandy valves. Basically rebuild the entire manifold.
 
  • Like
Reactions: DSMinAtlanta
Have you tried turning off the existing valve with a manual handle instead of the actuator?
Sometimes the automated actuators may not go full throw.

It appears there is PVC glue residue inside the valve area where the diverter sweeps. This is the probable cause of the issue.

My personal opinion is to have the 3-way Jandy valve replaced. I would also replace the three ball valves with 2-way Jandy valves. Basically rebuild the entire manifold.
Thank you for your input. Both times after opening up the valve assembly and then manually closing it the scupper stayed dry for several days. My theory was that it was either because I had manually closed the valve or it was because the plumbing was depressurized so it took a while for the water to slowly flow back into the pipe. I had wondered if maybe the actuator wasn’t closing it all the way. I don’t understand why the diverter seal is so close to the edge of the opening when the valve is closed. It leaves little to no room for any error. Seems that it must be perfectly aligned when closed with a perfect surface to seal against if you want no water flow.

I just hope that if I replace those ball valves that I can truly turn off the water flow to the scuppers. Reading that other thread is making me second guess my own plans here, especially when someone is saying that Jandy support told them it was normal to have some water flow when the valve is completely closed. I hope to meet with a plumber with the PB tomorrow to walk through the plan. Thanks again.
 

Enjoying this content?

Support TFP with a donation.

Give Support
Contact Jandy support.
I actually did that last week and even provided pictures. They basically replied and told me to stop trying to fix it myself or I could void the warranty and provided a list of local companies I could call. So they were of no real help. I will reply to that last email and see if they will at least confirm that the valve is not expected to allow ANY water through when closed.
 
  • Like
Reactions: Rancho Cost-a-Lotta
Thread Status
Hello , This thread has been inactive for over 60 days. New postings here are unlikely to be seen or responded to by other members. For better visibility, consider Starting A New Thread.