Vinyl pool remodel in San Diego - Going swimming!

carlscan26

0
TFP Expert
Platinum Supporter
LifeTime Supporter
Dec 22, 2010
1,137
San Diego, CA
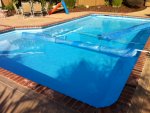
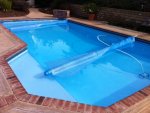
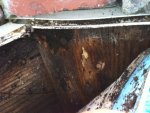
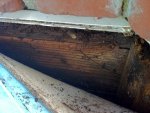
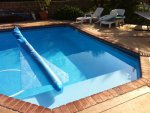
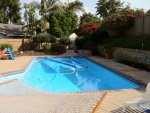
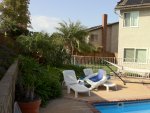
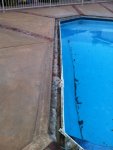
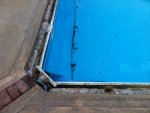
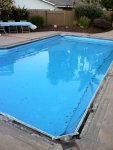
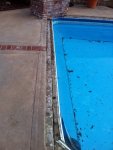
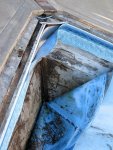
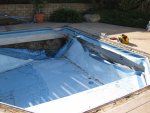
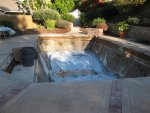
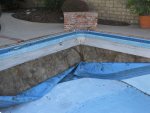
Well it's time. I had hoped to wait until next year but the liner had other plans. We learned soon after buying this house that the pool had been poorly maintained in terms of chemistry and brushing the waterline. Lots of staining along the water line and the southern facing wall was cracking and brittle. The CYA was off the charts and there was purple staining and high copper levels due to heavy use of chlorine tabs and copper algaecide. I had an RO treatement performed to reset tbe water. I also had the builder who installed the liner out to patch a hole and try to reseat a corner that had popped out of the track. That's when we learned the full extent of the damage to the liner and were given a warning that the liner would probably not survive more than one season.

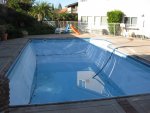
Turns out he was right but we had a great year with the pool and I'm glad I learned how to manage the chemistry on an old liner rather than a new one.

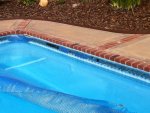
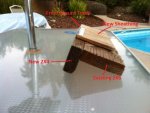
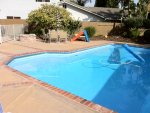
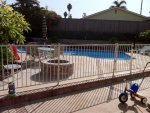
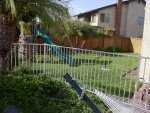
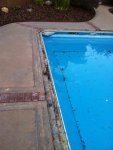
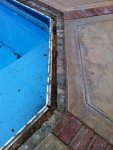
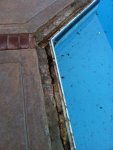
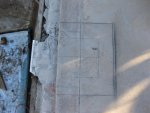
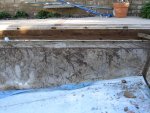
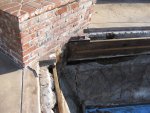
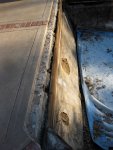
So I'm starting this thread to document our remodel of sorts: in addition to a new liner we are also repairing dry rot in the structure and replacing the bead track. This requires removing and replacing the coping which we are actually OK with doing as the existing square brick coping is very rough and scratches up the kids when they climb out the sides, etc. and has almost no overhang. So we will be replacing with a bullnose type coping - maybe the safety grip style if we can find a matching color While we're at it we're going to replace the tiny spa type skimmer with a real one and add a low suction port that will connect to the skimmer much like a main drain could.

I'm sure I'll have questions as we go. I've already spoken with two out of the three vinyl builders here in San Diego. Hopefully the bids aren't outrageous.
 
Re: Vinyl pool remodel in San Diego

MattM said:
ouch....good luck with your remodel and with finding the right builder.

Thanks Matt. Yeah the timing couldn't be worse with the holidays but oh well. I've only found 3 companies that work on vinyl pools here in SD. I have one bid and am waiting for a second one, the third guy should come tomorrow. Also getting a separate bid for the coping work from my landscape guy.

I'll try to post the "before" pics tonight.
 
Re: Vinyl pool remodel in San Diego

Here's the wall with the most patches. All due to sun rot and chemical damage - note the bleaching of the liner below where the normal water level would be. Those blue patches are the same pattern and color as what the rest of the liner should look like :shock:
 

Attachments

  • C-EastWallPatches.JPG
    C-EastWallPatches.JPG
    169 KB · Views: 1,007
Re: Vinyl pool remodel in San Diego

The track is pulling out in several places along the pool. The most noticeable spots are in the South West corner by the skimmer (also the low point of the pool). The track is coming out because of dry rot (see pics 2 & 3). To properly fix this we need to replace all of the rotted out 2X4s that cap the wall; this will require removing all of the coping. I expect that we will also be replacing other sections of the wall. The wall appears to be made of a sandwich of 2X4s laying on their long sides, with 2X6s laying on their short sides to make a 1.5+5.5+1.5+5.5+1.5 = 15.5" high wall above the angled wall section.

The current coping is a "manufactured used brick" (they take new bricks and tumble them with some paint (white in this case) to create a worn look). We will be replacing these with some kind of bullnose style brick. Also notice the short overhang - these are 8" bricks and in some cases do not fully clear the inside edge of the pool. We'll be going with longer bricks and are planning for 1.5" of overhang. The coping is also way out of level along the edge closest to the swim out bench - it's a combination of the bricks being laid higher than the deck behind them (1/2") and being angled up for some reason. May just have been heaving or settling etc. but there's no cracking of the concrete in that area at all and we hope to improve this with the new coping.

Check out that tiny skimmer in the first pic. We're going to saw a square in the cement behind the existing skimmer and put in a proper skimmer and then finish around the new skimmer with bricks matching the new coping.
 

Attachments

  • F-RotSkimmerCorner2.JPG
    F-RotSkimmerCorner2.JPG
    152.8 KB · Views: 1,006
  • E-RotSkimmerCorner1.JPG
    E-RotSkimmerCorner1.JPG
    148.3 KB · Views: 992
  • D-TowardsSkimmer.JPG
    D-TowardsSkimmer.JPG
    140 KB · Views: 1,000
Re: Vinyl pool remodel in San Diego

You can also see my PVC solar blanket rollers in these pics.

My cover is two 16'X16' pieces.

Each roller is 15' of 1.5" PVC - three 5' sections to avoid a single joint/weak point. I made an earlier version out of 3/4" PVC with a single joint; one of them split at the fitting, the other one cracked about two feet from the center. I haven't had any problems so far with the 1.5" but if/when I remake these I will probably do it with five 3' sections.

I drilled holes every 2' starting one foot in so there are holes at approx 1', 3', 5', 7' 9', 11', 13' and then another at 14'. I filled the pipes with expanding foam insulation - just put the tube in each hole and sprayed until it started coming out of the next hole etc. Let it dry for a few hours, then trimmed off the stuff that oozed out. Then I put on an L and a short section of 6-8" (don't remeber exactly) to another L to a 15" piece that sits on the deck. I capped both ends in case it falls completely in the pool. I used automotive trim caps/plugs (about 1" wide caps) that I found in a misc hardware drawer at Lowes. Super easy: you line up the cover and punch a small hole in the cover over the hole in the pipe and then push the plug in and it locks in. I offset the handle into the cover about 3" so that the vertical pipe is actually past the edge of the cover so the cover can be pulled flush to the wall and the pipe won't rub the liner.

I played around with a removable handle. The first version was a screw on solution but after a few weeks it wouldn't unscrew easily after rolling up the cover and it ended up becoming a fixed handle like these. I also tried some friction fit ideas but those would slip winding up the cover. Quick connects for hoses snapped. The current version is great for winding it up and helps to keep the cover in place when it's rolled up and left floating on the side of the pool. However, unrolling is a bit harder - especially if you're in the pool trying to unroll it from the other end. But overall they work great.

UPDATE: When rolling the cover, the furthest end will roll slower than the closer end and it rolls up unevenly which makes it harder to unroll. You can see this in the pictures above. I acccidentally stumbled on a solution when the end of one of the rollers was bent during the remodel (it's visible in the pics from January 10th 9:48 pm on page 3 of the thread). Because of this bend when I rolled up that piece, the far end kept up with the near end - the wider diameter caused by the bend in the pipe equalized the rolling. So I fixed the pipe and added a 90 on the end, facing to the left and flat below the cover. I repeated on the other cover too. The result is that the cover now rolls up almost perfectly making it much easier to unroll.
 
Re: Vinyl pool remodel in San Diego

That's a really nice looking pool in a very pretty setting....even before the remodel.

I wonder what the thinking was to have used those boards behind the liner? Do you know how old it is?
 
Re: Vinyl pool remodel in San Diego

duraleigh said:
That's a really nice looking pool in a very pretty setting....even before the remodel.

I wonder what the thinking was to have used those boards behind the liner? Do you know how old it is?

Thanks Dave! I'll post some wider shots - the previous owners created a tropical theme around the pool. The yard was a major reason for buying this house.

The wood frame seems to be common around here; both builders recognized it immediately and called it out before they even looked behind the liner. I believe the pool was built in the late 80's or early 90's so it's around 20 years old. The wood is pressure treated lumber but no wood will last forever buried like that. The plan is to remove and replace all of the rotted wood and then sheath the entire inside face with 1"/2" PT plywood to provide additional structure and strength. I'm hoping that the rot is mainly on that Southern wall - it's the low side of the pool by about 2" and where water spills over if it overflows and gets the least sun. That's also where most of the loose track is. The opposite corner where we have the major tears in the liner, the wood is in great shape. We won't know for sure until we get in there though.

My landscape guy who also does hardscape/masonry etc. came by and gave me a bid for the coping work - he's going to be hard to beat for the other contractors. We'll probably pull the coping out next week and drain the pool later that week or early the next week to make the repairs and put in the new skimmer. Then lay the new track and coping and then drop in the new liner. All in all 6-7 days of work spread out over 2-3 weeks...if everything aligns, especially weather wise.
 
Re: Vinyl pool remodel in San Diego

So - the new Hayward skimmer was installed yesterday. I want to add the float valve assembly - do I need the equalizer check valve assembly also? I'd like to be able to control suction from the surface vs the port below the water and also have it automatically switch to bottom suction only if the skimmer gets blocked or water level drops too low.
 

Enjoying this content?

Support TFP with a donation.

Give Support
Re: Vinyl pool remodel in San Diego

It's raining today so work has stopped. I need to post pictures as a lot of work was accomplished last week:

Day 1 (Monday): Coping completely removed. Draining started.
Day 2: Draining completed. Liner removed, found lots of roots and top 2X4 and old track removed. New skimmer laid out; measurements and markings for the concrete cutting.
Day 3: New 2X4 header installed, sheathing started and root removal.
Day 4: Concrete cut out for the skimmer and more sheathing work. (No pics of this day)
Day 5: Track installed, skimmer and new suction port installed, sheathing completed except for corner by waterfall (waiting for coping to be cut out).
Days 6-7: New coping install begun; a little less than half was completed over these two days.
Day 8 (Monday): coping under waterfall cut out. Rain stopped further work.

At this rate there's a solid day of work left to backfill around the skimmer and to complete the wall repairs around the new suction port, also completing the header, track and sheathing work under the waterfall and making the major repairs to the perlite from the root removal.

Probably two more days for the remaining coping and another day for the mastic/deck-o-flex.

And 1 day for the liner to go in which will wait on the coping to be completed first. The liner will take about a week once we order it. We're still deciding between the ultra and the 28mil but at least we decided the color: bluestone with no border.
 
Re: Vinyl pool remodel in San Diego

OK so pic time!

First off is a sample of what we're doing to the wall with the new header and sheathing the face of the existing structure. The sample only goes down one 2X6, but the sheathing continues down the entire face. This is important for strengthening the wall as the bottom 2X4 is also rotting but is not repairable without risking the fill behind the wall falling out. This sample shows a front mount track but we ended up going with a top mount instead for various reasons; builder would have to order front mount track, grout joint below the coping was going to be taller with the front mount by about 1/2" - this was the deciding factor as we wanted a thinner line (more on this later).

Speaking of the coping I have a picture of that too - note it's designed for a traditional inground pool's bond beam width of 12". We're having to cut down each brick to fit our needs. With the extra sheathing and the inconsistent overhang today (from negative 1/4" to less than 1" over) we needed something longer than 9" and in fact will vary around the pool somewhat so th elonger length was needed regardless.

Lastly, there's a picture of the liner from behind a fitting - that seems like a lot of fade (underwater) for a 5 year old liner!
 

Attachments

  • LinerFading.JPG
    LinerFading.JPG
    104.4 KB · Views: 854
  • NewCoping.JPG
    NewCoping.JPG
    152.8 KB · Views: 853
  • SheathingDescription.JPG
    SheathingDescription.JPG
    101 KB · Views: 853
Re: Vinyl pool remodel in San Diego

Some more shots of the pool and yard in general:
 

Attachments

  • Before3-YardPoolEast.JPG
    Before3-YardPoolEast.JPG
    176.9 KB · Views: 851
  • Before2-YardPoolNorthEast.JPG
    Before2-YardPoolNorthEast.JPG
    156.3 KB · Views: 849
  • Before1-YardPoolSouth.JPG
    Before1-YardPoolSouth.JPG
    170.5 KB · Views: 850
Re: Vinyl pool remodel in San Diego

Draining started the night of Day 1, we ran the pump for 4.5 hours then shut it off.

Day 2: Draining completed. Liner removed, found lots of roots, and top 2X4 and old track removed. New skimmer laid out; measurements and markings for the concrete cutting for the new skimmer. Work stopped to let me review damage with the owner of the pool company before we proceeded. I was travelling and reviewed many pictures that my wifer took for me and then spent a good bit of time on the phone discussing with the owner. We agreed that the rot was where we expecte dit (top and bottom 2X4s) and that the 2X6s seemed OK. The sheathing was definitely going to be needed as well as replacing all of the top 2X4s which was the plan.
 

Attachments

  • Day2C-RootsBySkimmer.jpg
    Day2C-RootsBySkimmer.jpg
    478.5 KB · Views: 840
  • Day2B-LinerComingOffRoots.jpg
    Day2B-LinerComingOffRoots.jpg
    327.5 KB · Views: 842
  • Day2A-Draining.jpg
    Day2A-Draining.jpg
    324.9 KB · Views: 840
Re: Vinyl pool remodel in San Diego

Day 2 - Skimmer, Roots, more tear out
 

Attachments

  • Day2F-EndOfDay2.jpg
    Day2F-EndOfDay2.jpg
    399.1 KB · Views: 841
  • Day2E-SkimmerLayout.jpg
    Day2E-SkimmerLayout.jpg
    361.9 KB · Views: 841
  • Day2D-RootsWaterfall.jpg
    Day2D-RootsWaterfall.jpg
    371.7 KB · Views: 842
Re: Vinyl pool remodel in San Diego

More...
 

Attachments

  • Day2I-EndOfDaySouthWall.jpg
    Day2I-EndOfDaySouthWall.jpg
    459 KB · Views: 841
  • Day2H-EndOfDayNorthEastCornerWaterfall.jpg
    Day2H-EndOfDayNorthEastCornerWaterfall.jpg
    447.7 KB · Views: 839
  • Day2G-EndOfDayEastWallDamage.jpg
    Day2G-EndOfDayEastWallDamage.jpg
    384.9 KB · Views: 838

Enjoying this content?

Support TFP with a donation.

Give Support
Thread Status
Hello , This thread has been inactive for over 60 days. New postings here are unlikely to be seen or responded to by other members. For better visibility, consider Starting A New Thread.