Vertical Installs

Rattus Suffocatus

Silver Supporter
Jun 5, 2019
1,657
Corona de Tucson, AZ
Pool Size
14000
Surface
Plaster
Chlorine
Salt Water Generator
SWG Type
CircuPool Universal40
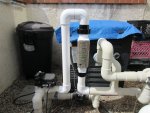
Is there any issues with installing the cells vertically than horizontally when using a VSP? would I have to increase speed/pressure much more than in a horizontal install at low speeds? I can do it horizontally but it's going to be more Rube Goldberg than I thought! Vertical would be much cleaner and look like it's meant to be there.

The cell and fittings are even longer than I guessed they would be when I played Tinkertoys with them before leaving for work. (Plan on 24"-28" for both!) So ideally the cleanest looking install would be to do something similar to the vertical install kit that Circupool sells.

In a horizontal configuration, is there any issues at all with putting the flow switch after the cell? How about in the vertical case in cast I can't get 12" spacing? (I could make the vertical longer.. but we are back to Mr. Goldberg if I am not careful.) You hear about it being okay, but try to find a picture anywhere where someone has done it! :)

I would like to try to get the plumbing squared away this weekend. Yes I did e-mail them, but I wanted the esteemed experts here to chime in on this. I probably will install the bypass for a week or two because I have something like 12 gallons of Liquid Chlorine in my stash now*.. It would be nice to get down through about half of that at least. The hot tub takes about an 1/8th of a cup every day, so .... I'd be using it for a LOOONG time in that application! :) But if I can get it plumbed then I can work on the electric next weekend (which I need supplies for) and even then start adding salt to turn on the weekend after.

* In my defense it really looked like we were going to have a severe shortage at the onset of the current Zombie Apocalypse, so I bought about 6 extra gallons at the time... It does make good Zombie repellant!

I'm going to be super happy to get rid of most of the jugs that are in my mud room/extra fridge room/laundry room... I can tell you that....
 
Yeah, so the flow switch will probably have to go vertical, and the cell horizontal, in a really wacky configuration unless... I am debating moving the cartridge filter... I swear the pool builder did this on purpose. I could put the flow switch on one return but I would rather put before the Jandy valve so that I can use either....
 
Yeah, I wouldn't put the flow switch on only one return. Feels like you've lost a level of safety protection doing that. If the flow switch failed AND you moved the vale to the wrong position - potential problem. The IC40s flow switch is built in so no thought needed there.
 
Rattus,
THIS is circupools vertical kit. You can do the same with your own fittings.
Yeah, except it doesn't fit. It's about an inch too big when all put together. :(. I am glad that I did not buy the kit from them.

I will have a bit of a weird rat's nest loop, but I think I have it figured out. I will run 45 degrees from the output of the cartridge filter to a 45° bend (20" of pipe) after that I do a 90° (horizontal) then the cell, then a 90° but angled down towards the valve (in front of it), then 90° to the existing pipe that is there.

That way I can strap the cell down on the wall I built. I can not hold the Tinkertoys when taking the pictures but it will all fit.

I have a narrow side on the house where the equipment pad is. So I understand why they probably did it the way they did, but two more inches would have made the vertical install work...

IMG_20200423_173454417_HDR.jpgWhen done the flow switch is vertical after about twenty inches of pipe, the cell is about eighteen inches, it's another twenty back to the level of the pipe feeding the valve and maybe another twelve into the valve. About four more feet than I wanted but what can you do?
 
Last edited:
IMG_0097.JPG

This is the vertical install I did last May of my IC60. There was no way it would fit horizontally, so this is what I ended up with. In talking with a Pentair rep, he said that the vertical install was actually preferable to a horizontal install because when the pump is off, water will not stand in the cell. So far, after one year I have had to replace a flow switch, but other than that is had worked great.

Gary
 
  • Like
Reactions: Rattus Suffocatus
So... I think I figured it out and I will go vertical. I need to go out a bit from the plumbing into the filter. I was going to use two 45° pieces. I still am going to use one. But instead of trying to mate to the existing 90° on the pipe that is connected to the Jandy valve, I will take that off at an angle and then do another 90. That should gain me the inch I need. It would sure look cleaner.

It's like trying to put ten pounds of {peanuts} into a nine pound bag.

IMG_20200423_185411594.jpg

That is all I have to work with... Just under 9" from the filter connector to the existing 90. I need to move it a couple of inches out then up. If I swing the 90 on the right, I can gain the inch or two I need. Measuring to the ends of the homemade vertical kit gets me to 9.5". So about 3/4" off. It's about the fourth thing this week that "shouldn't have been that difficult."IMG_20200423_192735333.jpg

But I think that is the way I will go after all. I do need to run out and get another two inch 90 elbow though.
 
Last edited:
Rattus,
THIS is circupools vertical kit. You can do the same with your own fittings.
I will take back what I said about their kit. It would have been slightly easier because it's tighter than the homemade kit by quite a bit, but I still would have had to add two 45° angle pieces to it to space out the pipe from the input pipe to the filter.
 
These might make it easier to understand what I meant about using a 45° piece to space the cell out from the existing plumbing. I need another 90 or a splice to rotate the right fitting counter clockwise about 45 degrees. IMG_20200423_195524229.jpg
IMG_20200423_195557658.jpg
 

Enjoying this content?

Support TFP with a donation.

Give Support
I will take back what I said about their kit. It would have been slightly easier because it's tighter than the homemade kit by quite a bit, but I still would have had to add two 45° angle pieces to it to space out the pipe from the input pipe to the filter.
The details of that kit show it compatible with RJ and SJ only. May have worked if your cell dimensions are the same.
 
What you might consider is:

Remove 1/4" on each of the 90 deg elbows that would attach to your existing pipes.
Remove 1/4" on each of the 2 90 deg elbows that face each other on the "U" part of your assembly.

This would give you 8.5" width instead of the 9.5" you have now.

I believe that losing 1/4" on each inner glue surface would still leave enough surface area for a good glue joint.

Gary
 
The details of that kit show it compatible with RJ and SJ only. May have worked if your cell dimensions are the same.

They sell the same kit for the "Universal" Si cell, so I think that it is the same. I don't think you can mount a SJ vertically though..

I am also building a roof for a sun shield, and needed the electrical stuff so on my "off Friday" in my 9/80 schedule today we ran to Costco, two Ace Hardwares and a bLowes to get everything (I really miss Menards)... What I didn't think of until after I got home was a 2" PVC street elbow. If I use that instead of one of the normal ones in the U it should save about an inch and it will fit better. I am replacing a really low quality plastic silcox valve that is already starting to leak that the PB used for pressurizing the system... I got the wrong size, so I need to exchange it at one of the Aces... Hopefully they will have the street elbow as well. It's getting pretty hit or miss out there.

I also have been working to get the salt concentration up. It's been weird because there has been a run on salt, especially "pool salt" but at one or two bags at a time I am getting there. It's looking to get to 3200-3500 PPM I am going to need almost one whole bag more than Pool Math calculated. Just as well.. I am not in the mood to drain down as I am still also trying to get TA down more and the fill water is about 150.
 
OK.


I think I have it close enough now. I took the lips off of two of the 90° pieces. No surface area was effected. I switched to a street 90, and shortened in inner part so it still had full contact area, but goes all the way into the normal L.

I get right at 8.5" now and if I cheat a little and bend one of the sides in slightly it can go as, low as about 8" before it looks bad.

I will measure all the parts and draw something up for the group. IMG_20200425_141715296.jpgIMG_20200425_141536107.jpgIMG_20200425_142323345.jpgIMG_20200425_143433130_HDR.jpg Sorry
about the blurry thumb. It
was hard to take this picture!
 
Last edited:
  • Like
Reactions: TimTucker
Make sure you have the flow switch the right direction.
Here I am, the brain a size of a planet and he tells me to put the flow switch in the right way! Yeah. There is an arrow on it so it would be hard to screw up. I am putting it before the cell so the water has to push up on it. Which seems logical... It's blurry but correct in the picture.

Here is my promised diagram to build this. In my case I knocked the lips off of two of the 90 degrees elbows to gain me another say 1/8" or so. I didn't reduce surface area for the bond. I also cut off about a 1/16" on the 2" street elbow so it would go all the way in, saving another 1/8". In most installs I would not do this.

The short collars are 2" lengths of 2" pipe (four of them). This provides the tightest fit possible with maximum glue area.


Going from right to left on the picture :


From the Jandy Valve that switches returns and the floor system in my pool, I start with a 90 degree angle, a short collar a 45 degree angle a short collar one of the 2" connectors, the cell, another 2" connector...

The dummy cell and two 2" connectors come with the SWCG. The total length of the cell is 16" with the connectors, 12.5" without.

The U is a standard 90 angle with the street 90.

The short piece from the flow switch to the U is 3.75" of pipe.

The flow switch outer length is 4". It is included with the SWCG.

The pipe from the flow switch to the 45 degree angle is 12" to make the required 12"+ distance for laminar flow over the switch. The 45 in my case is to get around the filter inlet pipe and would not be needed in most installs, I think. Then a short collar to the 90 degree, that goes to the output of the filter.

Overall length is 21.5" from the top of the U to the middle of the 45.

IMG_20200426_095004328.jpg

This gives an overall width with the two 90s to connect the short pipe that is existing (connecting the outlet of the filter to the Jandy valve) of 8.5" with the trims, about 8.75" without.
 
Bonus: converting from 220V to 110V.

This should be pretty much the same for all of the Circupool units.

For the Si 40. Open up the box, take off the front cover by removing two screws and lifting from the top of the panel. There are two tabs on the bottom.

Locate the AC Power input. Follow the tap instructions on the door/manual/silkscreen on the PC board.


Before:
IMG_20200426_104741926.jpgIMG_20200426_104722622.jpgIMG_20200426_104731343.jpg

After:

IMG_20200426_105415768.jpg
 
Yeah. Unselfish to help others. Selfish to use someone else's server space to get notes and a diary. It's almost 100°F today so I have limited myself to what I could do inside today as you can tell.. Should have it on line next weekend.
 
Thread Status
Hello , This thread has been inactive for over 60 days. New postings here are unlikely to be seen or responded to by other members. For better visibility, consider Starting A New Thread.