Tile countertop build

DOMO

0
Bronze Supporter
Mar 13, 2013
379
Rowley, MA
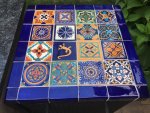
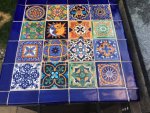
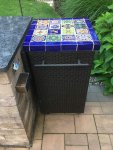
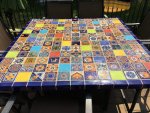
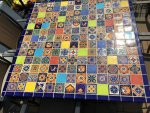
Hi all. Am looking to validate my approach for two small countertops we're looking to build. We have two resin wicker grill carts flanking each side of our grill island. Unfortunately, these are wicker topped and the manufacturer put a glass top over the wicker. a. Not a fan of the glass top in the pool area and b. the glass has magnified the sun which has caused the resin wicker to break apart. Sooo, as we have a Mexican themed pool area, my wife and I decided we should build talavera tile countertops as an overlay on the existing frame.

These will be 4" square tiles and we have V shaped edge pieces and end corner caps to create the overhang. All in, each top will be 20" square, so not very big at all. Here is my plan.

1. Cut the base material to just under 20" square. I was originally planning to use 1/2" PT plywood with cement board over it, but given how small these tops are, do I even need the plywood if I used a 3/4" cement board?

2. Thinset the cement board and set all the tiles.

3. Grout the tiles. Do I need an exterior grade grout? (These will not remain outside in the off-season, but will be stored in our basement).

4. Seal the entire surface (tops and sides), primarily for the grout.

5. Potentially secure the top to the frame of the cart from the underside, but they may be heavy enough not to need this?? Once/when the carts expire their useful life, I hope to build new carts and re-use these new tops.

Any thoughts or advise is greatly appreciated!
 
1. Thickest cement board I've seen is 1/2",I think 1/4" cement board glued and fastened to the plywood is fine. Assuming people won't be sitting on them.
2. Yes
3. No
4. Not necessary but a good idea.
5. Up to you but I wouldn't want it to get knocked off and land on my foot.

For the edge of the counter top you can buy trim called stop that you can wrap around the whole thing to give it a finished look. They may have other mouldings that you like better.
 
Thanks for the reply. Had thought there is 3/4" cement board, but I will go with 1/2" ply and 1/4" cement board (no one will be sitting on them!).

4. My understanding was that grout is porous, so it would need to be sealed.

5. I hear ya, but the wrap over tile edges should keep it from sliding off. That said, I will most likely figure a way to put a couple screws into the frame and the plywood layer.

Thanks for the suggestion on the trim piece. We considered wood, even stainless steel which could tie in with the grill island trim but my wife liked the idea of the wrap over/around tile pieces.
 
Good idea. I was thinking of just using an L bracket to connect the bottom side of the plywood to the inside metal frame of the cart. That said, how do I attach the plywood to the cement board; liquid nails, screw them together?
 
All the tile floors I've done I used thinset and screws to attach the hardie backer board to the sub floor. I'm not sure that would be necessary in this application, maybe just some PL Premium and temporary screws to clamp it while it dries.

FYI on the current house I'm remodeling, they did not thinset the backer board down and used nails. That makes it much easier to remove the ugly dated tile and backer as one!
 
Hi. So, I've completed our small talavera countertop project. We think they came out pretty good.
 

Attachments

  • IMG_3299.jpg
    IMG_3299.jpg
    104.2 KB · Views: 257
  • IMG_3300.jpg
    IMG_3300.jpg
    105.9 KB · Views: 255
  • IMG_3298.jpg
    IMG_3298.jpg
    71.2 KB · Views: 254
Thanks, Maddie, appreciate the kind words. Now we're inspired to do a similar overlay to our dining table as the slates are peeling and grout is breaking apart. Will post pics if we take on that project!
 

Enjoying this content?

Support TFP with a donation.

Give Support
New update, or rather next phase! We were so happy with how the grill carts came out, we decided to install a talavera tile table top over our existing gray slate table top. Much bigger project and had to take a lot of time on layout and setting of each tile as they are all varying widths and thicknesses (don't want to have wobbling plates and glasses!), but we're very happy with it.

Already planning next year's project: a talavera tiled fire pit with a removeable top that can make it a full coffee table when there isn't a fire going!
 

Attachments

  • IMG_3383.jpg
    IMG_3383.jpg
    102.6 KB · Views: 203
  • IMG_3384.jpg
    IMG_3384.jpg
    103.6 KB · Views: 198
Just stunning.... where do you buy the tiles? Are they a "set" or are you picking them out randomly? How did you solve the issue with the varying thicknesses and sizes? I've never worked with tile but it looks like something I'd like very much.

Maddie :flower:
 
Hi Marddie. Thank you, glad you like it! We purchased the patterned tiles as a random set of 100 on Amazon (seller is Alegria Mexicana). We've ordered 2 sets and they typically don't have more than 4 of each tile, sometimes only 2 or 3 of each, so we did a lot of picking through and laying out our pattern.

The solid tiles and the edge caps (V caps and corner caps), we purchased from Fine Crafts and Imports (finecraftsimports.com). I believe they also sell on Amazon, but you often have to buy in sets, whereas if you order direct from them, you can order by the piece.

As for getting the table smooth and dealing with the variation in thickness, we essentially played around with the thickness of the thinset adhesive and 'sighted' each tile as we set them one by one! We did a similar approach on spacing and generally went with an approximate 1/4" grout line to accommodate the variation in tile width/length (tile spacers just won't work when the tiles aren't exact same size. It's not hard, just takes extra time. Oh, and you have to make sure you seal the tile and grout once everything dries.

Good luck if you do a similar type project!

- - - Updated - - -

Thanks, Kimkats. Picking them out and creating the pattern were definitely the fun parts for sure. Glad you like it!
 
New update, or rather next phase! We were so happy with how the grill carts came out, we decided to install a talavera tile table top over our existing gray slate table top. Much bigger project and had to take a lot of time on layout and setting of each tile as they are all varying widths and thicknesses (don't want to have wobbling plates and glasses!), but we're very happy with it.

Already planning next year's project: a talavera tiled fire pit with a removeable top that can make it a full coffee table when there isn't a fire going!

Very stunning:cool: Maybe you can make a couple of these for me:D
 
Thread Status
Hello , This thread has been inactive for over 60 days. New postings here are unlikely to be seen or responded to by other members. For better visibility, consider Starting A New Thread.