This old house (for pool equipment)

bbrock

Well-known member
Apr 15, 2014
848
Livermore, CA
Pool Size
19000
Surface
Plaster
Chlorine
Liquid Chlorine
Hi TFPers,
Been awhile since I posted.

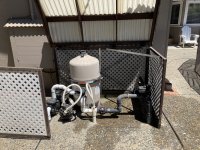
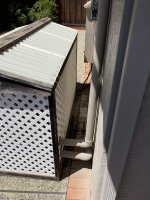
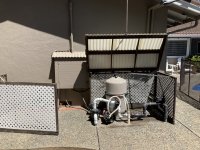
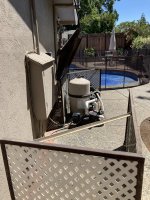
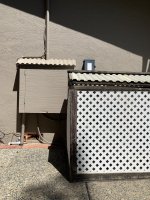
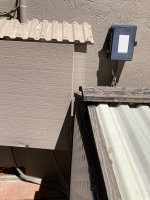
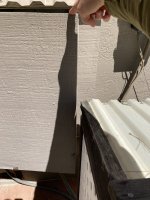
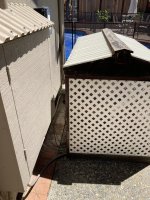
My pool equipment (not the fun equipment) such as my pump and cartridge housing, and old booster pump, are in a pool equipment box/unit so to speak. Keeps them out of the sun, and I am able to prop open the lid, remove half the unit, and get to the pump/cartridge housing. Well, it is decaying and getting dry rot. I am aware lumber is super pricey and a contractor had to increase his prices b/c of it and the time involved to build the same type of design but using pressure treated wood. Originally he quoted $840 to build a new one, now he said about $1680.

Alternatively they suggested this product at ACE hardware, but I am not sure it will work for my needs

My box is 71.25" L x 38.5" W x 39.5" H (excluding the top that prop opens)

EEC6E089-0202-46DD-878E-7E99116D77B1.jpeg
8BD49E33-992A-40DC-AF04-B2ED3BDE055D.jpeg

(Having trouble like usual posting photos. Trying to attach, and they are too large. Can't remember if there is another easier way to do it vs. upload to Flickr then paste that link. Could not figure it out on my laptop. Used my iPhone)
 

Attachments

  • A9D09F39-CFB5-4390-8BE5-E4EE1F23F742.jpeg
    A9D09F39-CFB5-4390-8BE5-E4EE1F23F742.jpeg
    695.5 KB · Views: 18
  • 98B87830-7721-4308-888C-EB857E657656.jpeg
    98B87830-7721-4308-888C-EB857E657656.jpeg
    531.8 KB · Views: 18
  • EA8E7B0E-4346-48DC-B094-75E3A8778451.jpeg
    EA8E7B0E-4346-48DC-B094-75E3A8778451.jpeg
    698.1 KB · Views: 18
  • 6FD80792-2B03-4B91-A799-7D2D0E530D85.jpeg
    6FD80792-2B03-4B91-A799-7D2D0E530D85.jpeg
    710.3 KB · Views: 18
  • E5D61171-6FC6-4B91-B520-DFA28BDD7C67.jpeg
    E5D61171-6FC6-4B91-B520-DFA28BDD7C67.jpeg
    716.6 KB · Views: 17
  • 1B5FD805-D52F-4B80-969F-ECC54DA04FF6.jpeg
    1B5FD805-D52F-4B80-969F-ECC54DA04FF6.jpeg
    574.7 KB · Views: 13
  • C5B7C3C4-7346-45E8-A740-7F10D5730F1C.jpeg
    C5B7C3C4-7346-45E8-A740-7F10D5730F1C.jpeg
    545.6 KB · Views: 12
  • D5A8B288-1E71-46D4-8931-DAA861B44034.jpeg
    D5A8B288-1E71-46D4-8931-DAA861B44034.jpeg
    609.4 KB · Views: 13
Last edited:
thanks Yippee. I’ll have to search for that.

I need one ideally that doesn’t have a floor (just sides) or at least can drain out water and have air flow due to having to prime the system/pump and let the air out.
 
(Having trouble like usual posting photos. Trying to attach, and they are too large. Can't remember if there is another easier way to do it vs. upload to Flickr then paste that link. Could not figure it out on my laptop. Used my iphone
 
Hi new dude. Thank you but I don’t really understand how that link helps me. I was able to post from my iPhone yesterday; however, not sure if I posted the pics with the right size or what not. I was having the problems and posting from my laptop.
 
I found a product by lifetime that may work. The interior dimensions fit my needs.

However, I wanted everyone’s input. I was thinking the best way to use it would be to install it and use it backwards. So build it without the floor/bottom, and the doors. And then I could just place in around/over our equipment. I called lifetime and they said it’s not recommended as it wouldn’t have the structural integrity since the sides pop into the floor. But they did say that it could still work though. So not a clear answer.

The other thought would be to install the floor, but literally cut away everything except the perimeter piece that the sides pop into.

With this product installed and used backwards, I would be able to remove the whole thing when I need to access the equipment.


Last edited:
Looking at the manual it seems you really need the bottom (at least around the edges) to be intact - especially for the doors/track. Perhaps you could cut out the middle of the bottom piece leaving yourself a rectangle frame. A hole saw 1st then a jig saw should do just fine .
Infact for ease & squareness of assembly I would suggest cutting the hole last after you have constructed the whole thing. I also suggest leaving space to bolt it to the ground so it doesn’t get wonky over time. Their products are quite easy to put together. I believe it took me about 45 minutes to put my deck box together & most of that was in the dark 😁
Maybe have someone help you lower it over your equipment.
 
I found a product by lifetime that may work. The interior dimensions fit what my needs
I do not like their or rubbermade sheds. I have found both warp sue to sunlight. I had one of each at the old place and the doors never closed right after a year. The rest of it warped pretty bad too.

We moved and inherited what looks darn near what you posted. The doors are warped and so is the top. It’s fine to hold garbage cans, but not for anything you want out of the rain.

Then again, if it’s only to shield the equipment, maybe being a sacrificial shed isn’t so bad. I’ll get pics of my current half shed thing later. :)
 
Ok it’s later :laughblue:

So the top has caved in at the middle making an ever so slight v shape to it. The pics don’t do it justice but it puts much undue force on the latch and is a pain to do/undo. That cave in causes both sides to have an open hole where the top meets the sides. And the doors have the standard bow to them. One locks into place too far in, the other too far out.

53484367-D83E-4148-8610-67AFFD29ACBC.jpeg11D60A47-130F-47CC-9833-0B47422DDBC8.jpeg33B13750-F226-4EA6-93FF-F07AE5082EEC.jpeg9D2CECD7-EFD9-45F8-B158-138D4A710137.jpeg1BC74555-2CF3-4F44-8E6D-0D1C99DBF51D.jpeg


this is on the backside of my house and is completely shaded from 12p on. It does take full sun from 9-12. I had the full blown shed at my old place that was completely shaded by oaks and it still warped just like this.

My original rubbermade shed did the same which is why I changed to lifetime.

Now. All this being said, I’m thinking of putting this on my equipment pad and using it for my equipment. But I have it and it’s free. I’m 50/50 right now if shielding from the elements beats no airflow on the SWG and VS pump electronics. If I had to spend a few hundred on a shed I would build the most simplest of lean-to type structure over it. Then wrap it with lattice like you have. What you have now isn’t fancy or walk-on-the-roof-able. I have no idea what your contractor was going to build but certainly not simple like you have.
 

Enjoying this content?

Support TFP with a donation.

Give Support
Thx Mgragger88. I did not look at manual yet or see that was possible.

I think I would have to use the flooring as you stated. I read some of the reviews, and on the first page, it discussed a review by Dave (2 years ago) who used this unit as I am intending. However, I intend to use my backwards. Sounds like the hardware will rust out after too much exposure to pool chemicals. So, if I am intermittently priming the cartridge housing to discharge the air, then that will allow water into the unit. And, that water will find its way to the flooring and hidden hardware. I estimate that after taxes perhaps I am looking at $1000+ for this thing. Then, I will be modifying it; hence voiding the warranty. For approx. $800 more, this contractor stated he would build one using pressure treated wood.

The other thought is even if I leave flooring around the entire perimeter, I still would need to lower it into place vs. sliding it into place around my pump, cartridge housing, and plumbing pipes. Lowering really won't be an option. The thought was to be able to slide it into place. I am not sure how much more strength and structural integrity would be gained by having flooring only on the three sides, with everything else cut away.

Thoughts anyone?
 
Tx Newdude. Did you take those pics with you iphone and upload? Or via laptop? I was definitely able to see what you mean either way.

I think the contractor has increased costs b/c of the price increases on lumber. Lumber is $$$ everywhere. Also, he said to make this same design, it would take a good amount of time. Don't know if I am being played.

My idea with the Lifetime would be to cutoff as much flooring as possible to still be able to slide it in around my equipment. The doors would be off the door side would be facing the wall of my house. The backside/hinge would be facing the viewer. Warping is fine as I only need to shelter the equipment, and it would have plenty of airflow b/c of no doors.

But, the million dollar question is would it work with that much flooring removed.
 
If you look at page 14 - 17 of the manual, it appears that it possibly make work even if I cut away/remove all flooring except around the perimeter for the back, and sides, and don't use the corner pieces and doors.
 
Last edited:
  • Like
Reactions: Newdude
Tx Newdude. Did you take those pics with you iphone and upload? Or via laptop? I was definitely able to see what you mean either way
Taken and uploaded in iPhone.
Lumber is $$$ everywhere. Also, he said to make this same design, it would take a good amount of time. Don't know if I am being played
Ok so it’s mostly labor. And labor ain’t cheap. Or half labor / half Covid supply gouging.
But, the million dollar question is would it work with that much flooring removed.
It needs itself for strength. I believe you could get away leaving a 6 inch border for the floor no problem. If you were to remove any panels I believe it would blow apart the first windy day. So I would recommend cuting the bulk of the panel but leaving the outside edge like the floor. This probably won’t work on the doors.
 
  • Like
Reactions: Mdragger88
Also, cut a big hole in the floor, lay the floor over the equipment and assemble the rest around the equipment. This will work great until you can’t fit 2 of the pieces together because they only slide together one way and the house is in the way on that side. :ROFLMAO:
 
Also, cut a big hole in the floor, lay the floor over the equipment and assemble the rest around the equipment. This will work great until you can’t fit 2 of the pieces together because they only slide together one way and the house is in the way on that side. :ROFLMAO:
That would be just my luck that the house would be in the way.

Its possibly trying to make a square peg find in a round hole, so-to-speak. Hence, you get what you pay for and I may have to chalk it up and go for one to be custom made.
 
  • Like
Reactions: Newdude
Are you guys handy at all ? You don’t need anything fancy or structural / load bearing. Four 4x4 posts, Some 2x4s to support the corrugated roof and wrap the sides with lattice. Doors get tricky so just make the front lattice panel attach with simple hooks.
 
  • Like
Reactions: Mdragger88
I still can’t believe the quote u got.
I know lumber is up but dang...
I really feel like @Newdude - a little handy work could go a long way here as far as savings. Basically use the existing shed as a template & improve it how you want.
 
Thanks for the replies. As far as power tools, my aresenal begins and ends with a power drill. Handy, yes with odds and ends. Haven’t made things like this before.
 
I still can’t believe the quote u got.
I know lumber is up but dang...
I really feel like @Newdude - a little handy work could go a long way here as far as savings. Basically use the existing shed as a template & improve it how you want.
The quote really isn’t even that high right now!!! That’s the crazy part lol I am doing a bunch of spring projects and was astounded by lumber prices so looked it up.........329% higher than normal market here in nor’east!!!! I actually caught myself thinking when I saw the price double” oh only double he’s giving him a break” smh , how terrible is that ?!?! But yeah put off finishing my second floor and am doing STONE patio instead.


so bbrock def think about going plastic route. I always have good luck at job lot for crazy rubber maid/ plastic containers and such. That being said it really looks like that’s just a rectangle frame with lattice sides. Saw you say not to handy but that really looks like 8 pieces of wood and lattice walls maybe a hinge or two cover. 👍🏻 Good luck tho. Oh and with wood being so pricey have them cut your 8 pieces at store and get every penny worth you can out of them lmao. two sets ,4 pieces one length front and back ,4 pieces the other ,both sides. And just throw a two hinges on back right corner instead of connecting them with nails and BAM two sides move.
 
Last edited:
  • Like
Reactions: Newdude

Enjoying this content?

Support TFP with a donation.

Give Support
Thread Status
Hello , This thread has been inactive for over 60 days. New postings here are unlikely to be seen or responded to by other members. For better visibility, consider Starting A New Thread.