Thought I would update my post now that the Stenner is successfully installed.
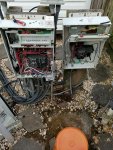
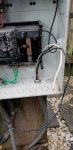
I used my last available relay in my secondary RS-4 panel (Aux B4) to power a new GFI outlet next to the Stenner pump. I wanted the Stenner only to run if the pump was running, so I needed to power the LINE side of Aux B4 with power from the filter pump relay. That was a headache! The filter pump is in the main panel, and all the conduit holes are full in the box. I had to snake a 12 AWG wire through the conduit that ran power / ground / neutral to the RS-4 panel. The pool builder used 1/2" flexible conduit between the panels and had 4 10 AWG wires in there. I couldn't push a 5th 12 AWG wire through. I had to disconnect everything from the Aux panel, remove the conduit, dig it up and stretch it out as flat as possible. Then I used some cable lube and patiently fed the new 12 AWG black wire through the conduit and reconnected the conduit. In the main panel, I connected the 12 AWG wire to one LOAD leg of the 220v filter pump relay. In the Aux panel, I connected the 12 AWG wire to the first LINE connection of Aux B4.
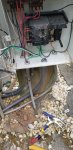
Next I ran a new flexible conduit from the Aux panel over the Stenner pump. I grabbed power (black) from the first LOAD connection on Aux B4, neutral (white) from the neutral bar in the panel, and ground (green) from the ground bar in the panel. I ran these black, white and green 12 AWG wires through the new conduit to the Stenner pump. At the Stenner pump, I dug a post hole about 18" deep and packed in a ground contact PT 2x4. I mounted a weather proof box and connected the GFI outlet per manufacturer instructions.
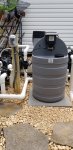
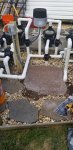
I picked up a 24 x 24 x 1.5 concrete pad for the Stenner at Home Depot and leveled it using crushed stone base material.
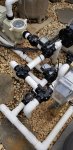
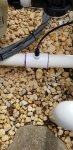
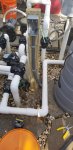
For the injection quill, I cut out the section of 2" pipe where my previous Hayward Off Line tablet feeder was injecting. I installed a 2" x 2" x 1/2" NPT Schedule 40 Tee fitting I found at Lowes. Luckily, the injection location is downstream of the heater and I was able to disconnect the union on the heater to give me wiggle room to install the fitting. I made three wraps with teflon tape on the Stenner injection fitting and inserted the fitting hand tight into the 1/2" NPT port, then made an additonal half turn with a wrench, per Stenner instructions. I did not trim the injection quill, even though it was shown in the instructions. The quill seems to terminate in the center of the pipe without trimming.
I am using the 30 gal Stenner UV tank and it was shipped with the weighted float suction strainer laying on the bottom of the tank. The instructions say to lift it a couple of inches to avoid picking up sediment. I managed to pull out the rubber grommet from the tank as I was pulling the tube to lift up the strainer. To fix that, I had to fish out the weighted strainer and remove it, then pull the tubing out completely. I massaged the grommet back into position in the tank and fed the wetted 1/4" tubing through the grommet down into the tank. I used water to lubricate the tube a bit in order to feed through the tight rubber grommet. Then I had to fish out the tube from the tank and reconnect the weighted strainer by pushing the tube into the strainer about 3 1/2". So now I know how to do that. Lol.
I added 9 gallons of liquid shock and started the filter pump. No leaks at the heater union or the glued-in Tee fitting. Using my handy iAqualink phone app, I enabled the Aux B4 / Chlorine Pump relay. The Stenner began to go around and around. I'm not really sure how you are supposed to know when it is primed and pumping liquid since the pump tube is opaque and the injection line is black.
With the iAqualink I can program the pump to run multiple times per day for as long as I choose. Since the GFI outlet to which the Stenner is connected is only getting power when the filter pump is running, the Stenner will not run if the filter pump is off even if an iAqualink program schedule enables Aux B4 / Chlorine Pump relay. That was the point of this whole endeavor and it seems to work as planned.
If you are going to undertake a project like this as a weekend warrior, give yourself plenty of time. I am usually overly optimistic when it comes to estimating and this was no exception. If you are like me you will have to Google, post questions on troublefreepools and waste a lot of time going back and forth to the store for things you forgot to pick up. Soup to nuts, this project took me 2-3 days part time to wire up the pool controller, install the GFI, make a pad, do the plumbing and set up the Stenner pump. YMMV!