
I’ve been working on building our above ground pool in our back yard for three years now. I'm a DIY nut who's spent more time reading this forum and designing my projects than I've actually spent in my pool. I officially finished phase 2 last week by turning on 160 square feet (~55% of pool surface area) of solar pool heating panels neatly installed above our custom deck roof. Here’s a snapshot:
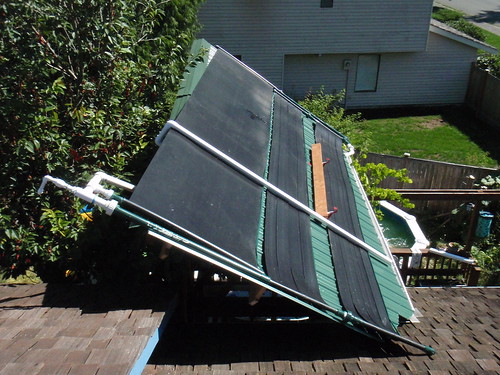
View facing East from top of roof. Three solar panels plumbed in parallel with inflow in top right corner of photo and outflow at middle left edge of photo. Both the 2x6 plank and single 2"; white pipe in middle of photo are temporary while I install permenant fastening system.

View facing South. Pool on left edge, pump near bottom middle, deck roof (with solar hot water array) in top right corner.
Here's the full set of photos on Flickr including larger size.
Detailed project description & notes:
Project History: In 2007 I ordered and installed a 12’x24’ AG (above ground) steel-sided pool in our back yard. In 2008 I built a roof over part of our deck. My original plans called for installing solar hot water panels on the roof, but after finishing the pool I decided the best option was to build a roof over part of our deck. This serves two goals: First, it provides a 10’ x 20’ south facing roof with nearly ideal solar TOF (Tilt and Orientation Factor). Second, the roof allows us to use the deck in the rain and provides shade when the weather is really hot. I’m very happy with the design. It’s great fun to sit out on the deck in the pouring rain or float in the pool on a hot day with it gently shading half the pool. In total the custom metal roof cost about $1000 and 2 hard weeks of my time to build. This year (2009) I’ve finally pulled out the Mario cap and finished installing and plumbing the pool SHW system.
Parts: Here’s the short list of items used:
I spent about $450 on the solar heater panels and plumbing supplies. I’d rather not count the hours it took me to design and install the system. I vaguely recall about 5 trips to Lowes and Home Depot, each time thinking that I was getting the last set of PVC joints and pipes to finish this project.
Biggest setback: Realizing the z-channels used to support the solar panels had to be screwed in at an angle that exactly match how panels laid after plumbed. Chicken-and-egg problem is I needed to support the panels to get them plumbed. I managed to solve the problem by installing temporary supports, then relying on contortionism with a cordless drill in one hand and faith that 6 screws (holding two mystic roof plank holders) would prevent me from tumbling to a painful and potentially maiming conclusion.
Biggest surprise: Finding the 20’ panels actually take 23’ to support!
Neat trick #1: Gutter downspout for the deck roof actually conceals the 2†pipe supplying water to the solar panels.
Neat trick #2: T joints used on the way up and down to roof are only 2’ above and 18†away from the pool and have threaded plugs to easily add fountains, water hose guns to splash kids, or anything else I can cook up!
Neat trick #3: Parallel panel configuration heats water with least resistance and slope toward feeder pipe (plus vacuum release valve at top) allows water to automatically drain back down when pump isn’t operating (instead of being cooled at night).
Highlights of the project: Turning it on and finding the only plumbing leaks were easily fixed by tightening threaded components (no slip joint leaks!). Even better is feeling slight but noticeably warmer water at the pool return jet even with full pump speed. Confirming my design worked as initially conceived with only minor tweaks to accommodate construction reality... priceless.
Here’s some more photos of the custom pipe manifolds I made, one leak in a solar panel. (Note the algae bloom has finally been conquered but photos here are still a bit green.)
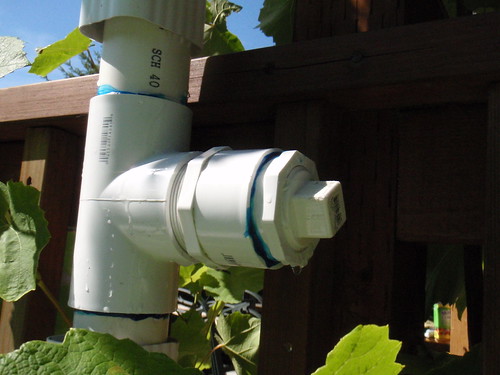
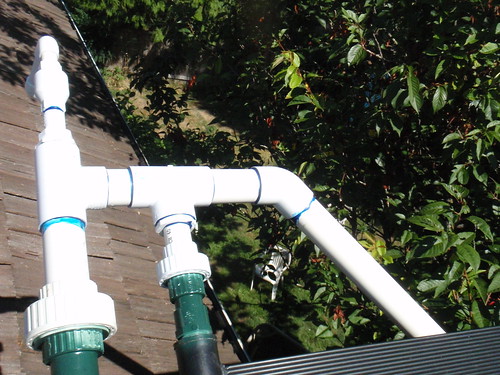
T-joint half way up to inflow manifold right below railing of deck. Threaded plug installed for now, but easy to convert to a fountain or water gun. This is located about 4' above and 16"; away from the pool.
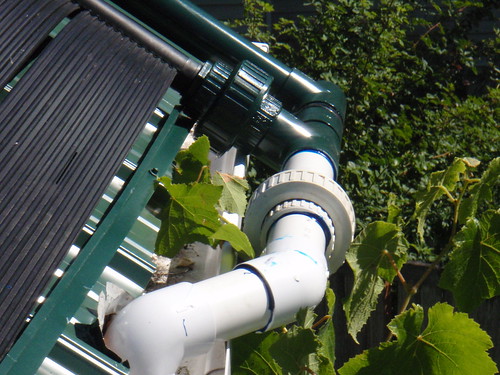
Inflow manifold from pump and filter in SE corner of heater array. Union joint allows entire array to be disconnected and serviced if needed in the future. (White section of piping has already been painted matching hunter green.) Also notice z-channel metal used on roof to support entire width of solar panel. It's a lighter gauge galvanized steel (+painted) than I'd like to have used but hopefully it will stand the test of time.
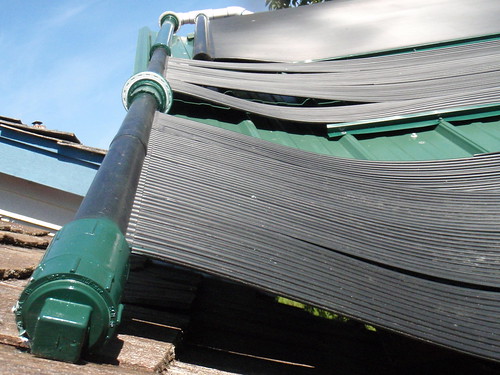
Outflow manifold of solar hot water array exceeded width of roof without having some curve added. Curve also assists drainback as a minor benefit.
Outflow manifold connects to return pipe with custom vacuum release valve at top. Photo facing North. Vacuum release is a 3/4"; one way valve pointing against the water flow - blocks water when pressurized, allows air in to expidite draining whenever pump is turned off.
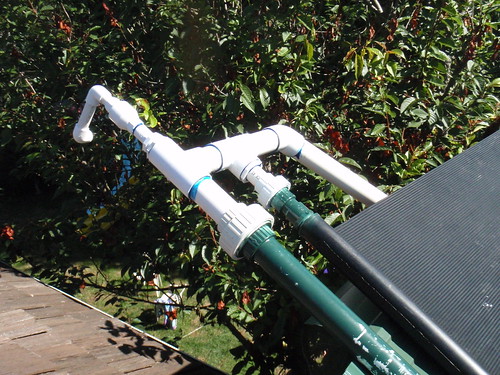
Outflow manifold perspective photo. Small pipe off top of manifold is a custom vacuum release valve. I've had this leak significantly once on startup, but since has behaved very well. One downside is I get air due to return pipe 20' drop causing enough suction to draw in air. I choose to view this as free airation and slight jacuzzi bubble effect at the return jet for now. I could probably eliminate by restricting flow through ball valve in the return pipe if air is a problem. Any known problems with semi-intentional air in the line?
What’s next?
Of course this project hasn’t been my only activity this summer, but it was definitely a big project. Next will be a massive clean-up. The back yard has looked like a construction zone for over two years. While not my top priority, I intend to reclaim some lawn from the large pool toys, drain pipes, and construction debris that have grown like noxious weeds near the pool. Perhaps the chlorine water naturally causes these things to overtake the surrounding area. Other neglected projects will take priority for a while (garage, master bath, etc.) as does my career work.
Oh yeah, and there's improving the electrical service to the pump and future gadgets such as SWG I purchased with pool 3 years ago (and still don't have installed due to electrical needs). I think I'll pay a professional to make the electrical service improvements to ensure everything is up to code (though I'll have some knowledge from reading related posts in TFP forums).
Eventually (2010?) the final phase of the pool will be designed and executed. Phase 3 is extending the deck about 18†to the pool on one side plus wrapping the deck around one end. One ambitious variation includes designing enough room for an 8’ tall pool slide I bought for $50 this spring (score!) and possibly even a rope swing from the deck roof overhang (after a few more structural reinforcements)! WOOHOOOOoo !
!
Want a closer look? Give me a call or e-mail and I’ll schedule a time for a personal tour") . Don’t forget your bathing suit! (Don’t worry, I still have the wet suits as a backup plan if there are no sunny days.)
. Don’t forget your bathing suit! (Don’t worry, I still have the wet suits as a backup plan if there are no sunny days.)
Feel free to comment on the design, implementation, suggestions for additions, or anything else.
View facing East from top of roof. Three solar panels plumbed in parallel with inflow in top right corner of photo and outflow at middle left edge of photo. Both the 2x6 plank and single 2"; white pipe in middle of photo are temporary while I install permenant fastening system.
View facing South. Pool on left edge, pump near bottom middle, deck roof (with solar hot water array) in top right corner.
Here's the full set of photos on Flickr including larger size.
Detailed project description & notes:
Project History: In 2007 I ordered and installed a 12’x24’ AG (above ground) steel-sided pool in our back yard. In 2008 I built a roof over part of our deck. My original plans called for installing solar hot water panels on the roof, but after finishing the pool I decided the best option was to build a roof over part of our deck. This serves two goals: First, it provides a 10’ x 20’ south facing roof with nearly ideal solar TOF (Tilt and Orientation Factor). Second, the roof allows us to use the deck in the rain and provides shade when the weather is really hot. I’m very happy with the design. It’s great fun to sit out on the deck in the pouring rain or float in the pool on a hot day with it gently shading half the pool. In total the custom metal roof cost about $1000 and 2 hard weeks of my time to build. This year (2009) I’ve finally pulled out the Mario cap and finished installing and plumbing the pool SHW system.
Parts: Here’s the short list of items used:
- 3 solar panels totaling 160 square feet: One Fafco (sloar bear?) 4’x20’ panel, two SunHeater 2’x20’ panels, both bought on http://seattle.craigslist.org for a total of about $250. Score
 ! [/*:m:3k5gufjl]
 - 5 size transitions to interconnect 4 different pipe diameters (thanks to 2†base plumbing connecting 2 panels using 1.5†fittings and 1 panel using 1†fittings, plus hand-built 3/4†vacuum release valve) [/*:m:3k5gufjl]
- 6 union joints (allowing me to maintain the system rather than hard pipe everything permanently then have to cut pipe on 7/12 pitch metal roof if repairs are ever needed) [/*:m:3k5gufjl]
- 17 2†pipe connectors including 5 45’ elbows, 2 90’ elbows, 2 straight connectors, and 8 T joints! [/*:m:3k5gufjl]
- 4 removable T-joint plugs inline for handy installation of fountains, water guns, or whatever I decide to cook up :-D [/*:m:3k5gufjl]
- 80+ feet of 2†Schedule 40 PVC pipe [/*:m:3k5gufjl]
- 2 cans of paint (to match brown deck wood and hunter green roof), 2 cans of PVC cement, 8 Pipe hangers, and several other miscellaneous supplies [/*:m:3k5gufjl]
- 1.5 years of worry that I’d fall off the roof as my shoes slowly slid down the straight metal roof toward a 12’ drop onto metal chairs and misc. planters on our deck [/*:m:3k5gufjl]
- ~6 days of labor split over 5 months time.[/*:m:3k5gufjl]
I spent about $450 on the solar heater panels and plumbing supplies. I’d rather not count the hours it took me to design and install the system. I vaguely recall about 5 trips to Lowes and Home Depot, each time thinking that I was getting the last set of PVC joints and pipes to finish this project.
Biggest setback: Realizing the z-channels used to support the solar panels had to be screwed in at an angle that exactly match how panels laid after plumbed. Chicken-and-egg problem is I needed to support the panels to get them plumbed. I managed to solve the problem by installing temporary supports, then relying on contortionism with a cordless drill in one hand and faith that 6 screws (holding two mystic roof plank holders) would prevent me from tumbling to a painful and potentially maiming conclusion.
Biggest surprise: Finding the 20’ panels actually take 23’ to support!
Neat trick #1: Gutter downspout for the deck roof actually conceals the 2†pipe supplying water to the solar panels.
Neat trick #2: T joints used on the way up and down to roof are only 2’ above and 18†away from the pool and have threaded plugs to easily add fountains, water hose guns to splash kids, or anything else I can cook up!
Neat trick #3: Parallel panel configuration heats water with least resistance and slope toward feeder pipe (plus vacuum release valve at top) allows water to automatically drain back down when pump isn’t operating (instead of being cooled at night).
Highlights of the project: Turning it on and finding the only plumbing leaks were easily fixed by tightening threaded components (no slip joint leaks!). Even better is feeling slight but noticeably warmer water at the pool return jet even with full pump speed. Confirming my design worked as initially conceived with only minor tweaks to accommodate construction reality... priceless.
Here’s some more photos of the custom pipe manifolds I made, one leak in a solar panel. (Note the algae bloom has finally been conquered but photos here are still a bit green.)
T-joint half way up to inflow manifold right below railing of deck. Threaded plug installed for now, but easy to convert to a fountain or water gun. This is located about 4' above and 16"; away from the pool.
Inflow manifold from pump and filter in SE corner of heater array. Union joint allows entire array to be disconnected and serviced if needed in the future. (White section of piping has already been painted matching hunter green.) Also notice z-channel metal used on roof to support entire width of solar panel. It's a lighter gauge galvanized steel (+painted) than I'd like to have used but hopefully it will stand the test of time.
Outflow manifold of solar hot water array exceeded width of roof without having some curve added. Curve also assists drainback as a minor benefit.
Outflow manifold connects to return pipe with custom vacuum release valve at top. Photo facing North. Vacuum release is a 3/4"; one way valve pointing against the water flow - blocks water when pressurized, allows air in to expidite draining whenever pump is turned off.
Outflow manifold perspective photo. Small pipe off top of manifold is a custom vacuum release valve. I've had this leak significantly once on startup, but since has behaved very well. One downside is I get air due to return pipe 20' drop causing enough suction to draw in air. I choose to view this as free airation and slight jacuzzi bubble effect at the return jet for now. I could probably eliminate by restricting flow through ball valve in the return pipe if air is a problem. Any known problems with semi-intentional air in the line?
What’s next?
Of course this project hasn’t been my only activity this summer, but it was definitely a big project. Next will be a massive clean-up. The back yard has looked like a construction zone for over two years. While not my top priority, I intend to reclaim some lawn from the large pool toys, drain pipes, and construction debris that have grown like noxious weeds near the pool. Perhaps the chlorine water naturally causes these things to overtake the surrounding area. Other neglected projects will take priority for a while (garage, master bath, etc.) as does my career work.
Oh yeah, and there's improving the electrical service to the pump and future gadgets such as SWG I purchased with pool 3 years ago (and still don't have installed due to electrical needs). I think I'll pay a professional to make the electrical service improvements to ensure everything is up to code (though I'll have some knowledge from reading related posts in TFP forums).
Eventually (2010?) the final phase of the pool will be designed and executed. Phase 3 is extending the deck about 18†to the pool on one side plus wrapping the deck around one end. One ambitious variation includes designing enough room for an 8’ tall pool slide I bought for $50 this spring (score!) and possibly even a rope swing from the deck roof overhang (after a few more structural reinforcements)! WOOHOOOOoo
!Want a closer look? Give me a call or e-mail and I’ll schedule a time for a personal tour
. Don’t forget your bathing suit! (Don’t worry, I still have the wet suits as a backup plan if there are no sunny days.)Feel free to comment on the design, implementation, suggestions for additions, or anything else.

 geekgranny
 And taking out about 4 90's that aren't needed at all coming from filter to main return.
 . I would have been much better off running the pipe adjacent to the gutter downspout.