Smoke coming from Raypak gas heater!

Pauls234

Silver Supporter
LifeTime Supporter
Jul 4, 2012
749
Chicago, IL
Pool Size
21000
Surface
Vinyl
Chlorine
Salt Water Generator
SWG Type
CircuPool RJ-60 Plus
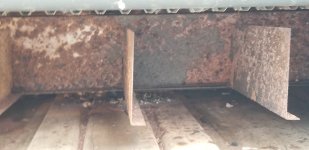
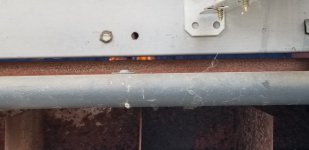
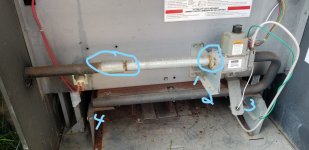
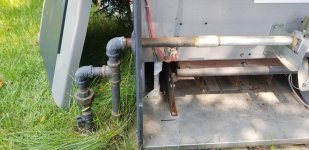
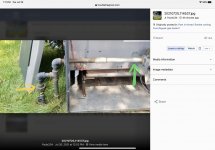
Just went out to turn on my heater. It fired up as normal, pump on high speed, then I smelled something. Turned around and smoke was coming out the top! Turned it off and pulled off the top panel assuming there would be dried leaves or something, but there was nothing obvious. I noticed a small amount of smoke was still coming out and it seemed to be coming from somewhere inside as opposed to the leaves you see on top... not sure if you can actually see the smoke in the pic. (That rust showed up about 3 weeks into ownership.)

Any thoughts for what I can investigate next? It is nearly impossible to find a pro that works on pool heaters much less get one to show up around here. 20210718_101215.jpg
 
Reading some older threads it seems this can be caused by a critter building a nest or incomplete combustion.

While it has maybe been 1-2 weeks since last running the heater, it has had water going through it, so critter seems unlikely, right?

I did just have a fence installed and one of the new posts is in the ballpark of the gas line (not sure exactly where the line is, only approximately). The fence guy was aware of this so dug that one by hand and said he did not find it. Is it possible that he got near it and the line got pinched in some way with the concrete pour or something?

The other thing though is it smells just like burning leaves, and it continued to smoke for several minutes even after it was turned off. Is that consistent with incomplete combustion of gas?
 
While it has maybe been 1-2 weeks since last running the heater, it has had water going through it, so critter seems unlikely, right?

Critters don't care about water running through the pipes. The heater has lots of open spaces they like to nest in.

I did just have a fence installed and one of the new posts is in the ballpark of the gas line (not sure exactly where the line is, only approximately). The fence guy was aware of this so dug that one by hand and said he did not find it. Is it possible that he got near it and the line got pinched in some way with the concrete pour or something?

Could be but unlikely.

The other thing though is it smells just like burning leaves, and it continued to smoke for several minutes even after it was turned off. Is that consistent with incomplete combustion of gas?

Smoke means something is in the heater that is burning. Normal NG burns clean.

Did you run the heater with the front cover off and observe the color of the flame?

Flame should be blue with maybe yellow tips. If flame is yellow then you have poor air/gas mixture.
 
Thanks, I was afraid to fire it back up, but I've done that now. Interesting... flames are pretty uniformly blue except for one spot in the middle where they are more orange, but I think I'm also seeing embers in that spot like it is burning something.

And, I noticed what I think is some ash just below. It's a tiny slit I'm looking through but tried to get a pic of the flame and also the white ash. If you zoom on the flame you can see it is blue except for that spot in the middle.

And also, no more black smoke, so assuming it is mostly burned away, but seeing the orange flame in that one spot and embers is still concerning....?
 

Attachments

  • 20210718_123014.jpg
    20210718_123014.jpg
    214.3 KB · Views: 24
  • 20210718_122933.jpg
    20210718_122933.jpg
    195 KB · Views: 24
The right answer is to pull the burners out and clean out the area.

You may get away with just letting whatever got in there be incinerated and move on.

@swamprat69 what do you think?
 
Thanks Allen. I'm definitely up for doing it the right way, plus I'll get to learn something.

What is the best way to access? Or maybe I should ask, is this a reasonably simple thing to DIY? I've made a few minor repairs to the heater over the years w help from this forum to give you a sense of my skill level.

I've got tools, patience, and can watch videos.
 
I think I may see some spiderwebs on the gas manifold. You may have to clean the orifices on the gas manifold and it wouldn't hurt to clean the burners at the same time and take a quick look at the underside of the heat exchanger. Especially if it hasn't been cleaned/serviced recently
 
Here are the instructions from my manual for removing the burner tray, and attached is a pic of my heater with front cover off.

Burner Tray Removal
1. Shut off main electrical power switch to heater.
2. Shut off gas upstream of heater.
3. Remove front door.
4. Disconnect gas line from gas valve.
5. Remove (2) screws that mount burner tray to unit,
and (2) screws that secure gas valve to jacket.
6. Disconnect wires that terminate at gas valve.
7. Disconnect hi-tension wire from PC board.
8. Carefully slide out burner tray assembly.
9. Reverse above procedure to reinstall.

For item #4, do I disconnect right where it goes into the valve? What is that other coupling to the left that I also circled?
For item #5, have I correctly (or most likely) identified the 4 screws that need removal?
Item #7 - I will disconnect all the needed wires of course, but what is the hi-tension wire? A search on raypak hi tension wire showed me some pictures, but I do not see one in my heater.

Lastly - any ideas to deter mice? When I took my leaf blower to every nook and cranny in the heater I saw one scurry away, so now I know what is trying to nest in there. So thankful that I just burned up the nest and not a family of mice.
 

Attachments

  • Heater pic.jpg
    Heater pic.jpg
    284.3 KB · Views: 13
Lastly - any ideas to deter mice? When I took my leaf blower to every nook and cranny in the heater I saw one scurry away, so now I know what is trying to nest in there. So thankful that I just burned up the nest and not a family of mice.

MK Rat Proofing sells wire mesh kits to cover the vents or you can fabricate your own using 1/4" mesh wire screen or simple chicken wire and some sheet metal.
 

Enjoying this content?

Support TFP with a donation.

Give Support
Whoever installed the heater did not do the correct gas plumbing job. That coupling above the #4 mark is all wrong. They should have used threaded pipe union similar to this -


Then you could easily unscrew the union and disconnect the gas plumbing. Is there a threaded union anywhere on that pipe outside the heater but before the 1/4 turn shut off valve? That’s where you disconnect it.
 
Nothing like that, unfortunately. Sounds like it would have made this far easier. See pic... so what are implications?
 

Attachments

  • 20210720_114537.jpg
    20210720_114537.jpg
    401.1 KB · Views: 10
Yellow arrow is your union. disconnect the union. Place your wrench at the pipe indicated by the green arrow and disconnect all of the fittings, in one piece from here. That way they will all fit back perfectly when you are done.
 

Attachments

  • F7F393F1-81E3-4903-81B2-8BBA78D85E9F.jpeg
    F7F393F1-81E3-4903-81B2-8BBA78D85E9F.jpeg
    300.5 KB · Views: 15
Got it. Not sure how I missed that so thank you @mulia

Is that likely pipe dope where the line goes into the gas valve and would then need to be used again when I reassemble? Should I do the soapy water leak test once it is back together?
 
Any downside to using pipe dope on the union as well? Doesn't look like any was used initially.

No pipe dope at my home depot so will have to order, but thank you for the guidance!

And I am going to get that rat proofing mesh kit, thanks Allen!
 
Thread Status
Hello , This thread has been inactive for over 60 days. New postings here are unlikely to be seen or responded to by other members. For better visibility, consider Starting A New Thread.