SF Bay Area build (done!!!)

We did some furniture shopping while we wait for work to be completed

Costco has some nice polywood adirondock chairs for only $130

We WILL be putting it in the sun shelf as well. My shelf is only 6" deep
 

Attachments

  • Patio furniture.jpg
    Patio furniture.jpg
    145.7 KB · Views: 42
LS work continues to get done.

Pre-deck forms and base gravel are in.

Inspection then pour on Sat. Going with sequoia sand as the color and a rock stamp

Looks like a 1 week delay is all I had for the drama last week.

Every phase that is done now gets closer and closer to the finished product. I am out there watching with a stupid grin on my face because I can see what I imagined finally taking shape.
 

Attachments

  • Pre deck (1).jpg
    Pre deck (1).jpg
    272.4 KB · Views: 91
  • Pre deck (2).jpg
    Pre deck (2).jpg
    284.5 KB · Views: 91
Ledger stone is in progress for my raised wall

Multi color slate from NPT

They just need to put the coping on top

You are probably curious why we didn't just shoot the wall with gunite.

I didn't realize it at the time but the decision was made when we had a conversation pre build about goals for the jumping area. We said we were concerned about safety from a sheer wall in the deep end like being stuck in a bowl with no way out and considered a couple different options. We discussed a seat and had further discussions where to place it so nobody hit it. We discussed a swim out or mini sun shelf type area as well. We finally settled on a wall that was NOT flush and included coping on the bottom for hand grips.

So they built a normal wall height. Put coping on the bottom. Then put the CMU blocks and filled with cement and put ledger stone on the front facing and will put more coping on the top again.
 

Attachments

  • Wall ledger stone.jpg
    Wall ledger stone.jpg
    296.4 KB · Views: 94
Nice job on the "finger ledge"! I like how you did it! There is another build where they built out the wall just enough to someones fingers to hold on to for the very reason you are doing it. Well they are putting PRETTY tile on that wall so it was a challenge for the tilers to come up with a way to tile it. They cut and laid out many tiles until they found a way that everyone liked. LOTS of extra cuts but man it looks GOOD! Yours is a much easier way to do it! I am going to have to remember this!

Kim:kim:
 
  • Like
Reactions: NorCalX
Nice job on the "finger ledge"! I like how you did it! There is another build where they built out the wall just enough to someones fingers to hold on to for the very reason you are doing it. Well they are putting PRETTY tile on that wall so it was a challenge for the tilers to come up with a way to tile it. They cut and laid out many tiles until they found a way that everyone liked. LOTS of extra cuts but man it looks GOOD! Yours is a much easier way to do it! I am going to have to remember this!

Kim:kim:

"Finger ledge"

Had no idea there was a term for it.

That is exactly what we asked for without knowing the name for it.
 
Plant list is done.

OMG I had no idea what a "canna" was before this project. My wife and I now want them everywhere.

The canna tropicana is a perfect match for the jasper colors of our rocks/boulders (orange and purples).
*Edit*
I added 2 newer photos but the colors don't seem to come across well on the computer. In real life I see more vivid purple and oranges.

The bad news is most are sold out right now. Think we will have a phase 2 plant installation when next spring rolls around!!
 

Attachments

  • canna tropicana.jpg
    canna tropicana.jpg
    89.9 KB · Views: 43
  • Boulder colors (1).jpg
    Boulder colors (1).jpg
    304.6 KB · Views: 38
  • Boulder colors (2).jpg
    Boulder colors (2).jpg
    411.7 KB · Views: 31
Last edited:

Enjoying this content?

Support TFP with a donation.

Give Support
Wait...............that is a REAL plant?? NO WAY! That is SO pretty and colorful!!!! WOWZER! It is the BLING of the plant world!!

Kim:kim:
They're real and they're spectacular!!

(sorry couldn't help myself)

Best part is the canna family is low maintenance and hardy and fits just fine in our area (zone 9b). Kind of like a plants for dummies category (perfect for me!!). I need to make sure they get enough water (automation) and nutrients (extra fertilizer beginning and end of season) but that is about it.

They can handle the heat here just fine and the full sun they will be getting is exactly what they need


They are basically tropical themed plants with nice banana style leaves. They grow quickly and up to about 6 feet

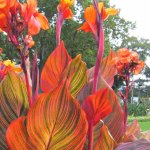
They have a variety of nice bright colors

-Canna tropicanna (also known as phasion) is one of the most popular and sought after
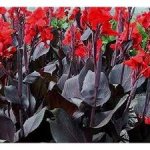
-Canna australia has nice dark colored leaves
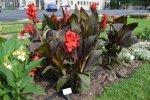
-Canna wyoming has some lovely orange flowers
-Canna cannova bronze and scarlet (I still think these look nice but the truth is these 3 are merely a fill in b/c I can't get the full order of tropicanna I want. Only 3/6 available. That sounds like a horrible comment but it is the brutal truth. I will always be judging you!!)

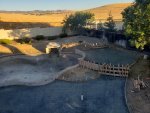
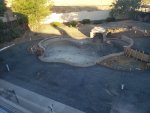
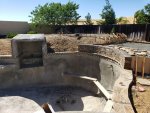
I am really really really looking forward to plant installation and the completion of water/rock work right now. I feel like a kid right before Xmas
 

Attachments

  • canna tropicana.jpg
    canna tropicana.jpg
    89.9 KB · Views: 26
  • canna australia.jpg
    canna australia.jpg
    13.4 KB · Views: 28
  • canna wyoming.jpg
    canna wyoming.jpg
    8.9 KB · Views: 29
  • canna cannova bronze.jpg
    canna cannova bronze.jpg
    13.6 KB · Views: 28
  • Like
Reactions: S-Merry
The finger ledge was completed today

My raised wall is now officially ledger stoned and capped. The original plan for this area was a FUN zone of jumping into the deep end.

Raised wall is 18" above grade. Deep end is 7 feet.

Was inspired from a trip to the Queen's Bath in Kauai. I was the only one who jumped (my kids were too young). Now they can get their chance.


I was asked if I was going to put a moisture barrier on the back of the wall. The spot where it connects to raised patio. I have no clue and need to ask my LS doing the concrete work I guess.

I assumed the mastic or expansion stuff would do that job but I should get full details. I don't want to see efflorescence in the middle of that raised wall in a few years


*Edit*
Forgot to mention the timeline

Inspection tomorrow

Pour concrete on Sat
 

Attachments

  • Finger ledge complete (1).jpg
    Finger ledge complete (1).jpg
    326.6 KB · Views: 74
  • Finger ledge complete (2).jpg
    Finger ledge complete (2).jpg
    288.6 KB · Views: 74
Last edited:
Those are some pretty colors in that wall!! I am loving the finger ledges!

Did you happen to take pics of the whole process? If so I hope you post them. I am going to "use" your finger ledge to guide others how it can be done!

Kim :kim: (I am hoping to stop by our local nursery to see if they have or can get those pretties!)
 
  • Like
Reactions: NorCalX
Too late now for the moisture barrier (but I would have had waterproofed - assuming the concrete guys will put an expansion joint, fill it with watertight sealant) - what ledger stone is that - looks like Ochre panels - this is what I was told:

"Our Ochre panels have been used in SPA pools. The thing to note is that with the Ochre stone is that if it goes through cycles of wet and dry,
this may cause the stone to get mushy and flake off. If it just stays wet, then typically you don't see this problem."
 
  • Like
Reactions: NorCalX
Too late now for the moisture barrier (but I would have had waterproofed - assuming the concrete guys will put an expansion joint, fill it with watertight sealant) - what ledger stone is that - looks like Ochre panels - this is what I was told:

"Our Ochre panels have been used in SPA pools. The thing to note is that with the Ochre stone is that if it goes through cycles of wet and dry,
this may cause the stone to get mushy and flake off. If it just stays wet, then typically you don't see this problem. We've sent to you a sample
of the OCHRE which you should be receiving today. After you review it, please let us know if you're interested in ordering."

The ledger stone is NPT multi colored slate.

Passed pre deck inspection and pour is Saturday.

We had a fire drill to discuss options to fix the back side of the wall. LS blamed PB and vice versa. This is literally where the separate projects come together and i didnt know enough to clarify this in advance. So this is officially the first major screw up of the project

I could get an emergency crew out to dig fix then recompact but the estimate was over 1k and I cant eat that type of surcharge. Both sides said it would be best practice to protect it but we can move forward and it likely will not be an issue down the road.

My wife and i discussed and we are rolling the dice and moving forward but not happy with both sides. Even if it wasn't their "job" they should have told me before we got this far so i could get it done.
 
Decking just completed (like literally...they stopped stamping a few minutes ago and I handed them the KFC big boxes I got for everyone)

PB and LS met before everything and tried to point out what was concerning

PB wanted to make sure 4" expansion foam for pool touching concrete and tarp over coping were used. Also suggested not coming too close to my boulders

The wall of annoyance (seriously every issue has to do with this wall) cropped up again. Concrete crew poured directly up to the exposed wall instead of putting foam all the way down to the base. They just had foam at the top. We don't want the concrete deck movement influencing this finger ledge wall at all. Asked the crew to dig it out and put the expansion foam in. They did it and joked with me if that earned them a lunch. I'm a stand up guy and said oh ya it did I truly appreciate fixing something.

You can see in the 2nd image the foam goes all the way down

Next up comes grotto and weeping wall

1 week from now the covered patio goes up

Aiming for pebble finish in 2 weeks (after July 4th holiday)
 

Attachments

  • Decking poured (1).jpg
    Decking poured (1).jpg
    385.9 KB · Views: 67
  • Decking poured (2).jpg
    Decking poured (2).jpg
    361.5 KB · Views: 82
  • Decking poured (3).jpg
    Decking poured (3).jpg
    302.3 KB · Views: 82
  • Like
Reactions: OGSW20
Great set of guys you have working there!! Love that you took such good care of them! SWEET!

I LOVE,LOVE, LOVE your decking! I was telling someone to do curves on their decking just like you did!!! It add so much visual interest!

Here is hoping that wall will stop coming up with problems gurrrr BAD wall! BAD!!

Kim:kim:
 

Enjoying this content?

Support TFP with a donation.

Give Support
Thread Status
Hello , This thread has been inactive for over 60 days. New postings here are unlikely to be seen or responded to by other members. For better visibility, consider Starting A New Thread.