Sanding/Polishing Plaster Pool

balrok

Member
May 8, 2020
6
Green Bay, WI
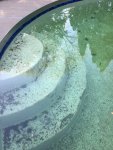
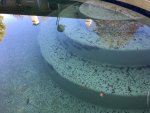
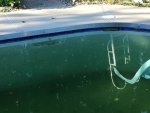
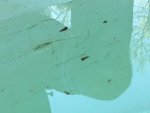
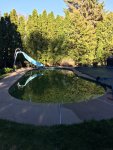
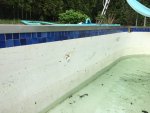
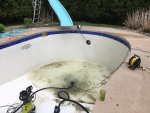
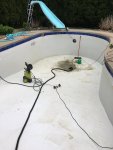
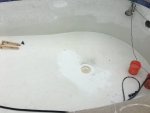
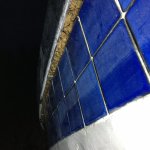
Hello everyone, over the last couple years we have noticed more and more algae sticking to the floor and walls of our pool due to a finish that is rough. The $10k quotes we have recieved for a chip out and plaster are more than we want to spend at this time. I have found a few videos of people sanding down their pools with diamond sanding pads with really good results.

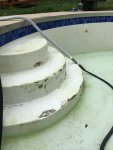
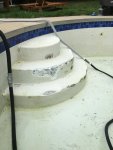
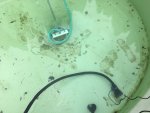
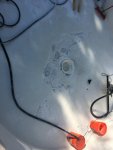
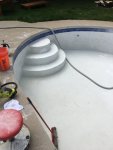
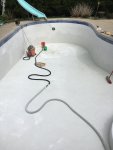
We plan on patching the edge of our stairs, some spots on the floor in the deep end, and a couple spots on the walls. I haven't done much research on which product to use except that I should clean the areas off with a power washer, use a bonding agent, patch the spot, then use a wet sponge to finish. Any suggestions on what bond/patch products work best would be nice. We have a white pool and I do have concerns of color matching.

For sanding I have decided to go with a 5" polisher and I am leaning towards a wet polisher, but I might get a dust hood to see if the process goes quicker or if the finish looks better using dry polishing. Again, any suggestions in this area would be helpful.

I have found that sanding pads come in various price ranges and don't really know what to expect in terms of how many pads I will go through. There are some pads that are sold in 50, 70, and 120 grit specifically for pool plaster that show 1500-2000 sq ft coverage for the coarse grits and up to 3000 sq ft for the finer grits. There are also pads made for quartz/concete/marble/etc that show 150 sq ft coverage, but I know the plaster is certainly not as hard as those rocks. My pool has an estimated 1000 sq ft of plaster. My original plan at this point is to start with 50 grit and come back with either 100 or 150 grit to smooth it out.

I will be posting pictures of the before, during, after in hopes that other members can learn from my successes and hopefully not too many mistakes.

Pool Info:
~16x32 pool 3.5' in shallow, 6' in deep end
~1000 sqft of white plaster

Unpurchased material list:
Polisher - Stadea SWP101K or SWP108K
Wet Diamond Pads - Stadea PPW192D (50, 100 or 150 grit)
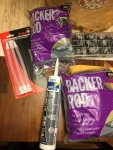
Patch Bonding Agent - Not found
Patch Material - Not found
Boots, submersible pump,etc

Thanks to onBalance for initial info!

I have also had some issues with my pool light which I have narrowed down to a possible fixture problem so we will be swapping our 120V incandescent light to a 12V LED light.
 
Last edited:
Welcome to TFP.

Quite a project you are planning.

Some pics of the biggest problem areas would give folks a better idea of your current situation.
 
Even if the steps have areas that have chipped off or flaked off, I believe it would be much better and easier if you just try to sand those rough areas instead of trying to patch.
 
I just took off the winter cover and will be draining tomorrow so I can get some better pictures at that point.

I picked up the following:
a 60# pail of SGM dynamite pool patch
wire style paddle mixer for my drill - I haven’t found any videos for this style of patch but the ez patch style shows it should be mixed like stiff potato
14” pool trowel
5x2” martin trowel
Cold chisels
Ryobi rotary hammer drill and SDS plus bits/chisels this isn’t necessary but I wanted something to drill into concrete anyway and this has a hammer only mode for chisels
I also have aair hammer and chisels if necessary but don’t think I’ll need to use it
Rubber boots
5” Wet polisher and 50/100 grit diamond pads. I bought 3 of each because I didn’t know how fast I would go through them but I probably won’t go through a pad
I got some phosphate free TSP to clean up the spots before patching but I don’t think that’s necessary.
I already have a pressure washer and used my water broom attachment to clean the winter cover. The water broom makes the process so much quicker.

The 1/16” deep lines shown in one of the pictures is all over the sides of the pool and algae just sticks in them so that is the reason for polishing.

I have a few spots down to the gunite around the stairs and where the side stairs rests on the pool sides. Those will be chipped/patched along with a large delaminated section in the deep end around the main drain. That part sits under the slide and it’s where most of the cannonballs are done so I have a feeling the delam is from that.

I researched quite a bit and I did a lot of drywall mud work in the basement so I’m good with a trowel. I hope things go well this weekend!
 

Attachments

  • ADC42813-7A52-4338-9A35-3BAB292E9D87.jpeg
    ADC42813-7A52-4338-9A35-3BAB292E9D87.jpeg
    536 KB · Views: 67
  • 62F12EDC-7149-4097-B0CF-276EB24165EE.jpeg
    62F12EDC-7149-4097-B0CF-276EB24165EE.jpeg
    508.7 KB · Views: 67
  • 43D0B57F-F8B9-4816-BE1C-0F10F6123B62.jpeg
    43D0B57F-F8B9-4816-BE1C-0F10F6123B62.jpeg
    352.8 KB · Views: 65
  • D563644B-8059-482F-B5FE-8D5666DEA168.jpeg
    D563644B-8059-482F-B5FE-8D5666DEA168.jpeg
    241.2 KB · Views: 67
  • E5DA6A46-59E0-4CA4-A307-5BDEE398132B.jpeg
    E5DA6A46-59E0-4CA4-A307-5BDEE398132B.jpeg
    751.3 KB · Views: 67
I used Pool Patch once on a small area that delaminated in my pool to buy some time before a full resurface.
It didn't match the rest of my pool perfectly, but it did last 5 years longer before I redid the entire pool (The patch didnt' fail, I just finally decided to redo the entire pool).
Pool Patch
 
Thanks for the vote of confidence in patching WhiteWine. When I bought the house the retired owner of the pool company was a family friend of the people I bought the house from so he came and checked it out. The pool company switched names, but I got the patch product from them so I am crossing my fingers it will be a close match.

Day 1 complete: ~6 hours off and on draining the pool while I worked from home, followed by 6 hours of chipping/washing.
Drained the pool using a couple of submersible utility pumps
I chipped out around the stairs while waiting for the water to drop. The Ryobi P222 cordless chisel made quick work of the plaster, but it did start to get warm so I switched to a manual cold chisel. I found using the manual chisel to create the outline of the chip out worked better because there was less surface chipping outside the perimeter. I then switched to the cordless to clear away the rest.

I pressure washed all of the sides so the algae wouldn't gum up the diamond polishing pad. This took a while using a 2000psi pressure washer with a 25 degree tip. I used a water broom attachment to clean up the bulk of the bottom. I alternated pressure washing and chipping to keep the cordless cool (it never shut down, but I like to take care of tools).

After everything was cleaned up, I decided to try out the wet polisher to see how it would work. My plan is to do that tomorrow, but I tried it out to be prepared. I am glad I did because I found out the part that attaches to the hose leaks so I will add a rubber washer tomorrow. I also found that the 50 grit diamond pad did not take as much material off as I wanted. It took about 10 minutes of grinding to remove a line that was about 1/16" deep. The good news is the finish was very smooth. I will not be using the 100 grit on most of the pool because it is unnecessary. I will use it on the corners because those seem to be the hardest to clean with a brush/vacuum so the polished surface should resist

My plan for tomorrow is to fix the leaking polisher and then try a diamond grinding cup/wheel that I got as a backup. I purchased it for another project later in the summer, but it should make quick work of the plaster. The wet polisher is a variable speed so I will start with around 2100 RPM and work my way up if necessary. I have a friend helping so he will be doing the grinding as I try my hand at patching.

I have attached some pictures of the progress. Thanks to those who contributed!

p.s. After looked at where the majority of the damage I can see it is about the same height where the water used to sit when the pool was winterized. I think the freeze cycle in Wisconsin caused most of the damage. The last couple years I have been bringing the water back up a little higher after winterizing and I think it helped.
 

Attachments

  • IMG_9453.JPG
    IMG_9453.JPG
    448.8 KB · Views: 57
  • IMG_9455.JPG
    IMG_9455.JPG
    413.9 KB · Views: 53
  • IMG_9457.JPG
    IMG_9457.JPG
    351.3 KB · Views: 52
  • IMG_9458.JPG
    IMG_9458.JPG
    455.9 KB · Views: 50
  • IMG_9459.JPG
    IMG_9459.JPG
    503.1 KB · Views: 46
  • IMG_9465.JPG
    IMG_9465.JPG
    314.9 KB · Views: 48
  • IMG_9452.JPG
    IMG_9452.JPG
    347.4 KB · Views: 49
Day 2 - 12 hrs (additional 6 from a friend)
Fixed the leaking polisher by using a standard garden hose rubber washer. My friend used a diamond grinding cup on a grinder with a dust hood hooked up the shop vac to take out material around the cracks and I followed with the wet polisher to smooth out the spots where he was grinding. This took pretty much the whole day going along the walls and we got about 3/4 of the pool walls complete.

I also tried mixing some pool patch and found that it was nothing like joint compound. I ended up getting out a scale and measuring an exact 3:1 ratio and was able to get it to work for a bit. This stuff goes from watery to the texture of joint compound in about 30 seconds, then you have about 20 seconds of time to spread it before it becomes too thick to apply. I did found I could add a bit of water after to help move it around.

Day 3 - 12 hrs (additional 6 from a friend)
We found that most of the cracks that we thought disappeared had come back. The slurry of the grinding and the sun hid them the previous day. Further looking into this I think the cracks were there since the pool was first plastered. They are similar to cracks caused by bad mixing of plaster.

We started the day the same as the previous day, except now we only ground down the area around the cracks until it was smooth. I started to patch areas that were down to the concrete until my friend was done polishing. After we got the steps and the majority of the sides complete we sucked all of the water out of the bottom to assess the damage around the main drain. After some back and forth we decided to chip out most of the area and patch. The ryobi got hot pretty quick so I wheeled out the air compressor and chipped out with an air hammer. After the chipping was complete I lost my helper so my wife started mixing the patch. We made fairly quick work of the area around the main drain. When you mix the patch it is really hard to get the remnants out of the bucket until it has dried completely so we made single and double (150g:50g / 300g:100g) batches in paper bowls.

Day 4 - 10 hrs (7 with the wife mixing pool patch)
We finished patching the pool starting with the bottom. I tried to make the stairs look a bit better, but it is really hard to work with the patch material to get it to look right. I am going to let it harden and see if I can make it better with the polisher. I polished the floor and sides with a 100grit pad.

We have had issues with some dirt dropping into the pool under the metal coping in several spots. There is just a foam backing pad in there right now so tomorrow I am going to put some caulk in there. Not sure which type of caulk resists the occasional splash from the pool so if anyone has any suggestions that would help. After caulking there is just one spot left to patch (found it right at the end while polishing), fix the steps, clean up, then start filling with water.

I can't wait to see blue water again. This project was definitely a lot of work and my body is sore!

Does anyone know how long pool patch takes to cure? The directions just say to keep it wet for 15 minutes.
 

Attachments

  • IMG_9489.JPG
    IMG_9489.JPG
    316.7 KB · Views: 54
  • IMG_9495.JPG
    IMG_9495.JPG
    247 KB · Views: 59
  • IMG_9498.JPG
    IMG_9498.JPG
    352.4 KB · Views: 62
  • IMG_9499.JPG
    IMG_9499.JPG
    296 KB · Views: 60
  • Like
Reactions: GDN
Day 5 - Mostly at the store picking through all of the types of caulk
I removed the old foam from around the pool and went to the store to get some caulk while my wife cleaned up the tiles with the pressure washer. There are far too many types of caulk. My plan is to fit a small backer bead in the gap between the pool and slab around the pool and then caulk it. Then I can fit a larger backer bead in the area that overhangs the pool and then caulk over that area.

I didn't find a definitive type of caulk that is best for pools so I looked for something rated for exterior use so it would have UV protection. It needs to be water proof obviously. It needs to adhere to both concrete and the metal coping. It also needs to be able to stretch. Water cleanup would also be nice.

100% silicone would be great for most of those, but they specifically said that they are not for cementitious (yes the label actually had that word) use. I ended up getting White Lightning 3006 Ultra Siliconized Acrylic Latex Elastomeric Sealant. It has 70% elasticity so it can stretch pretty far.

I spent too long at the store so I will apply the caulk tomorrow and finish up anything else that needs attention.

I will need to fill the pool up soon before I find more things to fix!
 

Attachments

  • IMG_9519.JPG
    IMG_9519.JPG
    559.9 KB · Views: 29
  • IMG_9520.JPG
    IMG_9520.JPG
    494 KB · Views: 28
  • IMG_9522.JPG
    IMG_9522.JPG
    573.7 KB · Views: 27
  • IMG_9524.JPG
    IMG_9524.JPG
    539.1 KB · Views: 28
Day 6 -5hrs with help from my wife
Caulked around the pool and put in a small 3/8” backer rod in the gap. I will add a larger backer rod to fill in the rest tomorrow.
We tried a couple different techniques until we found one we liked.
I took the grinder to smooth out the edge of the steps. It’s still not the best, but it is much better than before. In the process of the final cleanup we found a few small spots that looked like they were eaten away so I chipped them out and threw a quick patch over them.
Cleanup involved using the power washer water broom to get everything to the bottom. Then using the utility pump to pump most of it out. Followed by sucking up the rest with a shop vac. I used the pressure washer to clean out the remnants because it has a lower flow rate than the garden hose so less water to pick up with the shop vac.

We found yellow stains around the main drain and the pressure washer didn’t take them out. I also tried TSP and that may have faded the stains. The wife’s go to is soft scrub so we let that sit on the worst stain and after about 10 minutes we wiped it off and the stain was off. We spread some around the other spots while we cleaned up tools. Soft scrub is highly concentrated bleach so we have high hopes that any other yellow spots that wouldn’t come out will come out later.
At that point the wife gave the final okay and I turned on the hose to fill it up!

It has been quite the project to fix so many issues with the pool. I learned a lot along the way so hopefully others will find these posts useful in the future.

I know my pool has many thin spots so another layer of plaster will be in the not so distant future. I will probably go the route of SGM bond kote followed by SGM diamond brite. There is a local pool guy that I would hope would do the plastering if I got all of the material and whatnot.

I will get a couple pictures after I get the pool all filled up. With the hot days ahead I can’t wait!
 

Enjoying this content?

Support TFP with a donation.

Give Support
Thread Status
Hello , This thread has been inactive for over 60 days. New postings here are unlikely to be seen or responded to by other members. For better visibility, consider Starting A New Thread.