- May 13, 2025
- 39
- Pool Size
- 28000
- Surface
- Plaster
- Chlorine
- Salt Water Generator
- SWG Type
- CircuPool RJ-16 Plus
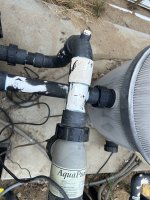
Just by appearance do you think i will have room to plumb in the RJ60 and the flow sensor?I made the switch from a Jandy 1400 SWG to the RJ 60 Plus this year. The Jandy salt cells were not lasting more than a year. Cutting out the old Jandy unit and installing the RJ unit took about 3 hours for me which included 1 trip to lowes for some elbows and a union to make the plumbing work.
Thanks for the advice, i look forward to this project!