Run MasterTemp heater without thermal regulator?

I would have on hand a new thermal regulator, bypass valve, and O ring kit for the manifold. When you remove the manifold to examine and clean the heat exchange replace all of those.

There are YouTube videos showing how to remove the manifold and descale a heat exchanger, if necessary.
 
  • Like
Reactions: JoyfulNoise
There are videos on YouTube for how to clean a scaled out heat exchanger using a submersible pump and a bucket of calcium remover … ha, @ajw22 beat me to it.

One thing, I would not use muriatic acid to clean the exchanger. CLR should be more than adequate to do the job.
 
Thanks for everyone's replies. I think a complete disassembly / inspection / cleaning will probably have to wait a couple weeks, or at least until spring at this point.

I like the idea of something like this:


If you wouldn't use muriatic acid, what ratio of CLR would you use? I have both readily available. I'll have to bodge together the plumbing for it, though I do have a couple extra unions.

Any better videos / ideas?
 
Before you do that descaling I would open up the header and visually inspect the heat exchanger to know what you are dealing it. I would not treat it like that video unseen.
 
Thanks for everyone's replies. I think a complete disassembly / inspection / cleaning will probably have to wait a couple weeks, or at least until spring at this point.

I like the idea of something like this:


If you wouldn't use muriatic acid, what ratio of CLR would you use? I have both readily available. I'll have to bodge together the plumbing for it, though I do have a couple extra unions.

Any better videos / ideas?

1:1 CLR:Water is what I would use. 2:1 would work a little faster. It can get foamy so you want to make sure your not trying to pump it in there with 12HP sub pump ... 1/4HP or less would work just fine. And if you can get one of those larger/taller 10 gallon buckets, that will let you house the pump and fluids with lots of extra room to work and very little splash out. Then you can flush out the exchanger by running a couple of buckets full of fresh water. As Allen mentioned, since you've got it all opened up anyway, you might as well have all the spare seals, diverters, etc, handy so you can change them out.
 
Before you do that descaling I would open up the header and visually inspect the heat exchanger to know what you are dealing it. I would not treat it like that video unseen.

Hm, seems splitting open that tub is pretty involved from what I've seen. Any tips / tricks to get in there?

1:1 CLR:Water is what I would use. 2:1 would work a little faster. It can get foamy so you want to make sure your not trying to pump it in there with 12HP sub pump ... 1/4HP or less would work just fine. And if you can get one of those larger/taller 10 gallon buckets, that will let you house the pump and fluids with lots of extra room to work and very little splash out. Then you can flush out the exchanger by running a couple of buckets full of fresh water. As Allen mentioned, since you've got it all opened up anyway, you might as well have all the spare seals, diverters, etc, handy so you can change them out.

Great, thanks.
 
Hm, seems splitting open that tub is pretty involved from what I've seen. Any tips / tricks to get in there?

It is not that tough if you have a good set of wrenches. You just unpeel the onion.

Disconnect the wires to the sensors in the header.

Remove 8 bolts and the manifold comes off.

You can then replace the thermal regulator and bypass valve in the manifold.

Look into the heat exchanger coils and see what you find.

Put the new O rings on before reinstalling the manifold.

Do you wrench a JT8 or just fly it?
 
Working on the manifold isn’t bad. It’s opening the tub to clean the heat exchanger that’s a royal PITA. If you have to check for a clogged heat exchanger, my suggestion would be that you removed the heater from the equipment pad and work on it in a garage. Taking the tub out to get to the inside of the burner is going to require a lot of disassembly. You will want to work in a space where you have easy access to tools, a work bench, etc, because lots of bolts and fasteners are going to have to be removed and you don’t want to work outdoors where it’s easy to lose stuff. It’s also a serious pain to realize you need a different sized socket or a slightly larger screwdriver and then have to go walking back to the garage to get one.

Hopefully descaling is all you have to do.
 
  • Like
Reactions: JamesW

Enjoying this content?

Support TFP with a donation.

Give Support
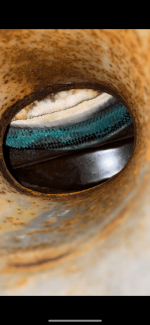
Thanks all for all your help. So I took a video inside the tub from the exhaust pipe today. The heat exchanger is looking ... I don't know.

I'm generally a pretty handy guy, so I'll drag it into the shop and meddle with it this winter.

So that green scaling, is that a problem, or natural oxidation? Is it OK to leave it, or does it need to be addressed?

Best way to check the exchanger for soot / scale? Boroscope?

Thanks again for everyone's continued contributions!
 

Attachments

  • IMG_1583.PNG
    IMG_1583.PNG
    257.9 KB · Views: 10
As background info, my pool was installed in Spring 2020 and the heater always seemed to run "hot." I'd have the Intellicenter set to say, 84º and the display on the heater would routinely be up to 20º higher than my desired, despite the pool not being that hot. I just realized yesterday, that the plumbing was actually BACKWARDS. So water was ENTERING the heater at the OUTLET, and EXITING through the INLET.
With the water going backwards, there was excessive heat in the heat exchanger, which will cause a lot of damage.

No telling how much damage was caused until you take it apart, clean it and then test run it to see if there are leaks or other issues.

Did the builder install it incorrectly?
 
  • Like
Reactions: JoyfulNoise
With the water going backwards, there was excessive heat in the heat exchanger, which will cause a lot of damage.

No telling how much damage was caused until you take it apart, clean it and then test run it to see if there are leaks or other issues.

Did the builder install it incorrectly?
Either the builder installed it incorrectly, or put it back together incorrectly after he closed it the first season. I'd imagine it will be hard to chase him down at this point. He also didn't remove the water pressure sensor, the first winter, though I did last winter. "Hire the expert" right?

The tub appeared dry, and there have been no other water leaks anywhere else. So I'm hopeful that there are no leaks.
 
  • Like
Reactions: JamesW and Poolbreh
The green corrosion isn’t a great sign. I agree with @JamesW , nothing you can do about it until you open up the tub and take a look. It’ll be hard to make any sense from a borescope so I would not waste the time. If you can pull it from the plumbing and bring it into your garage, then you can tinker with it at your leisure.

Take lots of pictures … makes it easier when trying to reassemble it and you have 3 screws, a nut, and 2 random wires left over :scratch:
 
makes it easier when trying to reassemble it and you have 3 screws, a nut, and 2 random wires left over :scratch:
Whenever someone is rebuilding something, I like to have about 5 spare parts from something else that I can slip in the pile of parts so they have to try to figure out where they go.

After about an hour of them trying to figure it out and calling tech support 3 times, I finally tell them.

:laughblue::laughblue::laughblue:
 
  • Haha
Reactions: JoyfulNoise
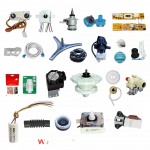
Try to figure out where these go on your MasterTemp heater.

View attachment 457080

One of those is the flux capacitor from Back to the Future …

One point twenty one JIGA- watts!!

Doc Brown Shock GIF by Back to the Future Trilogy
 
  • Like
Reactions: JamesW
Thread Status
Hello , This thread has been inactive for over 60 days. New postings here are unlikely to be seen or responded to by other members. For better visibility, consider Starting A New Thread.