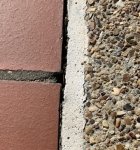
I have seen this referred to as "replacing the mastic", but the seal between my coping and the deck on my pool has developed a sizable crack. I assume this means replacement. The last time I had this done it cost me over $500. It looks like it could be a DIY job, though. Are there any instructions on troublefreepool showing how to do this? Some talk about a polyurethane seal that I assume goes at the bottom of the space? Is this a DIY or is it better left to the pros? And finally, if DIY, what kind of sealing materials should one use and where does one buy the polyurethane strip? See attached picture of closeup of current seal.

Replacing seal between coping and deck
- Thread starter ErniesPool
- Start date
You are using an out of date browser. It may not display this or other websites correctly.
You should upgrade or use an alternative browser.
You should upgrade or use an alternative browser.
- Apr 10, 2018
- 6,323
- Pool Size
- 18375
- Surface
- Plaster
- Chlorine
- Salt Water Generator
- SWG Type
- CircuPool RJ-45 Plus
The most common product is called Deck-O-Seal. It's a two-part sealant that is poured into the joint and hardens. I've never done it, but I'd imagine the hardest part is removal of the old stuff. If I recall correctly, the quote I received several years ago was about $5 per linear foot. Lots of info and DIY vids on the interweb. Amazon carries it as well.
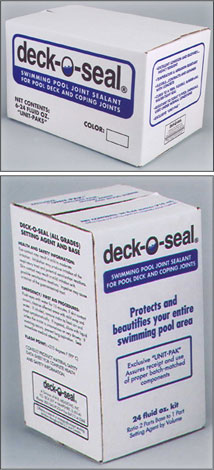
 www.deckoseal.com
DECK-O-SEAL - Polysulfide-Based Joint Sealant
Seal all cracks and joints with DECK-O-SEAL two-part, elastomeric, polysulfide-based joint sealant. DECK-O-SEAL is used for caulking and sealing joints subject to concrete movement to provide a firm, flexible, weather-tight seal. It is ideal for sealing joints around swimming pools, and for...

The cleaner and drier that crack is before the new mastic the better I hear.
Thanks for the replies. In the meantime, I see there are a number of YouTube videos out there that I watched, but there seem to be different products used and different ideas about using the backing rod. Two sealants seem to be prevalent. One is the Deck-O-Seal and the other is an air-curing product in tubes called Sika. Another different twist is to use sand AFTER inserting the backing rod(s) to create a level surface for the sealing product to prevent seeping below the backing rod. Downside of the Deck-O-Seal is one guy says you have only about an hour before it starts to cure and set up. For doing the whole perimeter of a pool, that's not long enough and it will start setting up in the applicator bottle. Raises the question about the long-term durability of the Sika air-curing product vs the Deck-O-Seal. Anybody know about that comparison?
Any further ideas/thoughts about these questions?
Any further ideas/thoughts about these questions?
- Jul 21, 2013
- 65,115
- Pool Size
- 35000
- Surface
- Plaster
- Chlorine
- Salt Water Generator
- SWG Type
- Pentair Intellichlor IC-60
That is an expansion joint that keep the deck from putting pressure on the pool bond beam. You need to use a flexible product. Sand is not flexible.
Cleaning the joint and surface prep is 70% of the work. Depends how good your back is.
Cleaning the joint and surface prep is 70% of the work. Depends how good your back is.
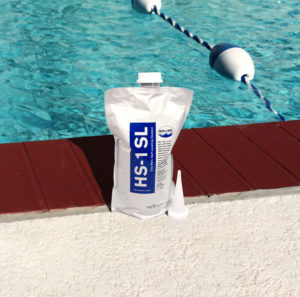
DECK-O-SEAL HS-1 SL - Self-Leveling Pool Deck Joint Sealant
DECK-O-SEAL HS-1 SL is a self-leveling pool deck joint sealant developed with silyl-modified polymer (SMP) technology. It cures under the influence of atmospheric moisture to form a medium modulus sealant with excellent adhesive properties and resistance to ageing and weathering.
I used this. Extremely easy and convenient. First mix the contents by squishing the bag for about 3 minutes. Cut the tip and squeeze the contents into the expansion gap until level with the coping / decking. The case I got had six bags. I used 5 1/2 bags to complete my 118’ perimeter pool / spa. Took about an hour to complete.
Thanks for this tip! This looks much more convenient than their two-part product that must be mixed and then loaded into an applicator. Do you have any feelings about the relative life of the two Deck-O-Seal products (one appears to be air/moisture curing and the other a two-part curing process)??DECK-O-SEAL HS-1 SL - Self-Leveling Pool Deck Joint Sealant
DECK-O-SEAL HS-1 SL is a self-leveling pool deck joint sealant developed with silyl-modified polymer (SMP) technology. It cures under the influence of atmospheric moisture to form a medium modulus sealant with excellent adhesive properties and resistance to ageing and weathering.
I used this. Extremely easy and convenient. First mix the contents by squishing the bag for about 3 minutes. Cut the tip and squeeze the contents into the expansion gap until level with the coping / decking. The case I got had six bags. I used 5 1/2 bags to complete my 118’ perimeter pool / spa. Took about an hour to complete.
I applied mine in June last year. It’s holding up great so far, but I can’t comment much on the life of it since it hasn’t been long.
- Nov 12, 2017
- 12,636
- Pool Size
- 12300
- Surface
- Plaster
- Chlorine
- Salt Water Generator
- SWG Type
- Pentair Intellichlor IC-40
Oh, good, now I don't have to start my own thread, as mine is due, too, and I'm not yet sure what material I'm going to try this time. I've done it once before. I'll second Allen's post. Don't use sand under your expansion joint. Backer rod is the correct material if after removing the existing joint the gap is too deep. Backer rod comes in many sizes (diameters) and is available where they sell concrete products. I got mine at Lowes.
I used a utility knife and various putty knives, including this handy painter's tool to remove my old seal. It was a lot of work. When I whined about that before, someone suggested I try a multi-tool. I may try something like this next time, if it doesn't mar my stone or deck. Anyway, you gotta get the old stuff out of there as best you can, and that's 90% of the job.
I've used Sika products with great results elsewhere. But it's not cheap. So I tried Lowe's generic version of that stuff in my expansion joint. I ran into two problems. That stuff is supposed to be self-leveling, but this brand was only so-so at that. And then it only lasted a couple of seasons. So I won't use that again. This time I'll either use Sika brand, or the Deck-O-Seal, unless someone here offers us a third alternative. I'm leaning towards Deck-O-Seal. But before I decide, I'll give Sika a call and ask them to recommend which of their many products they recommend for this purpose, and how it compares to Deck-O-Seal, and then choose at that point.
I'm not worried about drying/working time. I'll just do a section at a time.
I did use sand on top of my seal (before it dried) and for the most part that came out great. I had found a grey-colored sand at Lowe's that matched my grout. When dry, the joint looked a lot like the grout lines that are in the rest of my deck. And I imagine the sand kept the seal from being a slippery strip for the tiny feet that use my pool. So I'll do that again. But I made one mistake doing that, too, that I won't repeat. I got it in my head that just pouring it on top of the wet seal wasn't going to embed it enough, so I sort of patted it in with my fingers. I can't now say if that made a difference for the adhesion, but it did leave a few hundred finger-sized divots all around my pool! So I won't do that again. I'll use the sand, but this time just pour it on and leave it alone. The excess just brushes/vacuums off afterward.
Maintaining an expansion joint is important because you don't want water getting in there, rain or pool. So we're both a bit late in starting this project. But better late than never, I suppose. I'll try to get mine done before the big winter storms start.
Did you use primer? Any special prep other than thorough cleaning (like wetting surfaces?)?? Did you use backing rods?
Thanks for the sand application tip. One thing not mentioned so far is temperature at the time of application. What are the pros and cons of doing this job when it is warm or cold? I realize that all curing products will be retarded by cold, but I'm thinking that a moderate temp might be best. Most of the products have a 25% flexibility when cured, so I would think you would want to install it when the compression/expansion is in-between extremes of compression and expansion to put the least stress on the cured product. Any thoughts??Oh, good, now I don't have to start my own thread, as mine is due, too, and I'm not yet sure what material I'm going to try this time. I've done it once before. I'll second Allen's post. Don't use sand under your expansion joint. Backer rod is the correct material if after removing the existing joint the gap is too deep. Backer rod comes in many sizes (diameters) and is available where they sell concrete products. I got mine at Lowes.
I used a utility knife and various putty knives, including this handy painter's tool to remove my old seal. It was a lot of work. When I whined about that before, someone suggested I try a multi-tool. I may try something like this next time, if it doesn't mar my stone or deck. Anyway, you gotta get the old stuff out of there as best you can, and that's 90% of the job.
I've used Sika products with great results elsewhere. But it's not cheap. So I tried Lowe's generic version of that stuff in my expansion joint. I ran into two problems. That stuff is supposed to be self-leveling, but this brand was only so-so at that. And then it only lasted a couple of seasons. So I won't use that again. This time I'll either use Sika brand, or the Deck-O-Seal, unless someone here offers us a third alternative. I'm leaning towards Deck-O-Seal. But before I decide, I'll give Sika a call and ask them to recommend which of their many products they recommend for this purpose, and how it compares to Deck-O-Seal, and then choose at that point.
I'm not worried about drying/working time. I'll just do a section at a time.
I did use sand on top of my seal (before it dried) and for the most part that came out great. I had found a grey-colored sand at Lowe's that matched my grout. When dry, the joint looked a lot like the grout lines that are in the rest of my deck. And I imagine the sand kept the seal from being a slippery strip for the tiny feet that use my pool. So I'll do that again. But I made one mistake doing that, too, that I won't repeat. I got it in my head that just pouring it on top of the wet seal wasn't going to embed it enough, so I sort of patted it in with my fingers. I can't now say if that made a difference for the adhesion, but it did leave a few hundred finger-sized divots all around my pool! So I won't do that again. I'll use the sand, but this time just pour it on and leave it alone. The excess just brushes/vacuums off afterward.
Maintaining an expansion joint is important because you don't want water getting in there, rain or pool. So we're both a bit late in starting this project. But better late than never, I suppose. I'll try to get mine done before the big winter storms start.
ps I've been looking over the Deck-O-Seal products and I think Spookie's recommendation for the HS-1 SL product is the least hassle. But, it is air/moisture cured vs the other product by Deck-O-Seal which is a 2-part product (more hassle with mixing and pouring). My only question is the relative life of the two products. Is the 2-part stuff worth the extra hassle?? And self-leveling is DEFINITELY an issue!
Last edited:
- Nov 12, 2017
- 12,636
- Pool Size
- 12300
- Surface
- Plaster
- Chlorine
- Salt Water Generator
- SWG Type
- Pentair Intellichlor IC-40
No experience with lifespan of Deck-O-Seal, so others will have to help us with that. Regarding your temp theory, I had the exact same one. My joint has a rip (crack) right down the center of it. So, like you, I thought: well, may be best to install this stuff when my concrete is right in-between its two temp extremes. For me that is about 30° to 100°. So, what, 65°? That is pure conjecture on my part, but I think it is safe to assume you don't want to apply this stuff in the dead of winter or the middle of summer. For my area, this is about the right time. If our theory has anything to it, then I could advance that a bit by claiming a little bit colder is better than a little bit warmer. Better to err on the side of contraction. If the deck/coping expands a bit, the seal will just get squeezed. If they contract too much, then the seal could pull away or split (like mine did). More conjecture, but unless someone else has other proof, I would say now, in mid day (about 60°) is worth a shot, as long as this application temp is within the product's spec's, that is.
I didn't prime. I cleaned it well, but wasn't overboard about it. Didn't wet anything. I did use backer rod, that all went fine. I wanted to use sand, as that would have been easier, but researched that. Many installers do use sand, but I think they're just being lazy or cheap. As Allen pointed out, sand doesn't expand or contract, so, for me, that makes no sense in an expansion joint. Without the rod, I would have been filling very deep spaces, and possibly some "bottomless" ones (that run down between the shell and soil). With self-leveling compounds, some areas would have just sucked it all down. I don't see the need to put sand, or anything else, on top of backing rod to level that out. You place the rod at the depth recommended for the sealing product you're using, and that's it, ezpz.
I didn't prime. I cleaned it well, but wasn't overboard about it. Didn't wet anything. I did use backer rod, that all went fine. I wanted to use sand, as that would have been easier, but researched that. Many installers do use sand, but I think they're just being lazy or cheap. As Allen pointed out, sand doesn't expand or contract, so, for me, that makes no sense in an expansion joint. Without the rod, I would have been filling very deep spaces, and possibly some "bottomless" ones (that run down between the shell and soil). With self-leveling compounds, some areas would have just sucked it all down. I don't see the need to put sand, or anything else, on top of backing rod to level that out. You place the rod at the depth recommended for the sealing product you're using, and that's it, ezpz.
santacruzpool
Gold Supporter
I have done my pool twice now and have used both the Deck-O-Seal one part pouches and the Sika Flex self leveling caulking tubes. I think the Deck-O-Seal is a much better product and it hasn't cracked or had any other issues that the SikaFlex exhibited pretty quickly after my first attempt with it in 2015. I redid 2 sides of my pool in 2018 and it still looks great. I still have one side of my pool to re-do at some point and I will only use the Deck-O-Seal product.
I used a cordless multi-tool with a caulking knife blade to make quick removal of our old Sika Flex stuff - I used my sons skateboard for some of it to roll along the pool as I cut to save my knees...and a really nice knee pad when I was in one spot.
I used a cordless multi-tool with a caulking knife blade to make quick removal of our old Sika Flex stuff - I used my sons skateboard for some of it to roll along the pool as I cut to save my knees...and a really nice knee pad when I was in one spot.
- Nov 12, 2017
- 12,636
- Pool Size
- 12300
- Surface
- Plaster
- Chlorine
- Salt Water Generator
- SWG Type
- Pentair Intellichlor IC-40
OK, so that's another vote for Deck-O-Seal and my multi-tool idea. Thanks for that!I have done my pool twice now and have used both the Deck-O-Seal one part pouches and the Sika Flex self leveling caulking tubes. I think the Deck-O-Seal is a much better product and it hasn't cracked or had any other issues that the SikaFlex exhibited pretty quickly after my first attempt with it in 2015. I redid 2 sides of my pool in 2018 and it still looks great. I still have one side of my pool to re-do at some point and I will only use the Deck-O-Seal product.
I used a cordless multi-tool with a caulking knife blade to make quick removal of our old Sika Flex stuff - I used my sons skateboard for some of it to roll along the pool as I cut to save my knees...and a really nice knee pad when I was in one spot.
- Jul 21, 2013
- 65,115
- Pool Size
- 35000
- Surface
- Plaster
- Chlorine
- Salt Water Generator
- SWG Type
- Pentair Intellichlor IC-60
Did you use backing rods?
If you don't use backing rods in the expansion joint you will use 2X or more sealant. You want the backing rod to form a floor about 1/4" below the coping that the sealant then fills.
Last edited:
- Nov 12, 2017
- 12,636
- Pool Size
- 12300
- Surface
- Plaster
- Chlorine
- Salt Water Generator
- SWG Type
- Pentair Intellichlor IC-40
On my way now to Lowes for the multi tool. (I only need the tiniest excuse to buy more tools, especially DeWalt!)
Any suggestions on the best buy for Deck-O-Seal?
Does the one-part Deck-O-Seal (or two-part for that matter) accept the sand "top coat" like Sika does?
Anybody got a favorite/definitive YouTube video for Deck-O-Seal installation?
Any suggestions on the best buy for Deck-O-Seal?
Does the one-part Deck-O-Seal (or two-part for that matter) accept the sand "top coat" like Sika does?
Anybody got a favorite/definitive YouTube video for Deck-O-Seal installation?
Last edited:
- Apr 10, 2018
- 6,323
- Pool Size
- 18375
- Surface
- Plaster
- Chlorine
- Salt Water Generator
- SWG Type
- CircuPool RJ-45 Plus
Well Dirk, sounds like you got your mind made up on Dewalt (a great choice). If you can deal with a cord, the Rigid Job Max is a good choice. The Job Max has a removable head that you can change out with different attachments. I picked up a Drill/Driver Head that converts the tool into a relatively compact 90 degree drill/driver. If I recall correctly, I got the attachment free as part of a promotion at the time. The Job Max is a solid tool and comes with a nice carrying case and multiple blades.
- Nov 12, 2017
- 12,636
- Pool Size
- 12300
- Surface
- Plaster
- Chlorine
- Salt Water Generator
- SWG Type
- Pentair Intellichlor IC-40
I looked at the DeWalt corded multi tool, to save some dough, but decided that I like cordless too much, especially for this job around the pool! I do like tools that do more than one thing, but also don't like having to change things out over having all the dedicated tools. I have a good collection of DeWalt, so that's what pushed me in that direction. Thanks for the idea, though.Well Dirk, sounds like you got your mind made up on Dewalt (a great choice). If you can deal with a cord, the Rigid Job Max is a good choice. The Job Max has a removable head that you can change out with different attachments. I picked up a Drill/Driver Head that converts the tool into a relatively compact 90 degree drill/driver. If I recall correctly, I got the attachment free as part of a promotion at the time. The Job Max is a solid tool and comes with a nice carrying case and multiple blades.
I just finished doing the 70' seam around my pool on two days when the temperature was 60 - mid 70s. It was a chore. I dug out the old mastic and the old backer material (turned out to be the easier part), cleaned the edges, put masking tape on both sides of the crack, and installed new backer rod all the way round, primed the edges, and poured. Several things ... the oscillating tool was only used a couple of times, as my mastic had pretty much come loose at the edges. A painter's knife was very helpful in removing the mastic where it was still sticking. Stubborn areas required the oscillating tool.
Putting in the backer rod was another story. My pool is 30 years old and things have shifted a bit. In some places the crack was close to 1/2". In other places it was closer to 1". So after returning the 3/4" backer rod to Lowe's I ordered on line 1" backer rod. I made that work all the way round and in some places it was a squeeze. I made a tamping tool out of a small board and that helped me adjust the depth of the top of the backer rod. I started out measuring to get 1/4" but that become to much trouble and I eyeballed most of it in terms of how far to push the backer rod down. To make things more complicated, the coping and the deck in several places were al slightly different levels, meaning a self-leveling compound was bound to leave some edges exposed. Nothing to be done about that.
I used masking tape all the way round on both sides of the open slot. Very important!!! You will be dripping the goop all over the place when putting it into the groove, and you'll spend a lot of time wiping the stuff off the coping or deck if you don't use making tape. I recommend the wide contractor's stuff at the hardware store.
I decided to use primer just to try and make sure the stuff stuck to the edges and sealed. The manufacturer provided NO information about how long it takes the primer to become "tacky" (they recommend you pour the sealing compound while the primer is tacky and they say do NOT let it dry), nor do they tell you how long the stuff stays viable in the can once the harding agent is added (it's a two-part mix). So, I wound up doing 10' at a time, which took longer, and there were times when I am sure the stuff was wet when I poured the self-leveling compound in. You also have to be careful and not use too much primer because it melts the backer rod. I wonder after the fact if it is worth it to bother with the primer. Time will tell.
I poured sand onto the sealing compound after I finished a 10' stretch. I don't know if that is a good idea or not, but my previous installer did this and it gives a nice finish. Again, may not be worth the $5 for a bag of sand and the effort. VERY IMPORTANT! Do not let the compound set up before you remove the tape. In fact, remove it once a section has been poured. Once it is skinned over and you start pulling the tape, you will have a real mess on you hands!
But, I encountered a really annoying problem along the way. I bought my Deck-O-Seal HS-1 SL and the primer from Mudsupply.com. I should have known the price was too good to be true. I had four packs of the stuff for my job. In all four packages I encountered problems with either what looked like fibers, plastic sheeting, or half setup plugs of compound that jammed the nozzle. It was a real hassle. When I finally finished the job I looked at the expiration date and it showed Jan. 2020 as the expiration date. (The date I bought it if you are reading this in the future.) Mudsupply had sold me outdated sealant, and my conjecture is the clogging materials were sealant that had begun to set up over time if the packs were stores in a fixed position. The other problem was the resin in the sealant had separated, giving a marbled appearance when the stuff was poured into the crack. Whether this will be noticeable or not remains to be seen. In short, if you buy from Mudsupply, demand that they do not sell you stale or expired materials. I have filed a complaint.
One other tip. They don't tell you this, but the top of the sealant bag has a little plastic ring underneath the threads of the cap. You must cut the white ring off of the bag with a carpet knife or pocket knife before the nozzle will screw all the way down on the top of the bag. Otherwise the nozzle won't screw on all the way, causing a leak. Annoying. Also, just cut the nozzle off as far up as possible. You will need that level of flow of sealant out of the bag.
Tools you will need: Deck-O-Seal type and color of your choice, P/G primer (if you decide to use it), a brush for the primer, painter's knife, oscillating tool is helpful but maybe not required, depending, a blunt & wide tamping tool of some kind to push the backer rod into the crack (I made one from a scrap piece of lumber), some cloth or paper towels to clean up mistakes, masking tape, backer rod that is wider than the crack (1/4" bigger is ideal), sealant (I like the stuff I used because it didn't have to be mixed with a curing agent), some sand if you decide to use that as a toping (I would NOT use in the crack it to try and level or fill either underneath or over the top of the backing rod), a putty knife may help push the backer rod in, and a wire brush to clean the edges. I used the painter's knife to remove the old backing material.
Good luck! Not for the faint of heart. It's not something I would probably choose to do again. ps Pictures are available upon request.
- Apr 10, 2018
- 6,323
- Pool Size
- 18375
- Surface
- Plaster
- Chlorine
- Salt Water Generator
- SWG Type
- CircuPool RJ-45 Plus
Thread Status
Hello , This thread has been inactive for over 60 days. New postings here are unlikely to be seen or responded to by other members. For better visibility, consider Starting A New Thread.