Raypak Pilot Not Lighting - Adjustment Needed

DFWDave

Member
Nov 8, 2020
5
Carrollton, TX
Pool Size
12500
Chlorine
Liquid Chlorine
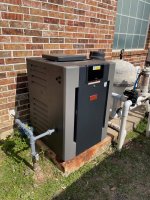
Hey all, long time lurker but first time poster. I wanted to go over something that could really help someone out in the future since I beat my head against the wall for a few hours trying to solve this one. I just got done installing a new Raypak 336A heater and am very happy with it so far. The unit is well constructed and was reasonable to install. A major item I had an issue with that Raypak does not list in their manual is anything about pilot flame adjustment based on gas pressure. After I got the unit all hooked up and ready to fire, it tried to light itself for 90 seconds without avail and threw an error. I started testing everything - Gas input pressure, electrical, spark, etc. I figured I may just needed to adjust my gas pressure up or down according to what I had read in the Raypak manual. My gas is coming into the heater at 8" WC as measured with a manometer on the input side of the gas valve. From what I could tell, it seemed too high for the pilot to light at that pressure (could hear the gas flowing pretty good) even though the manual states "A minimum of 6 in. WC and a maximum of 10.5 in. WC upstream pressure under load and no-load conditions must be provided for natural gas." The Raypak manual does talk about adjusting gas pressure but as I later learned, that's ONLY for the main burner assembly.

Raypak Manual: "The pressure at the gas valve, taken with a manometer, should be about 4.0 in. WC natural gas and 10.5 in. WC propane gas. If an adjustment is needed, remove seal and turn adjustment screw clockwise to increase pressure or counter-clockwise to decrease pressure."

That's it. The only section in the whole manual that talks about gas pressure and how to adjust it... thanks Raypak. Stuck now with a brand new heater, a pilot that won't light, and a cold spa - I started digging in a bit. I pulled the manual for the Resideo (formerly known as Honeywell) gas valve and started reading. I discovered this section on page 8:
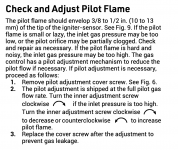
Screen Shot 2021-04-03 at 9.01.46 AM.png

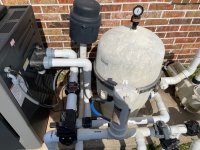
What Raypak doesn't tell you in their install guide is that the pilot flame pressure is not affected at all by the adjustment screw for pressure on the main burner, they're completely independent. However, the latter is the only one Raypak references. Once I turned down the pressure to the pilot light (I needed to turn mine 2-3 full turns clockwise) the pilot lit almost immediately and the heater came to life. Hopefully this is helpful to someone who stumbles on this in the future, I certainly wish I would have known this before having to fight with it for a few hours. I tossed a few pictures of my final install below for critique and linked the gas valve manual as well. I believe Raypak uses this same valve for all of the 206, 336, and 406 digital ignition heaters so this isn't just limited to the 336.

Link to Resideo Gas Valve Manual (Diagram of where pilot adjustment screw is on page 7 and pilot instructions on page 8): Gas Valve Manual

Pics:
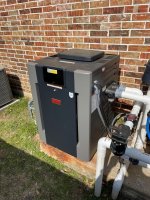
IMG_3614 (1).jpegIMG_3616 (1).jpegIMG_3615 (1).jpeg
 
Welcome to TFP.

Thanks for sharing. Raypak manuals assume a trained technician is installing the heater and details are missing like you discovered.

I will be adding what you found to our Raypak wiki page...

 
Last edited:
Welcome to TFP.

Thanks for sharing. Raypak manuals assume a trained technician is installing the heater and detail are missing like you discovered.

I will be adding what you found to our Raypak wiki page...

Thanks! Yes, I figured that was the case but considering Raypak is friendly to end users buying and installing (one of the reasons that drove me to purchasing their heater versus others) I would have figured that would have been part of the book or at least the troubleshooting steps they detail for techs to use. Glad I could help improve the Wiki!
 
If your gas pressure going into the heater is correct for static and dynamic, you should not have to adjust anything.

I don't know exactly what the problem is or was, but adjusting the pilot should not have been necessary.

Since it is a new installation, you probably just had air in the lines that needed to be purged.

I would ask Raypak for their opinion on the installation and operation.

In general, you should not start adjusting the gas pressure screws unless you are sure about what you're doing and you verify the inlet and outlet gas pressure static and dynamic.

Also, the filter pressure looks like it's probably too high.

What is the filter pressure?
I did verify the input pressure at the gas valve and it’s within spec (8” WC). There is a new Maxitrol 325-BL regulator in line since I have 2 PSI gas coming off the meter. I also adjusted the output pressure to the burners using the built-in regulator on the gas valve to bring it within spec as well (4” WC). All of this was verified using a UEi EM201 manometer. Also, I did use a flammable gas meter to confirm we had NG coming out of the pilot orifice and not just air. Resideo does tell you that the pilot ships wide open and may need adjustment based on your gas pressure (check the book I linked). I was just surprised Raypak themselves doesn’t reference this in their manual but I get that more experienced techs usually install these, although I’m not totally a spring chicken when it comes to troubleshooting gas appliances.

Also, I think the filter pressure is too high for the spa unless I’m wrong. I think it was running about 30 PSI since the pool pump is a 3 HP which may be too big for the CC325 filter. I want a variable speed long term so will probably swap it and the filter out for a newer model (filter housing is original from 2000) so I can run the spa at a lesser speed and GPM when I go into spa mode and save money on pool mode so I don’t have to run up as high. The pool runs around 10-12 PSI when in pool mode and the cartridges were just recently replaced for the season a few weeks ago.
 
  • Like
Reactions: JamesW
Also, I did use a flammable gas meter to confirm we had NG coming out of the pilot orifice and not just air.
There's always air in the lines when you first hook everything up.

You have to purge the air before the heater will work.

Even if the tester detected gas, it doesn't mean that it was pure gas.

It might have been 95% air and 5% gas.

I suspect that the heater would have worked with no adjustment.

Even if the gas pressure was too high, why would that keep it from lighting?

If you have plenty of gas and an ignition source, the gas should ignite.
 
Also, did you test for gas before or after the heater tried to light?

Once you open the gas valve, gas will begin to mix with the air and then the air will be at least partly purged during the initial 3 tries for ignition.
 
Also, did you test for gas before or after the heater tried to light?

Once you open the gas valve, gas will begin to mix with the air and then the air will be at least partly purged during the initial 3 tries for ignition.
Tested for gas after the heater tried to light. All good points, James. I’ll keep an eye on it and readjust the pilot pressure if I have continued issues. Just thought I might save someone the headache in case this fixed their issues in the future.
 
Just thought I might save someone the headache in case this fixed their issues in the future.
Ok. I appreciate the effort. You definitely know more than most about these things.

My main concern was for people who are not experienced and who might think that they should begin adjusting the gas pressure for a normal installation.

In my opinion, anyone who does not have gas experience should not be adjusting the gas pressure.
100% agree. I wouldn’t even recommend taking on installing this heater as a DIY project if I didn’t have the right tools or a healthy respect for natural gas and what it can do if you are not careful, especially with multiple scopes involved. You need to understand high voltage electrical (why tap a 120 vs 240 circuit and proper wire sizing), gas plumbing (2 psi vs low pressure gas, regulator sizing and reading charts to ensure you have enough max BTU for regulator output based on heater BTU), water plumbing (heater bypass and how to plumb it, check valve on the output side of the heater, etc) , and how to troubleshoot if any of the 3 go awry. Etc, etc, etc. I should have probably put a bigger disclaimer on this because, yes, I 100% agree you don’t need to just start messing with screws because “well, my pool heater pilot stopped lighting.” Maybe I assume too much but I’d hope you’d only be touching the gas valve if you know what you’re doing.
 
  • Like
Reactions: JamesW

Enjoying this content?

Support TFP with a donation.

Give Support
Thread Status
Hello , This thread has been inactive for over 60 days. New postings here are unlikely to be seen or responded to by other members. For better visibility, consider Starting A New Thread.