Pool Build - Baltimore

bmoreswim

TFP Expert
Gold Supporter
Platinum Supporter
LifeTime Supporter
Moderator Emeritus
Jul 16, 2012
7,204
Central MD
Pool Size
27000
Surface
Plaster
Chlorine
Salt Water Generator
SWG Type
Hayward Aqua Rite (T-15)
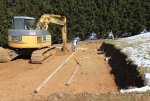
Spent last summer researching, interviewed five builders in early October, received quotes from 4 of them, selected the builder we wanted to work with in late October (didn't tell him that) and spent the next two months working out the details. Signed our contract on 12/14/12. Permit issued February 7th and here we are. Weather permitting they are planning to dig in the next week.

18' x 38' In-ground gunite rectangular pool (~27,000 gal.)
3' to 8 1/2' diving board pool
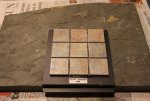
Grey Marbelite finish
Coverstar automatic cover w/ stone lid and Wi-Fi keypad
Hayward Swimclear 3030C cartridge filter
Hayward Tristar 2-Speed - 2 hp pump
Hayward Aqua Plus 16V Automation w/ Aqua Pod
Hayward Aqua Rite w/ Turbo Cell T-Cell-15 - 40,000 gallon salt water chlorinator
Hayward ColorLogic 4.0 LED lights (2)
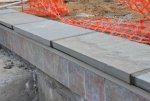
PA Flagstone (a.k.a. Bluestone) coping - 12" x 24" rectangular natural cleft surface w/ square face
1650 s.f. StoneMakers decking with irregular flagstone pattern
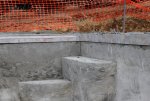
2 1/2' x 100' StoneMakers retaining wall with stacked stone pattern
Dual main drains, 3 returns plus pressure side vac. line, 2 skimmers on house side, rigid PVC
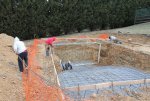
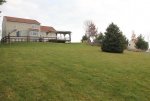
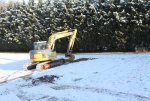
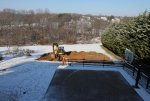
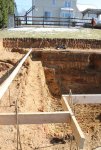
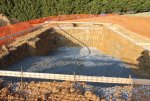
The yard before.
[attachment=2:3u3n6nvc]IMG_5649.JPG[/attachment:3u3n6nvc]

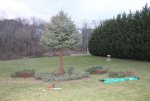
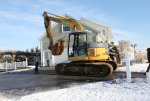
Christmas tree this year - sad to see it go though (16' tall and also our Christmas tree from 1999)
[attachment=1:3u3n6nvc]IMG_5660.JPG[/attachment:3u3n6nvc]

Down she came. Huge once inside but fun.
[attachment=0:3u3n6nvc]IMG_5688.JPG[/attachment:3u3n6nvc]
 

Attachments

  • IMG_5649.JPG
    IMG_5649.JPG
    145 KB · Views: 6,595
  • IMG_5660.JPG
    IMG_5660.JPG
    158.6 KB · Views: 6,332
  • IMG_5688.JPG
    IMG_5688.JPG
    169.3 KB · Views: 6,381
More than true! You are wise beyond your years.
 
So today was the day...Valentine's Day, with a 1 1/2" snow the night before for good measure.

In comes the excavator which they transported very gently on boards to avoid damaging the road and driveway.
[attachment=2:3br0o7po]IMG_6279-TFP.jpg[/attachment:3br0o7po]

The 1st Scoop!
[attachment=1:3br0o7po]IMG_6287-TFP.jpg[/attachment:3br0o7po]

Site overview.
[attachment=0:3br0o7po]IMG_6299-TFP.jpg[/attachment:3br0o7po]
 

Attachments

  • IMG_6279-TFP.jpg
    IMG_6279-TFP.jpg
    159.8 KB · Views: 5,984
  • IMG_6287-TFP.jpg
    IMG_6287-TFP.jpg
    216.7 KB · Views: 5,998
  • IMG_6299-TFP.jpg
    IMG_6299-TFP.jpg
    176.8 KB · Views: 6,015
Our site in on a generous hill so we will have an upper retaining wall and lower wall created by a turned down edge concrete deck. The hill will be cut back an additional four feet or so towards the house.
[attachment=2:1dhu14w0]IMG_6317-TFP.jpg[/attachment:1dhu14w0]

A view of the autocover box location. The motor will be located on the uphill side closest to the equipment pad to which you can see a rough trench.
[attachment=1:1dhu14w0]IMG_6321-TFP.jpg[/attachment:1dhu14w0]

A view from the kitchen.
[attachment=0:1dhu14w0]IMG_6345-TFP.jpg[/attachment:1dhu14w0]
 

Attachments

  • IMG_6317-TFP.jpg
    IMG_6317-TFP.jpg
    237.4 KB · Views: 5,992
  • IMG_6321-TFP.jpg
    IMG_6321-TFP.jpg
    225.8 KB · Views: 5,989
  • IMG_6345-TFP.jpg
    IMG_6345-TFP.jpg
    239.2 KB · Views: 6,019
Excavator tracks after the dig and gravel placement. They filled them in some on the way out. They were getting deep while in use.
[attachment=2:feibylkp]IMG_6354-TFP.jpg[/attachment:feibylkp]

Overview with our long pile.
[attachment=1:feibylkp]IMG_6357-TFP.jpg[/attachment:feibylkp]

View from south to north.
[attachment=0:feibylkp]IMG_6361-TFP.jpg[/attachment:feibylkp]
 

Attachments

  • IMG_6354-TFP.jpg
    IMG_6354-TFP.jpg
    269.9 KB · Views: 5,985
  • IMG_6357-TFP.jpg
    IMG_6357-TFP.jpg
    243.5 KB · Views: 5,981
  • IMG_6361-TFP.jpg
    IMG_6361-TFP.jpg
    257.5 KB · Views: 5,995
And our coping/tile selection. The coping is PA Bluestone. The tile will be 6x6 on the waterline and 2x2 highlighting the steps and benches.
[attachment=0:1tuoc8gv]IMG_6370-TFP.jpg[/attachment:1tuoc8gv]
 

Attachments

  • IMG_6370-TFP.jpg
    IMG_6370-TFP.jpg
    145 KB · Views: 5,880
Yesterday it was 25 degrees with a windchill of 10 all day; a tough day to work outside. Steel goes in with main drain plumbing the day before.

[attachment=1:pxwowb7y]IMG_6387-TFP.jpg[/attachment:pxwowb7y]

One small cave-in on the right from rain.
[attachment=0:pxwowb7y]IMG_6391-TFP.jpg[/attachment:pxwowb7y]
 

Attachments

  • IMG_6387-TFP.jpg
    IMG_6387-TFP.jpg
    289.1 KB · Views: 5,857
  • IMG_6391-TFP.jpg
    IMG_6391-TFP.jpg
    239.1 KB · Views: 5,843
Today is the shoot. A brisk start at 22 degrees with a high of 33 with a few snow flurries. They arrived at 6:30 and left at 4:00. Very pleased with the shell.

Truck one of four.
[attachment=2:2ynh2cw5]IMG_6430-TFP.jpg[/attachment:2ynh2cw5]

[attachment=1:2ynh2cw5]IMG_6436-TFP.jpg[/attachment:2ynh2cw5]

[attachment=0:2ynh2cw5]IMG_6438-TFP.jpg[/attachment:2ynh2cw5]
 

Attachments

  • IMG_6430-TFP.jpg
    IMG_6430-TFP.jpg
    148.5 KB · Views: 5,862
  • IMG_6436-TFP.jpg
    IMG_6436-TFP.jpg
    179.1 KB · Views: 5,865
  • IMG_6438-TFP.jpg
    IMG_6438-TFP.jpg
    194.1 KB · Views: 5,887

Enjoying this content?

Support TFP with a donation.

Give Support
[attachment=2:3i715d9c]IMG_6456-TFP.jpg[/attachment:3i715d9c]

[attachment=1:3i715d9c]IMG_6465-TFP.jpg[/attachment:3i715d9c]

Two deep-end hydrostatic valves and one mid-depth.
[attachment=0:3i715d9c]IMG_6462_mod-TFP.jpg[/attachment:3i715d9c]
 

Attachments

  • IMG_6456-TFP.jpg
    IMG_6456-TFP.jpg
    254.2 KB · Views: 5,833
  • IMG_6465-TFP.jpg
    IMG_6465-TFP.jpg
    186.1 KB · Views: 5,801
  • IMG_6462_mod-TFP.jpg
    IMG_6462_mod-TFP.jpg
    167.2 KB · Views: 5,797
A high-tech way to heat the water a bit for gunite.

[attachment=0:n4tzbr64]IMG_6437-TFP.jpg[/attachment:n4tzbr64]
 

Attachments

  • IMG_6437-TFP.jpg
    IMG_6437-TFP.jpg
    187 KB · Views: 5,786
Good question...

The line connects to the bottom of each of the main drains (I guess they each have two but I'm not sure how they are usually plumbed). The pool builder said that he puts in an additional suction line in case we want to have another source for a separate water feature in the future. I guess it would work such that you'd take that suction line and put a booster pump in place and then send the water to the water feature. For now I suspect he will just tee it back into the other suction line before it goes to the equipment. I didn't ask for it but he seemed pleased to say he usually just does this.

Met with the landscaper who the whole job is contracted through today on site. We discussed the deck/wall layout and details on conduits, 2" lines for future solar, low voltage lighting, electrical outlets, 120V lights, grading, etc. He is going to do the plumbing I was going to do separately. It was getting too confusing on what he would do and what I would take care of. We are dropping a 3/4" water line in the electrical trench after inspection which will not be frost proof. It is all down hill to the pool and beyond so he will plumb for a gravity drain to clear the line to avoid having to blow it out. I will be building a shed later next to the site with a changing room and sink that will drain to a dry well underneath it. We will also put an outdoor shower on the side of the shed. Attached is a file I've been working with to arrange the layout of the project. The bottom right corner of the decking is over 3 1/2' above grade so, including footer, the concrete is going to be THICK, kind of like a bunker wall. The dirt will then be graded up close to the top of it and then trail away downhill. The cabana structure is also future but will have electrical to it and the solar lines will be close by should we choose to go that route on the cabana roof. I think solar is the most heat we will go with. Having the auto cover will also assist. But we will surely go a few years without any supplemental heat.

[attachment=0:2qj8mstc]Pool Layout.pdf[/attachment:2qj8mstc]

Tile is supposed to happen Sunday and auto cover track on Monday. Coping shortly thereafter. Subsurface work on the hardscape late next week and then the wall/decking concrete will be the week after at the earliest.
 

Attachments

  • Pool Layout.pdf
    53.3 KB · Views: 361
Today they installed the tile (7am - 2pm)...tomorrow should to be the autocover track.

I think it looks less pink and more tan in person. When the boxes arrived yesterday, they were labeled "light green". I was a little concerned for a moment until I opened one box up only to see the color we had in fact selected. I was fairly pleased with Arturo's Tile and Coping's handiwork and thought the skimmer work looked pretty good. I've seen better on here and worse too I suppose. Another cold day for the workers...mid 30's and windy. We could have a nice late winter snowstorm on Tues night/Wed, we'll see.

[attachment=1:1dbcjnxf]IMG_6483 - TFP.jpg[/attachment:1dbcjnxf]

[attachment=0:1dbcjnxf]IMG_6484 - TFP.jpg[/attachment:1dbcjnxf]
 

Attachments

  • IMG_6483 - TFP.jpg
    IMG_6483 - TFP.jpg
    163.5 KB · Views: 5,655
  • IMG_6484 - TFP.jpg
    IMG_6484 - TFP.jpg
    184.7 KB · Views: 5,667
bmoreswim said:
I will be building a shed later next to the site with a changing room and sink that will drain to a dry well underneath it. We will also put an outdoor shower on the side of the shed.

Are you going to have a toilet out there as well or a door to an inside toilet? You don't want people in wet suits traipsing through your house to go potty.
 
scudman said:
Are you going to have a toilet out there as well or a door to an inside toilet? You don't want people in wet suits traipsing through your house to go potty.

We have a full bathroom just inside the basement slider so that will be the "pool bath", which is what we had in mind about 5 years ago when I finished the basement. We did consider putting a toilet in the shed structure and tapping into the line running to the septic tank, which is downhill from the pool, but opted not to add that complexity to the project and annually. If we were in a more year-round pool use region, we may have gone that route.
 
As I suspected when looking at the pictures of our pool in gravel (which you can see above), the center (lengthwise) of the pool is sloped to the left now that the concrete is in. It is 6" deeper on the downhill side versus the uphill side (5' vs. 5 1/2'). No issue for me but just interesting. I am glad that the shallower side is the side where the main seating area is located on the decking instead of on the other side which just has a few feet of decking. Both dimensions of the shallowest and deepest parts are right at spec. and the same side to side. Our pool is 2" longer than spec. as the builder pointed out during excavation, just measured a bit long I suppose, or he was feeling generous. He didn't say this, but it's also 1/2" skinnier too!

Autocover track was installed on Tuesday, 3/5 with no action since. Coping soon and wall/decking prep work maybe Thu/Fri.

I'm also excavating the area in front of my existing shed (separate from the pool site) where I had a ramp made of enormously heavy 24"x24" solid concrete (not the porous kind) stepping stones. It was functional but the way it blended (or didn't) with the paver patio was not attractive. So I've gone down 8-10" and put a base of 4" of stone (left over from the pool shell). Since I agreed with the PB that we will bill by cubic yard of concrete (including concrete/labor/pump truck/Stonemaker's additives), I can add whatever I want for a set fee per cu. yd. I chose to do the excavation of that 64 sq. ft. because it is separated and didn't want the equipment going over more grass.

It will be interesting to see the big concrete pumper on site (too much slope for the trucks to approach the pool). We are expecting about 42 yards of concrete for the deck/wall. As an aside, I read elsewhere that a standard concrete truck can haul 8 yards on two rear axles and 9 yards with the extra axle engaged. Not sure if that is accurate in all locales, but it would yield 5 trucks of concrete. Yikes. That will be more concrete (I guess) than is in the pool shell at 4 trucks. The volume of decking concrete is high because the downhill side of the pool is about 3' elevated and the decking on that side will be full depth concrete at 5'+ thick at the outer edge including the footer and 3' thick at the pool. The footer needs to be deep because it's considered a wall at that height.
 
Flagstone coping was installed today...

Definitely glad I was able to be there to arrange pieces like I wanted them. Had to leave at one point and of course they stuck a very rust colored one in a prominent place. Oh well, did as well as I could. They only had one extra piece and it was broken so there were no extras to swap out. They may have picked the best side on the rust one but I would have placed it out of the main traffic area.

Overall very pleased.

[attachment=1:1wcbazbn]IMG_6513 - TFP.jpg[/attachment:1wcbazbn]

[attachment=2:1wcbazbn]IMG_6514 - TFP.jpg[/attachment:1wcbazbn]

[attachment=0:1wcbazbn]IMG_6515 - TFP.jpg[/attachment:1wcbazbn]
 

Attachments

  • IMG_6514 - TFP.jpg
    IMG_6514 - TFP.jpg
    145 KB · Views: 5,473
  • IMG_6513 - TFP.jpg
    IMG_6513 - TFP.jpg
    201.8 KB · Views: 5,467
  • IMG_6515 - TFP.jpg
    IMG_6515 - TFP.jpg
    141.1 KB · Views: 5,446

Enjoying this content?

Support TFP with a donation.

Give Support
Thread Status
Hello , This thread has been inactive for over 60 days. New postings here are unlikely to be seen or responded to by other members. For better visibility, consider Starting A New Thread.