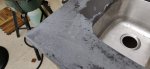
I was planning to do no exposed aggreagte but due to the repair I had to sand off the excess JB weld. I decided to sand/polish the whole this to expose it a little. You can see in the last picture.

Outdoor kitchen build
- Thread starter schuetteknight
- Start date
You are using an out of date browser. It may not display this or other websites correctly.
You should upgrade or use an alternative browser.
You should upgrade or use an alternative browser.

@schuetteknight this is soo awesome! Nice job. Looking to do this also. Thanks for making it look easy.
WattsZ
Member
I bought some armor ar350 sealer Hoping it will penetrate and make it stay dark. I haven't applied it yet Cause its been super rainy around here. But I will report back once I do.
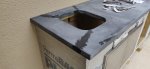
I did make 2 mistakes when I made the bigger piece. First I did not have any draft angle on my sink knock out. This made it really hard to get out. Also I did not use the set control to slow down the cure. I should have cause by the time I mixed up my 4th bag the 1st bag was already setting up fast in the mould. I still got a good surface finish but i panicked and forgot the rebar around the sink. These 2 errors led me to break the end off when I was trying to get the sink knock-out removed.
After several colorful words I figured I should try to salvage before I scrap the whole thing. I ended up getting out the 5min JB weld and clamping the whole thing together. The color is really close to the concrete but def not perfect. In the end I decided to roll with it cause I'm lazy. And in the future if it bothers me I will re do it then.
Understand that, I waited about a week before I sealed ours. I was referring to once the counters dried. Of course everything dries lighter so I wish I would have mixed the color in a little darker but all is well. I also rolled with a few areas I was less than impressed with that I couldn't get fixed, but in the end I was like ehh its an outdoor kitchen and they are minor. It can be a little imperfect lol. Gives it character lol
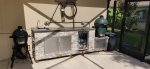
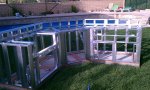
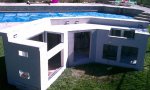
The company I work for recently started designing outdoor kitchens in metal. These pics are from our showroom model. They are made out of all aluminum and stainless. I’m in the middle of planning one out for my pool now. 


Been awhile since I posted.
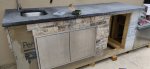
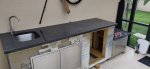
I finished up the stone and electric but still need to finish the plumbing and the feet.. I built molds for the feet so I can make feet that will match the counter top.
For all of those looking at this build in the future. I highly recommend making the area where a large BGE sit just a little larger. Mine is 26 inches deep and just barely clears when I open the lid. It needs probably 2-3 more inches to be perfect.
Attachments
- Oct 18, 2009
- 3,637
- Pool Size
- 6000
- Surface
- Plaster
- Chlorine
- Salt Water Generator
- SWG Type
- Hayward Aqua Rite (T-15)
Hi neighbor, looking great, luv the fridge with the glass door, looks like you are into Green EggsI bought some armor ar350 sealer Hoping it will penetrate and make it stay dark. I haven't applied it yet Cause its been super rainy around here. But I will report back once I do.
I did make 2 mistakes when I made the bigger piece. First I did not have any draft angle on my sink knock out. This made it really hard to get out. Also I did not use the set control to slow down the cure. I should have cause by the time I mixed up my 4th bag the 1st bag was already setting up fast in the mould. I still got a good surface finish but i panicked and forgot the rebar around the sink. These 2 errors led me to break the end off when I was trying to get the sink knock-out removed.
After several colorful words I figured I should try to salvage before I scrap the whole thing. I ended up getting out the 5min JB weld and clamping the whole thing together. The color is really close to the concrete but def not perfect. In the end I decided to roll with it cause I'm lazy. And in the future if it bothers me I will re do it then.

Those look pretty sweet. That egg looks way way too high though?The company I work for recently started designing outdoor kitchens in metal. These pics are from our showroom model. They are made out of all aluminum and stainless. I’m in the middle of planning one out for my pool now. View attachment 142280View attachment 142281View attachment 142282View attachment 142283View attachment 142284
Gras
Member
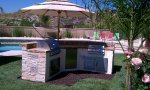
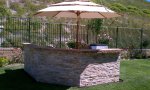
Love your work! Looks amazing. I built mine outside a few years ago and because we don't have the moisture issue you do, I used metal framing and a rock facia to match the pool
Attachments
vampstucco
In The Industry
Recently, clients hired me to build an outdoor kitchen on their existing deck. I work in the V.A.M.P Stucco, so even though this deck was roofed, moisture was still a problem. Additionally, the kitchen was going to be located on the windward side of the deck, where it would be exposed to wind-blown rain. That meant not only did I have to handle the extra weight of the kitchen on the existing deck framing, but I also needed to select components that could stand up to the constant water intrusion.Yeah I plan to pour myself. I have watched probably 100 videos on youtube so I think I'm basically a pro.
I plan to make a form using melomine. Use high strength concrete with flow additive. And a lot of black dye in the mix. Hopefully to get it really dark black/ charcoal grey. I'm not looking for a high polish I want it more "industrial"
Went to Lowe's Tonight. I think we are set on one of these 2 stone veneers I put them I'm my kitchen sink to wet them and see how they look next to the stainless. About 5$ a square foot. I didn't think it was that bad.
Thread Status
Hello , This thread has been inactive for over 60 days. New postings here are unlikely to be seen or responded to by other members. For better visibility, consider Starting A New Thread.