OB Fiberglass Pool in South Florida

Tym2Fish

Well-known member
Jul 31, 2022
65
South Florida
Pool Size
6000
Surface
Fiberglass
Chlorine
Salt Water Generator
Hi All,
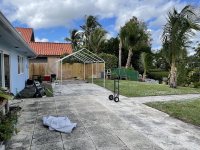
I'm installing a 11x23 fiberglass pool in our backyard (it's a small one, hence the small pool). I had a contract with a pool company to do it a year and half ago but after 9 months of trying to get through permitting they came back to me and added 50% to the cost so we ended our relationship. After not being able to find someone capable to do the work I decided to do it myself.
I've got an excavator that's experienced with pool digs and a great concrete guy. Right now my biggest problem is the truck arrives on the 16th to deliver the pool and I can't find a way to get it off the truck. All of the equipment for rent and rigging guys are in Ft. Meyers for hurricane clean up (I'm in West Palm). The equipment the excavator has is too small but might be able to lift it and set it in the front yard until we can find something.
I've read for hours on this site and all over so I'm hoping I can pull it off. I've got time and I'm pretty handy so we'll see.

Right now I've been talking to the concrete guy about securing the collar. We're pouring all at once (collar and patio). No pavers, it'll be concrete all the way to the water. My mfr says we 'may use 3/8" rebar at 90 degrees to secure the lip to the concrete.' I've read on here about using fiberglass pins. Anyone know of anywhere I can get more info on that or pick up some of the pins? From what I've seen it seems like a better plan than the rebar.

I'll try to keep up with this thread as I go along so maybe something I learn along the way can help someone else down the road.

Thanks to everyone on this site for all of the info. I've learned a ton over the past few months and I'm sure the learning is just starting.

Cheers!
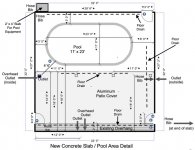
PatioAreaDetailjpg.jpg
 
  • Like
Reactions: Newdude
Thanks Texas Splash! Good news and bad news today. On the up side, we finally got permit approval this morning! On the downside, my concrete guy backed out on me. Back to work...
 
Sorry for the delay. I've been working night and day for the past week but we've made much progress. Tomorrow is supposed to be rainy so I'm going to try to update, add pics, etc.

I think the concrete guy backed out because he didn't know how to do the coping. We want concrete for everything, right up to the waters edge. Oddly here in South Florida there are pools everywhere but almost no fiberglass. Fortunately the new concrete guy seems much more comfortable.
 
  • Like
Reactions: kimkats
We're working on that now. He's been able to show me the forms, etc. that he intends to use. I've also been able to get a few reviews of his work from some folks I trust so I'm fairly comfortable. Not much to choose from around here when it comes to this kind of work.
 
  • Like
Reactions: kimkats
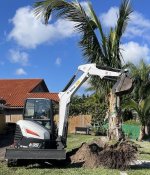
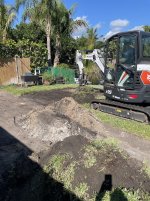
Then we started digging.
BY3.jpg

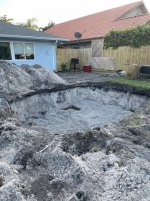
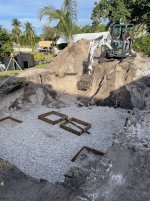
After a while, we had a hole. We added #57 rock to form a base.

BY4.jpg

A few things of note here:

If you’re excavating in South Florida, there will be cave ins. As our soil is straight sand, over the course of the week we caved in about eight times. Our plan for a 1’6” overdig quickly became 3-4 feet.

Many folks on here that say there will be more dirt than you expect. They are right. There will be lots of dirt (or sand in my case).

Fiberglass pools are sharp. I’m not going to post pics but I’m guessing in a week or so I’ll heal up nicely. But don’t worry, the pain in your back will take your mind off of the many cuts. Pro tip: buy yourself at least four pair of gloves to get started.

Installing a pool is a tremendous amount of labor. If you’re doing it yourself, be prepared to work like you’re on a chain gang.

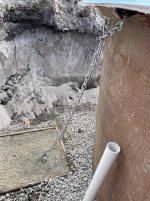
After the dig was about finished I started leveling the bottom. You’ll notice the wooden boxes. My plans called for a 30” x 30” x 10” dead man in each corner of the hole with minimum 8k# rated chain going to the lifting handles on the pool. This part was very much a pain in the butt. I have mixed feelings about the whole thing but since they were on the plans it didn’t matter how I felt. I built them and dug them into the bottom of the hole. One upside to the cave ins - there was plenty of room to work.

FYI - this was the beginning of day 2. Day 3 was pool delivery day so we were jumping to get ready.

BY5.jpg
 

Enjoying this content?

Support TFP with a donation.

Give Support
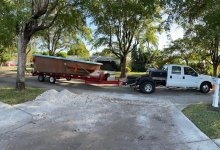
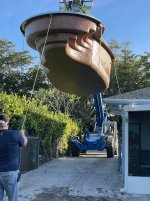
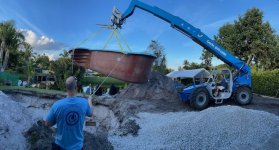
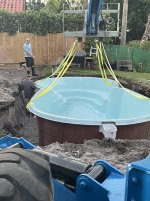
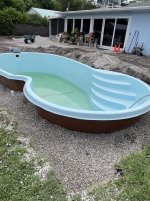
Day 3 - Our pool was coming from Georgia. I spoke to the driver and he said he’d be here around 3pm. The folks from the equipment rental place were bringing me a telehandler at noon. I figured sometime between noon and 3pm I’d learn how to drive it. The pool is 11’ wide and considering the overhang of my soffit on the side of my house I only had about 10’ to work with. I’d have to lift the pool above the house until it was in the back yard and then I could lower it, take a sharp left turn and drop it into the hole.

The pool showed up.

BY6.jpg
After a bit of rigging the pool was in the air and over the house. Note the stairs / seat in the pool. They will be part of the story later.

BY7.jpg

After the turn it was in the hole.

BY8.jpg

BY9.jpg

We worked until we couldn’t see trying to get it level. We didn’t get it level.
 
  • Love
Reactions: Newdude
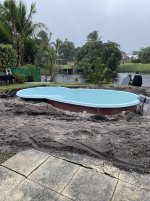
The next morning I woke up and at daybreak returned to my attempts at leveling the pool. The bottom felt fairly solid but the shallow end was sagging. I wasn’t sure if it was a lack of support or if there wasn’t enough gravel under the bottom. You can see from the pic above that the seats / stairs are just hanging there. The only ground contact was the small part in the middle.


After a bit I decided I needed a break from that so I installed the concrete dead men. It’s probably not best practice but I added a bag to the hole and soaked it with water. Rinse and repeat until the hole was full. I hauled over 20 60# bags of concrete down into the hole via a stepladder. Like I said, be ready to do some work. I didn’t realize the real work had yet to begin.

BY10.jpg

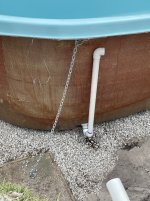
After the concrete work was done I moved on to getting the plumbing ready for backfill. There was weather on the way and I wanted to get some backfill done and try to prevent more cave ins.

I ran all of the plumbing up to 12” below the top and capped it. My plan was to backfill up to the top of the pipes, swap the caps for 90’s and head toward the equipment pad. Here’s a shot of one from the side drain. Before calling it a day I put about a foot of water in the deep end of the pool.

BY11.jpg
 
The next day was Saturday. Heavy rains were coming on Sunday so today would be all about backfill. Mostly…

I had my excavator showing up at 8am. Unfortunately the shallow end of the pool wasn’t level. At 6:30 I was out there with 2 bottle jacks, 2 4x4’s and some random chunks of lumber. I don’t have a pic but basically I put a 1’ chunk of 2x6 on the gravel, set the 4x4 on top of it (vertically), put the bottle jack on the 4x4 and a chunk of 2x4 on top of the jack. The 2x4 was slid into the underside of the top of the pool next to a lifting lug. I jacked up the pool until it was level, then jacked it up a little more. I shoved gravel under the pool until it was packed in there and lowered the jacks. After the second try the pool was level and felt solid when I got in it. I beat the excavator by 15 minutes.

A note here: give yourself a day for leveling. If you get it on the first try not only do you have a promising career as a magician but you can take the rest of the day off, make a pitcher of margaritas and get some rest. You’ll need it.

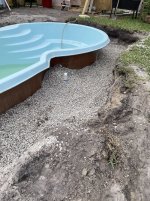
With the excavator on site it was time for backfill. He was jumping back and forth from the excavator to the bobcat delivering gravel to the hole. I was in the hole moving the gravel with a shovel as it was delivered. The deep end wasn’t too bad, mostly me shoving rock under and around the plumbing while he dumped the gravel. Then we got to the shallow end.

You’ll note from the pics there are stairs and a seat in the shallow end. The only way to get gravel under there is with a shovel and by hand. Literally laying on your gut and shoving gravel in there with your hands. Not gonna lie, it was unpleasant. It took almost three hours. If you can, pace yourself during this phase. My excavator had to leave at noon so we plowed through it. I’m thankful I survived is all I can say.

I was trying to keep the water level at the same pace as the gravel but our time crunch got the gravel ahead of the water a bit. I continually checked the sides to ensure they were straight and there was no issue. I believe the size / shape of my pool had something to do with this. I’m guessing some folks wouldn’t be so lucky.

We managed to get the pool about 2/3 backfilled.

BY12.jpg

BY13.jpg
 
I read some good stuff from Jimmy about installing my nicheless LED. He said the pvc conduit must be water tight. Anyone know if I have to pressure test it or can I just glue it and go?
 
Hi All,
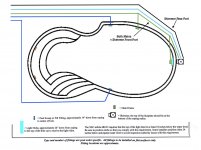
Installing a new small fiberglass pool. I've got 2 main drains, one skimmer and 2 returns. My skimmer has 2 holes, one front, one back. From all of the reading I've done on here it sounds like the back hole on the skimmer should be home run to the pump. Also, the mains should be tied together and home run as well. My question is, should I tie the front hole of the skimmer to the mains and then home run or should there be three home runs, one with mains and two from both holes in the skimmer? FYI, all lines 2".PoolPiping1.jpg
 

Enjoying this content?

Support TFP with a donation.

Give Support
Thread Status
Hello , This thread has been inactive for over 60 days. New postings here are unlikely to be seen or responded to by other members. For better visibility, consider Starting A New Thread.