New F/Glass build DownUnder - Adelaide - What have I let myself in for?... :)

Had some free time this evening so I started to pull apart my newly acquired 'spare' Viron P320XT pump for a 'Deep Clean'.

Wet end components got to have a bubble bath:

I have left the impeller still attached to the motor as I did not want to disturb the mechanical seal for no good reason at this point in time.


SwDJFe.jpg


KWJfCZ.jpg


Even cleaned up the control electronics - Easy enough to remove from the motor as it just a case of removing 3x Hex bolts and it unplugs from the motor - well designed for maintenance.

sO7R5F.jpg


I'll get stuck into the motor tomorrow - although it will just require a superficial clean by the looks of it - Just enough to clean out any redbacks..!
 
Re: New F/Glass build DownUnder - Adelaide - What have I let myself in for?... ?

Wow it’s in great knick!

You had some free time? Are you sure you are pulling your weight around the house? [emoji6]

I did help my daughter with her Maths homework this evening... - Does that count?

With regards to the pump - It comes apart very easily - Just 6 hex bolts hold the wet end to the motor - Takes less than 2 minutes to pull apart.

I could see that if you had some foreign object enter the main chamber/impeller, you would never be able to remove it unless you pull the wet end off like I have done.

Pump was mainly just a bit dusty/dirty from being outdoors - a few spiders etc and the dreaded algae inside the basket area.
 
Spare pump assembly time....

Quick look at the impeller: - ...and No I did not forget to install the main seal before screwing the volute to the motor assembly...:)

QNxRJ9.jpg


Motor - Note the connector on top which mates to the control panel via a weatherproof seal.

aHxeG9.jpg


All back together ready to roll...

BzAEUf.jpg


Probably knock up a test jig on the weekend with some spare PVC pipe etc so I can run some water & bleach through it for a while for a test & final clean.
 
Had some spare PVC and a couple of valves/fittings lying around - so knocked up a small test jig for testing a spare pump.

Also configured the test jig so that it can be pulled apart via the compression coupling which facilitates the connection of the pump's inlet/outlet to some 50mm hose and therefore be able to use it in an emergency to pump water in/out of the pool while not connected to any pool plumbing.


I6P9pS.jpg
 
Wow! Great job! Even your second hand equipment looks immaculate. Mine is still covered in concrete overspray [emoji31]

Hey, with the pal lighting app what do I need to do after I’ve downloaded the app. I’ve selected the pal lighting wifi but when I go into the app it tells me the device is offline. Is there something I need to do at the box? Box looks completely sealed from what I can tell. Not overly bothered as we just use the remote. The pal wifi doesn’t reach our patio area next to the pool so not sure how much use the app will be to me anyway.
 

Enjoying this content?

Support TFP with a donation.

Give Support
Hey, with the pal lighting app what do I need to do after I’ve downloaded the app. I’ve selected the pal lighting wifi but when I go into the app it tells me the device is offline. Is there something I need to do at the box? Box looks completely sealed from what I can tell. Not overly bothered as we just use the remote. The pal wifi doesn’t reach our patio area next to the pool so not sure how much use the app will be to me anyway.


OK - here are the steps I use:

First - Make sure you have downloaded the correct app as they have a couple and only one will work with our controller - Do not use the 'PAL Touch' app as that one does not work - Download & Install the 'PAL Lighting' app.

GbSkIj.jpg


Before running the app, make sure you connect to PAL Wifi and not some other WiFi signal in your WiFi settings on your phone:

MAB4JA.jpg


Now launch the app and you should see the following screen.

Note that Blue antenna & tick symbol - It may be illuminated blue or ghosted out. If it is ghosted, simply press the refresh button and it should turn Blue after a sec or two.

This means that your phone has now 'connected' to the WiFi controller inside the PAL box.

NF5xRj.jpg


Once you have the Blue antenna/tick illuminated - Press on the radio button which has PAL Lighting and its MAC address (hex numbers underneath PAL Lighting text) inside the bubble. Do not press on the Blue antenna symbol (this selects another feature) but simply press on the text & MAC address to the left of the antenna & tick symbol.

You should then be presented with the following screen:

ofZIon.jpg


Now select the PAL Touch-5 option and the following screen will appear:

v2IGi6.jpg


Select the 'ON" button and away you go....!

qt3plz.jpg


CH5 is the controller for the lights.

CH1 to CH4 are used to turn on other features such as pumps etc but another (different) controller box needs to be added for this option.


Is there something I need to do at the box? Box looks completely sealed from what I can tell.

The box has a sealed weather proof lid (rubber O-ring sealed) which is easily removed via the 4 large screws visible from the very front where the front label is affixed to.

You need to remove the lid when attaching the wiring etc so it is designed to be easily removable.

Here is an internal pic of mine which I took when I was labeling each of my wiring runs:

HmPBsa.jpg
 
To achieve the best WiFI range you really need to position the controller box so that the label of the internal WiFi module faces the direction you will be controlling it from.

The small WiFi antenna is inside the small WiFi module and this really needs a good line of sight path to your phone to achieve maximum range.

Sometimes this is not achievable due to where the main equipment pad resides relative to where you sit/stand around the pool.

I can control it from around 15 to 20m away but I have mounted it in my equipment room near the very front of the room so it faces back to my house.


The OEM controller also uses WiFi signals to control the box - so if the original controller works in a particular location, then your phone should also work in the same spot.
 
Thank you for such a detailed reply! Ok so I can only get the antenna to turn blue when I’m standing fairly close to it. This explains why I wasn’t having any luck even when connected to the pal lighting wifi. Might have to get our neighbours to download the app and text them when I want a colour change [emoji6] It’s facing their house and couldn’t be in a worse position for ours from what you’ve explained! Anyway, can get through all the steps fine. It says it’s on and my screen looks just like yours but nothing happens. Hmm. Could there be something that should have been hooked up during the build that wasn’t? It appears to be connecting fine just no action.
 
See if this fixes it....

Make sure that only one instance of the app is running on your phone.

If it has been open more than once it will confuse itself... so check your running apps and shut all instances of the app down.

Then just open it once.

When finished for the night... close the app fully ie. Dont leave it running in the background as next time you open it it will open another copy of itself and it will get confused again.... :)
 
Thanks [emoji4] Will check that tomorrow. Too cold out now - think we’re down to about 15* brrr ??


*** OK - I must have been asleep at the wheel yesterday as I forgot one more important step before it will work with your phone.

This is not covered off in the manual very well but I figured it out after playing around with mine when it was first installed a few months ago.

The system allows up to 4 individual remote controls (incl phones) but each one must be registered (a bit like 'pairing') with the unit before it will accept commands from the remote. I'm 100% certain this is why yours is not working with your phone at this stage.

To do this you will need to open the cover on the main unit...!

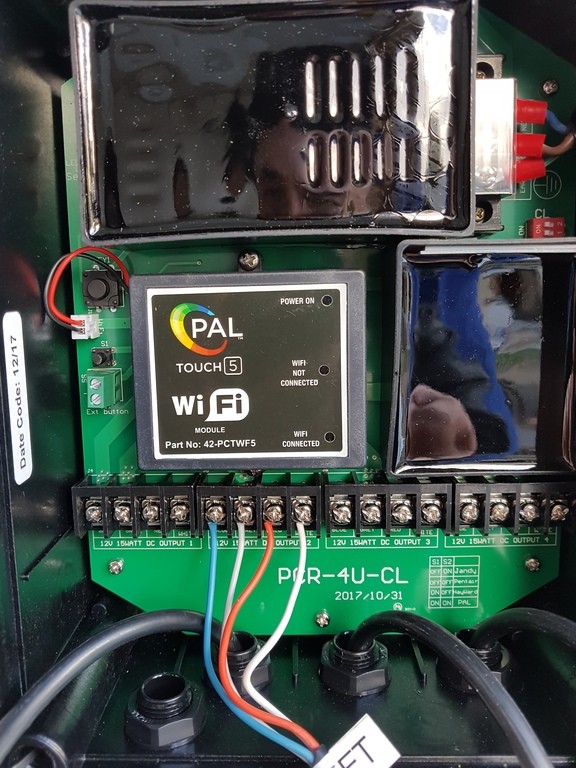
If you refer to my photo above - You will see two small buttons over on the far LHS of the printed circuit board (PCB) about half way up the PCB.

One button (labelled S1) is smaller than the other. This button is is simply a manual on/off control for the lights. You can actually connect an external momentary push button to those two small green screw terminals (below/next to S1) and mount this button externally for manual on/off capability - maybe handy in some circumstances.


Now the button we need to use to register additional remotes is the larger one situated a bit further up the PCB.

Follow the previous steps earlier so that your phone is connected to the PAL WiFi module and step through until you get to the main remote control screen.

Now - Press the larger button on the PCB (A small RED LED should illuminate just above this switch) and while the LED is illuminated (within 2 secs) press and hold the 'Speed UP' button on the app on your phone for 2 secs.

The pool lights will/should flash a few times indicating successful registration.

Now it should all work OK....!


Took me ages to sus this out when I had it first installed as I was in the same boat where the phone would connect but not do anything further...!

The reason they do this is to stop your neighbours controlling your lights.. :) If there was no registration facility anybody could just download the app and connect to your controller - Registration keeps them locked out.


Repeat the above process to de-register a remote/phone if ever required but hold down the 'Speed UP' button for 5 secs this time. Remember that you can have up to a maximum of 4 devices acting as a remote which includes the standalone remote and any additional remotes or phones/tablets etc.


There is also another more complex configuration where the WiFi module can be connected to a router which then opens up the possibility of being able to control the lights via any internet connection around the world.

I was playing with that option and managed to totally lock myself out of the WiFi module....:eek: Power cycling the unit did not help.

I then managed to find a small button which is located on the very LHS of WiFi module. If you hold this button in for 10 secs or so it will reset the WiFi module to its default settings - This allowed me to get it up working again...phew...!

Again - this is not covered in the manual at all so most people would be unaware of its existance.
 

Enjoying this content?

Support TFP with a donation.

Give Support
Thread Status
Hello , This thread has been inactive for over 60 days. New postings here are unlikely to be seen or responded to by other members. For better visibility, consider Starting A New Thread.