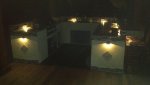
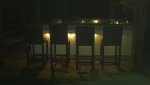
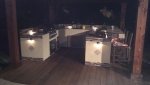
My Outdoor Kitchen build

Stevereno said:
Last one. View from across the pool. Comments and questions are welcomed.
2 questions 1 Request,
1. What did you use for base boards? Is it something prefab or did you built it yourself?
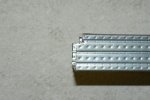
2. What type of sheet rock did you use for skinning?

Request: Post some pictures at night, dying to see how the malibus accent that kitchen!

Geat Job !! Congrats!!
 
mrmiguelrobles -

1. For the base I used 1/2" hardiebacker set on top of some synthetic deck boards, similar to Trex but another brand carried by Lowes. The hardiebacker needs to be raised above the deck/floor level so that it doesn't sit in water.
2. I used 1/4" hardiebacker for all the vertical surfaces (sides, backsplash) and 1/2" hardiebacker for the horizontal surfaces (countertops, bar). If I had it to do over again, I would have used nothing but 1/2" for the whole thing. The 1/4" is too fragile, you have to be very careful not to split it when you are screwing it down near the edges. I learned that the hard way and after replacing a couple of pieces I started pre-drilling those holes to minimize the splits/breaks. That was a real pain as the "backer-on" screws are self-tapping through the hardiebacker and the metal studs you are attaching them to.

I need to take some night pics of the kitchen and the pool. I also still need to buy some overhead lights (plus a ceiling fan) and install them. Should get that taken care of over Christmas holidays.

Thanks for the compliments! It was a lot of work but proud of how it turned out, never had tackled anything remotely similar to this project before.
 
ladsjohn said:
It looks fantastic. How's everything holding up after one season?
How did you reinforce the bar overhang and does it hold up to the leanings of a few drunken cowboys at the bar?
It has held up quite well so far.

For the bar overhang I used some 90 degree framing brackets. I will try to post some pics tonight or tomorrow to illustrate.

After I skinned the frame with Hardiebacker, I tested the strength of the bar by putting all my weight on it and it did not move. I weighed around 225 lbs at the time (now about 20 lbs lighter) so that was probably a pretty good test. :cool:
 
joallen001 said:
Any night time pics. I install a lot of outdoor lighting and would love to see! Also do you have any of the framing dimensions on height, bar height, width, countertop width etc.
Sorry about slow response, have not been monitoring the forum lately.

I have only these pics below taken with my phone, so not the best quality. I still don't have any overhead lights up, keeps getting pushed back for one reason or another.

The countertop is 36" H and 26" W except for the side with the grill and there it is 28" W. The bar is 42" H and 19 1/2" W with approx. 15" overhang. Each section is about 10' long so overall dimensions are roughly 10' x 10'.

[attachment=2:1rcxz730]night1.jpg[/attachment:1rcxz730]

[attachment=1:1rcxz730]night2.jpg[/attachment:1rcxz730]

[attachment=0:1rcxz730]night3.jpg[/attachment:1rcxz730]
 

Attachments

  • night1.jpg
    night1.jpg
    59.1 KB · Views: 269
  • night2.jpg
    night2.jpg
    55.9 KB · Views: 267
  • night3.jpg
    night3.jpg
    71.1 KB · Views: 269

Enjoying this content?

Support TFP with a donation.

Give Support
Really like your step by step pictures. Have not used metal studs. Looking at the 6th picture: Finished the bar, starting countertop. How are the right angles made? The ones that ultimately support the bar top?
 
getrealkc said:
Really like your step by step pictures. Have not used metal studs. Looking at the 6th picture: Finished the bar, starting countertop. How are the right angles made? The ones that ultimately support the bar top?

Here is the process.

1. Cut and flatten one side of horizontal stud to prepare for overlap with vertical stud.

[attachment=2:ibc5twcc]angle1.jpg[/attachment:ibc5twcc]

2. Notch corners of vertical stud as needed to allow flush seating of the horizontal stud.

[attachment=1:ibc5twcc]angle2.jpg[/attachment:ibc5twcc]

3. Cut slot in vertical stud to receive reinforcing angle bracket.

[attachment=0:ibc5twcc]angle3.jpg[/attachment:ibc5twcc]

(continued next post)
 

Attachments

  • angle1.jpg
    angle1.jpg
    53.5 KB · Views: 197
  • angle2.jpg
    angle2.jpg
    41.1 KB · Views: 196
  • angle3.jpg
    angle3.jpg
    55.4 KB · Views: 196
4. Slide studs together along with angle bracket and square them up. I found the angle brackets at Home Depot. I think they were in/near the lumber section.

[attachment=1:qyaxlnhc]angle4.jpg[/attachment:qyaxlnhc]

5. Clamp securely and screw the pieces together. I used 12 screws in each angle joint. After I had the skin (hardiebacker) on, I tested the strength of the bar and it held my weight without flexing at all. I weighed around 225-230 at the time.

[attachment=0:qyaxlnhc]angle5.jpg[/attachment:qyaxlnhc]

NOTES:

a) Grind the screws down on the outside of the end piece so that hardiebacker goes flush against the stud and is not held back by the ends of the screws. I used my angle grinder for this.

b) The angle on the opposite end of the bar is reversed, mirror image so that the solid face is on the outside for attaching the hardiebacker.
 

Attachments

  • angle4.jpg
    angle4.jpg
    54.2 KB · Views: 196
  • angle5.jpg
    angle5.jpg
    63 KB · Views: 196
I just love the outdoor kitchen you created! We live south of Houston and also admire the pavilion and deck you had built. If you do not mind me asking, who did you use? Did you stain the wood or did they do it for you? We thought about putting ours on a slab, but didn't know if it was better to use deck or not. I do like the look of the decking, but I think my husband is thinking down the road with rot. Do you leave the low lights on all the time or turn on/off? We have more than our share of skeeters and probably would have to leave off most of the time. :roll:
 
garden:nut said:
I just love the outdoor kitchen you created! We live south of Houston and also admire the pavilion and deck you had built. If you do not mind me asking, who did you use? Did you stain the wood or did they do it for you? We thought about putting ours on a slab, but didn't know if it was better to use deck or not. I do like the look of the decking, but I think my husband is thinking down the road with rot. Do you leave the low lights on all the time or turn on/off? We have more than our share of skeeters and probably would have to leave off most of the time. :roll:
Thanks for the compliments.

We used Sullivan Construction (Mike Sullivan) out of Magnolia. We got 3 bids based on a very similar pavilion sold through Home Depot. I handled the staining myself, used a product called Ready Seal. Since the pavilion and deck are made of cedar and there is no contact with the ground (posts are anchored on top of concrete footers) they should last quite a long time, especially if I keep up the stain/seal.

The low voltage lights stay off unless we are outside at night. I have them on a controller that will operate on pre-set time or with a light sensor but have it setup for manual on/off via light switch. We do have an arsenal of mosquito repellent candles, tiki torches, etc. to handle those pests when needed. :cool:
 
Thread Status
Hello , This thread has been inactive for over 60 days. New postings here are unlikely to be seen or responded to by other members. For better visibility, consider Starting A New Thread.