My new Black&Decker VSP and DIY pool controller

hexabc

Silver Supporter
Bronze Supporter
Earlier this year I bought a Black & Decker 3HP VSP on poolpartstogo.com and have just finished its integration with the pool.

bd_pump_view_2.png

The pump is quiet and energy efficient. Here are some numbers:

2200 RPM (priming only) - 2.2A, 530W
1800 RPM (cleaning and/or intensive skimming) - 1.3A, 310W
1600 RPM (normal speed for chlorinating, 80% of running time) - 1A, 240W

Compare these numbers to my previous single-speed Jandy PHPM1.0, running always at 3450 RPM and consuming 1600 watts! When B+D is not running, its VSD drive draws 100mA, which is about 24W.

The controller is pretty simple. It runs node-red flows on Raspberry Pi with two Sequent Microsystems HATs: Building Automation and Eight Relays. High-power devices (Circupool RJ-60 SWCG and Polaris PB4-60 pump) are switched with Omron G7 relays installed in a separate relay box. Low-power contacts, such as for controlling B+D pump, are switched directly by the Eight Relays HAT.

stand_view_2.png

An important part of the controller is the current transducer Senva C-2344. I have set it to 30A range and wired inside the electrical subpanel with 3 wraps of one of the lines off 20A 2-pole GFCI breaker feeding the B+D pump, so the transducer converts 0 - 10A current to 0 - 10V voltage, which is passed to one of 0 - 10V inputs (analog to digital converters) of the Building Automation HAT.

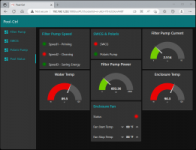
The transducer is pretty precise, with the output very close to the one derived from the B+D display by dividing power by 240V (or whatever voltage one has between the two lines ;)). The output from the transducer is used by the node-red flows to provide a safety mechanism preventing SWCG and Polaris booster pump from running when B+D pump is not running at appropriate speed. Here is a screenshot of the dashboard's Pool Status panel (the water temperature 10k sensor is not inserted into the pipe yet, it shows the air temperature):

cleaning.png

Now a couple of notes on the B+D automation panel. The original panel is swapped with the automation one, which allows for 1) BAU programming of speeds 2) remote selection of one of the three preset speeds. The programming of speeds is easy: set mode to manual, press speed1 button and set it to a desired value, press speed2 and set the value, and so on. The speeds programmed this way are remembered after power disconnect. The speeds can be modified when the panel is in manual mode, but only if the pump is not currently running. (BTW, the manual mode is the only valid mode with the automation panel.)

One more thing, which is not mentioned in the automation manual.

BD_automation.png

The priorities of inputs in the above diagram, from the highest to the lowest, are: IN1, IN2, IN3. This allows for multiple speeds to be scheduled at the same time, the highest priority input being effectively selected. To lower the number of entries in the schedule, we can superimpose higher priority speeds on top of the lower ones, like in the schedule below:

schedule.png

Controller features:
[EDITED 9/30/2023]
  • VSP scheduling at three preconfigured speeds, with one-click schedule disabling/enabling:
    • priming (Speed1 = 2200 rpm)
    • cleaning (Speed2 = 1800 rpm)
    • chlorinating (Speed3 = 1600 rpm)
  • SWCG scheduling, with one-click schedule disabling/enabling.
  • Polaris pump scheduling, with one-click schedule disabling/enabling.
  • Allowing the user to manually start/stop the VSP (for any of the preconfigured speeds), Polaris pump and SWCG.
  • Monitoring the VSP speed with a current transducer.
  • Preventing the user and the scheduler from starting the Polaris pump when the VSP current transducer doesn't report Speed2.
  • Automatic stopping of the Polaris pump if the VSP current transducer stops reporting Speed2.
  • Preventing the user and the scheduler from starting SWCG if the VSP current transducer doesn't report any speed (reports just a 140mA standby current).
  • Automatic stopping of SWCG when the VSP current transducer stops reporting any speed (reports just a 140mA standby current).
  • Measuring pool water temperature.
  • Measuring enclosure temperature.
  • On-off controlling, with temperature hysteresis, of the enclosure fan.
  • Charting temperatures of water, controller enclosure and Raspberry Pi CPU for the last 12 hours.
  • Sending an email alarm when the VSP current exceeds expected values, indicating, for example, an obstruction in water flow.
  • Sending an email alarm when the VSP current is close to 0, which may indicate a tripped circuit breaker.
  • Sending "alarm cleared" email when the VSP current returns to normal levels.
  • Secure, password protected and TLS-encrypted Internet-wide UI.

A link to this project's public repository on github:
[GitHub - hexabc/pool-ctrl: Raspberry Pi / node-red based pool controller]
 

Attachments

  • cleaning_2.png
    cleaning_2.png
    6.5 KB · Views: 55
Last edited:
I love the dashboard - I use Wireless Tags for pool temp and I'm just about to replace the old single speed Hayward with a similar VSP pump. I also have a couple of Raspberry PIs hanging around ;)
 
Cool project. The use of a current sensor is interesting, don't remember anyone else doing that.

I have a fairly large node red program running parts of my smart home stuff, really like it.

Impressed by how neat your wiring is, my wiring is embarrassing by comparison, but it works.

Did you use anything special to make your dashboard? I don't know how to make fancy looking screens like that with NR, I've only made very basic ones.

One suggestion when you install your temp sensor, try to install somewhere in the shade. The sun heats the pipes during the day, can throw temps off.

Congrats
Randy
 
I love the dashboard - I use Wireless Tags for pool temp and I'm just about to replace the old single speed Hayward with a similar VSP pump. I also have a couple of Raspberry PIs hanging around ;)
The beauty of the node-red dashboard is that you get it for free. Basically, user interface "widgets" are also nodes and are components of flows! Nothing new to learn once you get the hang of node-red. All nodes that I utilized in this project are available in public repositories, accessible directly from the node-red web editor, for example excellent Sequent Microsystems nodes for their Raspberry Pi HATs, or a great scheduler node-red-contrib-ui-time-scheduler.
 
Cool project. The use of a current sensor is interesting, don't remember anyone else doing that.

I have a fairly large node red program running parts of my smart home stuff, really like it.

Impressed by how neat your wiring is, my wiring is embarrassing by comparison, but it works.

Did you use anything special to make your dashboard? I don't know how to make fancy looking screens like that with NR, I've only made very basic ones.

One suggestion when you install your temp sensor, try to install somewhere in the shade. The sun heats the pipes during the day, can throw temps off.

Congrats
Randy
Thanks Randy.
Long, long time ago I worked as a control engineer in an oil refinery during its startup. So I might had acquired this wiring neatness OCD back then... :)

The user interface is based on node-red-dashboard. It's actually very basic.

It seemed like a good idea to give node-red an authoritative feedback on the pump's currently running speed, and the Senva transducer is a good match for the building automation HAT's 0-10V inputs. I bought it here: C-2344 | Analog 0-10VDC, 30/60/120A, split core | Senva Sensors.

Thanks,
Jerzy
 
Last edited:
The beauty of the node-red dashboard is that you get it for free. Basically, user interface "widgets" are also nodes and are components of flows! Nothing new to learn once you get the hang of node-red. All nodes that I utilized in this project are available in public repositories, accessible directly from the node-red web editor, for example excellent Sequent Microsystems nodes for their Raspberry Pi HATs, or a great scheduler node-red-contrib-ui-time-scheduler.
OMG - I so did not need another Nerd project...but I can feel the siren call of a new time-sink.... LOL
 
  • Haha
Reactions: Newdude
Nice! Just got my Calimar pool pump installed today but my automation board is on backorder. Was thinking of doing something extremely similar with an ESP32 and Home Assistant.

Unfortunately, the user manual for the automation board is extremely confusing to me for some reason. What is the difference between scheme 1 and scheme 2? Is it one or the other, or both?

If I wanted to just turn the pump on and off with the relays at certain times (determined elsewhere, not by the pump times), would that be possible?
 
Manual is confusing, it seems like with scheme 2, when you close the relay to IN4, pump will start at Speed 1 for the programmed time, then go to Speed 2 for the programmed time, then to 3 and 4.
My guess is the pump will stop when you open the relay, so if you program Speed 2 for long enough, it would only go to Speed 1 and 2. Seems like you would want to set Speed 1 for a short time at high speed to prime the pump.

With scheme 1, close relay 1 to set to speed 1. Seems like it will run for the programmed time, and it looks like it wants a pulse there, to close the relay and open it a short time later.
"IN1/IN2/IN3 is controlled by external relays. After the relay is opened and closed, the running time corresponding to the speed can be realized."

Scheme 1 is strange if this is how it really works. With my Hayward, you close the relays and it starts up, primes and then goes to the speed you've choosen.

Good luck
Randy
 
  • Like
Reactions: tidnab

Enjoying this content?

Support TFP with a donation.

Give Support
Nice! Just got my Calimar pool pump installed today but my automation board is on backorder. Was thinking of doing something extremely similar with an ESP32 and Home Assistant.

Unfortunately, the user manual for the automation board is extremely confusing to me for some reason. What is the difference between scheme 1 and scheme 2? Is it one or the other, or both?

If I wanted to just turn the pump on and off with the relays at certain times (determined elsewhere, not by the pump times), would that be possible?
I'm a bit confused on how the interface works with Wifi relays myself. Check out the link below. @FloridaGary may be able to help you out.

 
Nice! Just got my Calimar pool pump installed today but my automation board is on backorder. Was thinking of doing something extremely similar with an ESP32 and Home Assistant.

Unfortunately, the user manual for the automation board is extremely confusing to me for some reason. What is the difference between scheme 1 and scheme 2? Is it one or the other, or both?

If I wanted to just turn the pump on and off with the relays at certain times (determined elsewhere, not by the pump times), would that be possible?
Yes, the automation brochure is not very clear, to say the least.

Scheme 1 allows for external starting/stopping of any of the three pre-programmed speeds. The speeds are pre-programmed with the pump automation panel (the way I described in my post above). But the time of starting/stopping is programmed in your pool controller, which closes/opens controller-provided contacts connected to IN1, IN2 and IN3 terminals of the pump automation panel. The IN1, IN2, IN3 terminals correspond to Speed1, Speed2, Speed3 speeds. The values of those speeds cannot be set by your pool controller. To implement scheme 1, just make the connections as depicted in the diagram "Remote control scheme 1".

Scheme 2, to me, is not very useful. Basically, it allows for external starting/stopping of the whole schedule consisting of multiple triples (start time, duration, speed) preprogammed with the pump automation panel.

Back to scheme 1. As I mentioned in the post, the speeds have priorities, determined by the pump automation panel's input terminals to which the controller contacts are connected. This allows for a very concise schedule, where the background Speed3 (a single schedule entry, let's say from 8am to 8pm) is overriden by Speed2 intervals (pool cleaning, which may coincide with a Polaris schedule or just work as intensive skimming periods), and Speed2 is overriden by Speed1 (pump priming from 8am to 8:03am).
 
Last edited:
I'm a bit confused on how the interface works with Wifi relays myself. Check out the link below. @FloridaGary may be able to help you out.

With scheme 1, I think the correct approach is to have 3 independent schedules, one per each speed. Basically, we can treat those 3 speeds as three pumps. Then, utilizing IN1, IN2, IN3 priorities (see my post), WiFi relays can be programmed in a simple, non-confusing way.
 
  • Like
Reactions: SJPoe
Back to scheme 1. As I mentioned in the post, the speeds have priorities, determined by the pump automation panel's input terminals to which the controller contacts are connected. This allows for a very concise schedule, where the background Speed3 (a single schedule entry, let's say from 8am to 8pm) is overriden by Speed1 (pump priming from 8am to 8:03am) and by Speed2 intervals (pool cleaning), which may coincide with a Polaris schedule or just work as intensive skimming periods.
This makes sense. My DIY automation (link in sig) uses an Intellicom 2 Interface Adapter that allows the use of digital inputs for control of my Pentair IntelliFlo VS. I simply use Alexa Routines for control/programming of pump speeds and schedules (in addition to valve actuators. SWG, and spa blower). It works for me, but as I mentioned in my earlier post, I wish I had the ability to do what you did.

Great Job!
 
That's really slick, @hexabc ! (I had to skim this just now, but will come back to read the whole thread).

I've had my eye on that B+D pump, but since I did my own automation and re-wiring of my manual two-speed pump, it's a low priority.
I've never heard of Node-Red until now. I'll have to learn more.
My system is controlled by a RPi, with custom code in Python using Flask. It only controls the pump now, but I could imagine it it growing. I have considered adding temp and pH sensors, but a good pH sensor is expensive-ish, and still basically a consumable when used full time.

I'll have to do my own write-up one of these days.

(Edit: Having read everything now)
Yeah, this is nice. I was not familiar with Sequent. I'll keep them in mind for my next project like this, or maybe the next iteration of this one.
I used a breakout board to make the GPIO pins on the RPi Zero W more easily usable, and an 8 relay board that accomplished a similar end. Cheaper, but not as nice to integrate, and doesn't provide as much functionality as that Building Automation HAT.

My objective was to take my manual two-speed pump (controlled by a DPDT rocker switch on the wire box) and 'upgrade' it to be scheduleable where the scheduler could also select High and Low, while retaining local manual control, and providing a web UI for a phone.

The above, plus a 24 VAC transformer, a 20-30A contactor, a 20-30A relay, and a handful of push buttons and LED and some 3d printed brackets and DIN rails produced something that has been useful and fun :) The project spent a while in the cogitation phase, and at one point (after spotting that B+D pump, or one of its siblings), I almost just bought a pump that could do the most important bits, plus save me some energy. But then I looked at the pile of bits I'd been slowly accumulating and said, "Nope! I'm buildin' that sucker!"

I'm not exactly retired, but I did quit my last job back in February, and was in 'sabatical' mode during the assembly and programming phase.
 
Last edited:
Good day, hexabc.
I am impressed with the clean setup and your ability to create this DIY Pool Controller. I am very interested in creating my own. I have read on various projects but your seems to be the simplest and the clearer of all. I am not a programmer or a RP power user at all. I hardly understand the concept but I am willing to go for my own DIY Pool Controller.
I have a split situation. Pool and Spa.
The Existing equipment in the Pool is simple:
2 HP B&D VSP - purchased the automation Controller for this pump.
Gas Heater (not working at this moment -too old to rebuild and they are too expensive to purchase one.
The Spa has a Blower and intake and return valve actuators
1 Light on the Pool and 1 Light on the spa (both turn on at the same time)

My goal is ambitious but I think that If I can be mentored I can achieve it with time. My goal is:
Control the Pump from the DIY Controller
Control the Spa
Control the lights
Control the Heater and automate its use when a temperature is set.
Control the lights in the Pool and the Spa
Control the lights surrounding the Pool Enclosure.
I would like control the chemicals dosing and monitor the chemical balance in the Pool (Muriatic Acid and Chlorine)
I know it is a lot but I think your Controller could take care of 90% of what I would like to do except the Pool dosing.

I have already purchased:
Enclosure
Raspberry Pi 4B
SD Card
Sequent automation HAT for Raspberry PI version 4
Sequent 8 Relays Hat
A NDR 120-24 Power Supply

I have installed raspian on the RP and I will start looking at your project to install the remaining applications.
Is there a way I can be in communication with you - I know I have tons of questions. I am willing to learn and do. Failure is not an option but I can start all over again as many times as needed. I just need help in the process. I am a windows guy and know very little to nothing on Linux.
I need your help if possible.
In your explanation there is a few things I did not understand:
"An important part of the controller is the current transducer Senva C-2344. I have set it to 30A range and wired inside the electrical subpanel with 3 wraps of one of the lines off 20A 2-pole GFCI breaker feeding the B+D pump, so the transducer converts 0 - 10A current to 0 - 10V voltage, which is passed to one of 0 - 10V inputs (analog to digital converters) of the Building Automation HAT"

Right now my Pool Pump is wired from the Breaker directly to where to the Pump. Do I need to purchase this transducer? If it is needed I will order it as soon as you confirm it is needed.


I will greatly appreciate your response.
 
The pool controller is powered from a separate 120V GFCI circuit breaker - Siemens' QPF2. In the US, the nominal voltage is 120 / 240V, that's why the power supply is marked as SDR 120-24 (120V input, 24 V output).
The range of the input voltage for SDR 120-24 is 100-240V. 240V could be too high, as the nominal 240V from the power grid could actually be 240V +/-10%.
 
Good day, hexabc.
I am impressed with the clean setup and your ability to create this DIY Pool Controller. I am very interested in creating my own. I have read on various projects but your seems to be the simplest and the clearer of all. I am not a programmer or a RP power user at all. I hardly understand the concept but I am willing to go for my own DIY Pool Controller.
I have a split situation. Pool and Spa.
The Existing equipment in the Pool is simple:
2 HP B&D VSP - purchased the automation Controller for this pump.
Gas Heater (not working at this moment -too old to rebuild and they are too expensive to purchase one.
The Spa has a Blower and intake and return valve actuators
1 Light on the Pool and 1 Light on the spa (both turn on at the same time)

My goal is ambitious but I think that If I can be mentored I can achieve it with time. My goal is:
Control the Pump from the DIY Controller
Control the Spa
Control the lights
Control the Heater and automate its use when a temperature is set.
Control the lights in the Pool and the Spa
Control the lights surrounding the Pool Enclosure.
I would like control the chemicals dosing and monitor the chemical balance in the Pool (Muriatic Acid and Chlorine)
I know it is a lot but I think your Controller could take care of 90% of what I would like to do except the Pool dosing.

I have already purchased:
Enclosure
Raspberry Pi 4B
SD Card
Sequent automation HAT for Raspberry PI version 4
Sequent 8 Relays Hat
A NDR 120-24 Power Supply

I have installed raspian on the RP and I will start looking at your project to install the remaining applications.
Is there a way I can be in communication with you - I know I have tons of questions. I am willing to learn and do. Failure is not an option but I can start all over again as many times as needed. I just need help in the process. I am a windows guy and know very little to nothing on Linux.
I need your help if possible.
In your explanation there is a few things I did not understand:
"An important part of the controller is the current transducer Senva C-2344. I have set it to 30A range and wired inside the electrical subpanel with 3 wraps of one of the lines off 20A 2-pole GFCI breaker feeding the B+D pump, so the transducer converts 0 - 10A current to 0 - 10V voltage, which is passed to one of 0 - 10V inputs (analog to digital converters) of the Building Automation HAT"

Right now my Pool Pump is wired from the Breaker directly to where to the Pump. Do I need to purchase this transducer? If it is needed I will order it as soon as you confirm it is needed.


I will greatly appreciate your response.
I will be happy to answer your questions.

There were several reasons I did not decide to go with a full-blown, configurable soliution - nodejs-poolController or its offshoot nixie.
First, my pool is very simple. Second, although node-red was new to me, I was in the programming business longer than I care to admit :) Third, I needed a quick solution.

An ad-hoc node-red controller was perfect in my situation - I got a working off-line prototype within a week.

You can still consider going with the nixie - there are several members who did just that. The advantage would be that it's configurable - you do not have to write any code when adding new equipment, such as heaters, actuators, lights, etc. With an ad-hoc solution like my controller, a new piece of equipment requires adding a new node-red flow. Although it's usually a simple task, you need to know how to do that.

To answer your question about the current transducer... It's role is to provide a reliable feedback that the VSP is running at a selected speed. The VSP is powered from the circuit breaker and the transducer just measures the current flowing through the feeding wire. The feedback is useful for two reasons. First, it allows to implement safety mechanisms, such as preventing the SWCG and Polaris booster pump from running when the filter pump is not running. Second, the fact that the pool controller's scheduler or a button sent a command to the pump to change its speed doesn't mean that the pump actually executed the command. Ultimately, it's the output from the transducer, interpreted by node-red, that determines the current state of the pump.
 
Last edited:

Enjoying this content?

Support TFP with a donation.

Give Support