
- Jun 13, 2013
- 224
Hey all...thought I'd share this. It's probably a long post (and is still an experiment in progress, so I *will* follow up with details as it progresses) but I thought it could be useful to those looking to go with automatic liquid chlorine injection, but don't want to spend hundreds on a professional system.
Like many here I'm not big on pucks. I'll use them when we're going away for a weekend because there's few other options, and I hate bugging friends to come do my pool maintenance. And of course, one slip up or forgotten visit to add chlorine and I end up with a frog pond. I keep my pool quite warm with solar (90-91) so chlorine demand can get up there, and with direct sun for many hours a day, it can bleed off quickly. My CYA is 30, and in my comfort zone, leaving me some room for occasional puck use.")
But, I wanted to add a basic level of automation to things. Yes, it's not an excuse for still maintaining and checking manually, but it's a backup - I've almost forgot a few times to add the morning and evening liquid chlorine doses and it's only a matter of time before I slip up and end up fighting an algae bloom.
So....I was on the hunt for a peristaltic pump...but being in Canada the prices were high at retail, and anything used I was finding was on eBay after shipping costs would have ended up being unreasonable for me...or worse yet, taking a chance on an "as is" type deal (as many peristaltic pumps seem to be on eBay) could have backfired and I end up out a bunch of money.
So I started Googling for cheap liquid/chemical pumps, and came across a bunch of references on aquarium forums for the "Aqua Lifter AW-20" by TOM equipment. I was hesitant initially figuring the chlorine may eat the internals, but it was listed in many places as designed for "chemical dosing" usage for aquariums, and with a price of only $21 at my local aquarium shop I thought I'd give it a shot.
So, a project was hatched. PIctures of the current "quick and dirty" setup - if it works out I'll tidy up the install and make it more permanent, but I didn't want to spend an inordinate amount of time with a fancy/tidy setup for something that may need to be changed or tweaked in the coming weeks.
The pump:
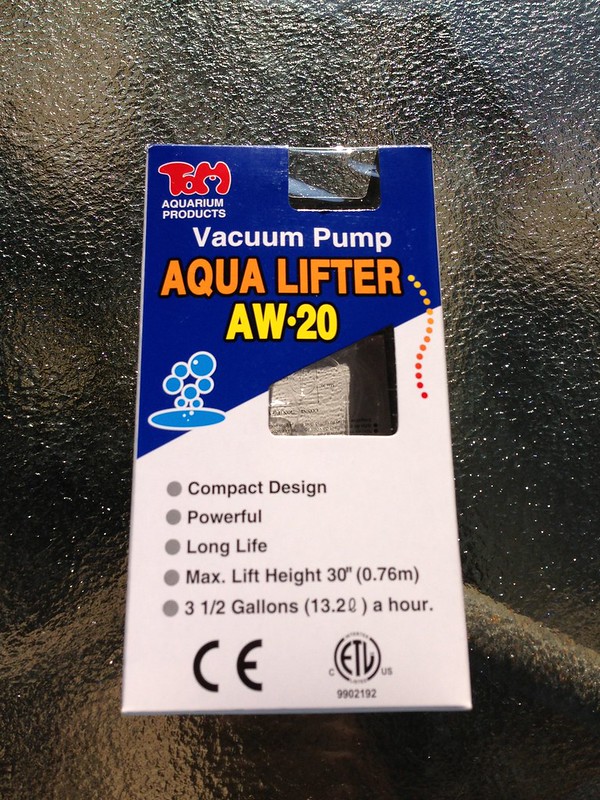

As you can see...it's small. Best as I can figure (based on parts availability) it's very similar internally to an aquarium pump except that it's plumbed for both inlet and outlet. The pump itself does appear to be rubber so longevity may be the big question, but a few days of initial testing have proven it resistant to liquid chlorine so far. I have plumbed it with chlorine tolerant tubing.
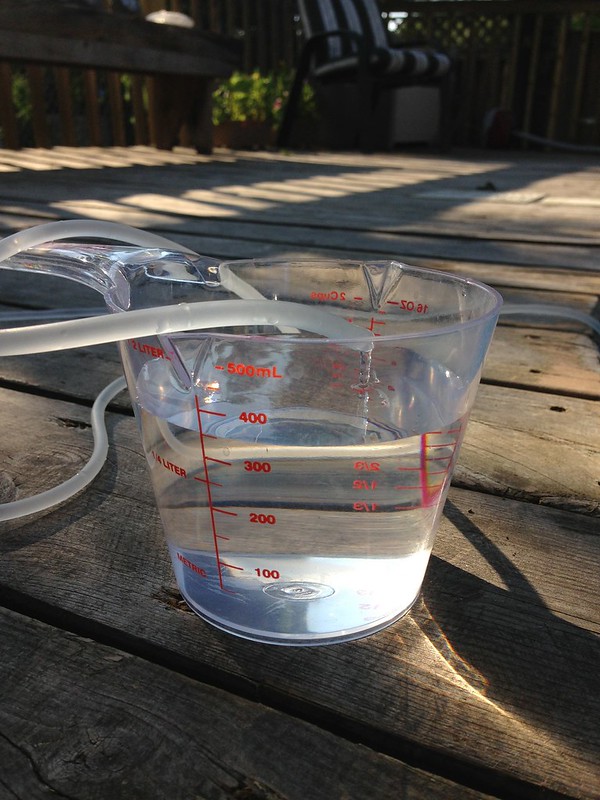
So, I hooked it up today and tested it's flow rate which conveniently came to exactly 100ml/minute. That makes dosing calculations easy. Your mileage may vary, it's rated for twice the flow rate versus my testing, but I attribute it to the fairly long hose run I have (probably 20 or so feet), so testing is necessary to confirm and time injection cycles accordingly.
One thing I noted is that the flow WILL SIPHON through the pump if the tank is higher than the pump. Don't ask me how I found this out initially, but thankfully it didn't end in disaster. Keeping the pump ABOVE the chlorine supply is absolutely necessary for this pump in particular!
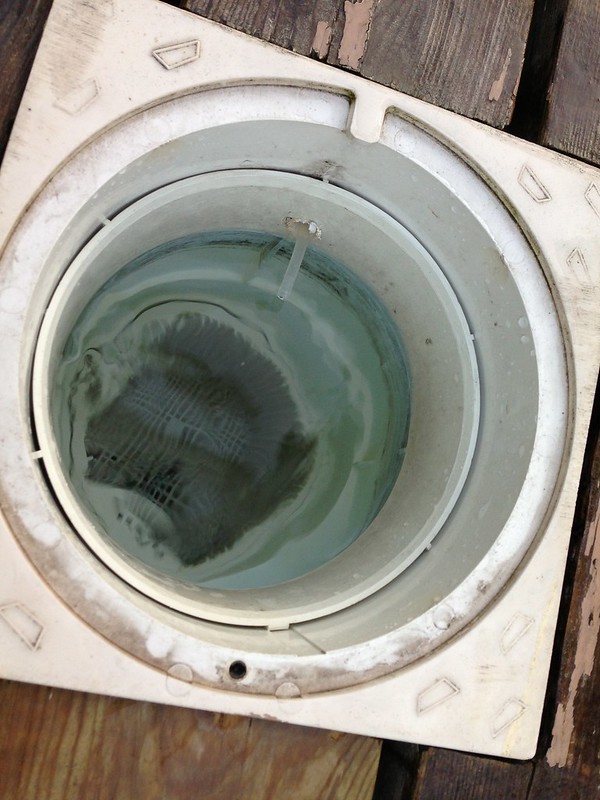
So, continuing, I drilled a small hole in my skimmer above the water line and ran the feed line from the pump, securing it with hot glue. (Yes, my skimmer needs a good scrubbing. Out of sight, out of mind.. ) Thankfully the underside of my skimmer is exposed under decking so this was a viable spot for me to basically "drip inject" into. Your mileage may vary, but timed carefully (to ensure my pump is running whenever injection happens) this was a viable spot for me. More on that later.
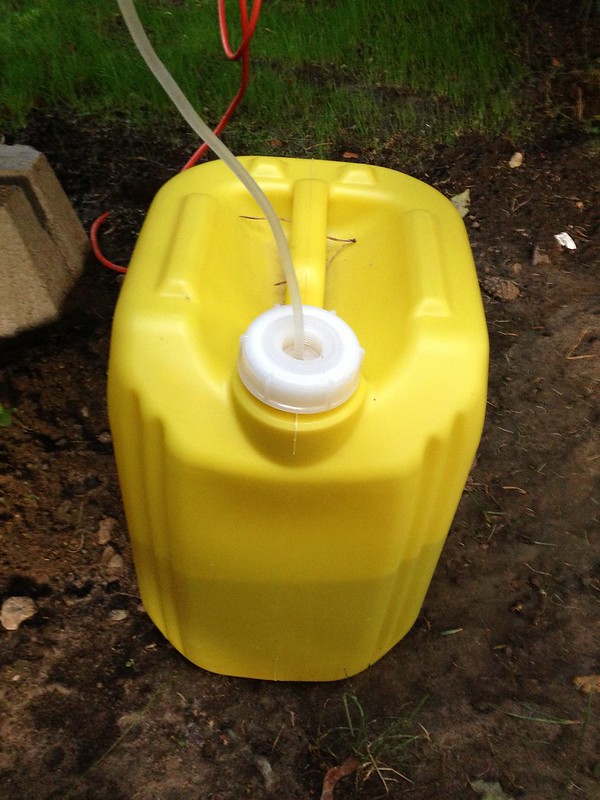
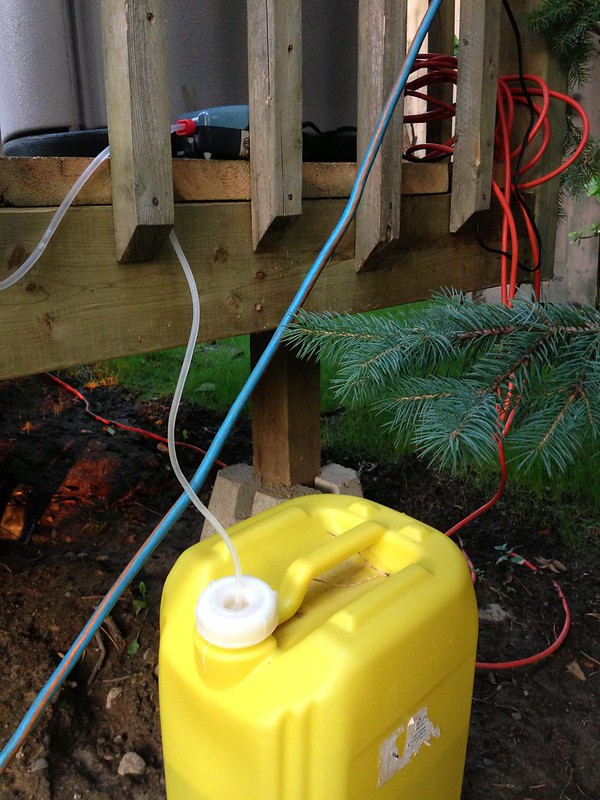
Again, as mentioned earlier, quick and dirty for now, I ran the lines and situated my chlorine container in an out of the way area (with little/no sun) under the back edge of my deck. I drilled a small hole in the lid (obviously I'll need a new one now, or a plug, for when I transport the jug to/from the pool store to refill) to run the feed line. I weighted the feed line to ensure it sat on the bottom as initially it wanted to float and sucked air.

Again, I temporarily setup the pump out in the open. I will tuck it carefully away in the cabinet in the picture before weather arrives, although in all honestly, it looks pretty waterproof - it is designed for aquarium use so although it's obviously not submersible, it's probably reasonably waterproof. However, if this project works out I will certainly tidy up the install - run the plumbing neatly under the deck, make a bracket or something to hold the chlorine jug (although this section of my yard is basically a dead zone, no activity goes on there), and put the pump inside the cabinet in this pic..
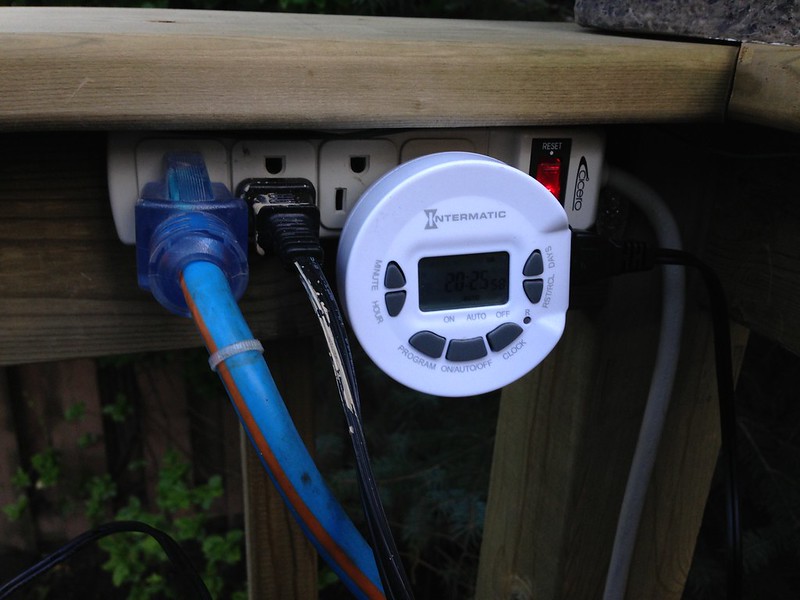
Last but not least, and most importantly, a good high end electronic timer with multiple on/off program cycles. I've used this timer for a year or so now to do a nightly reset on my DVR security system and it's worked perfectly, so I trust it. Best of all it had 20 programmable on/off cycles (at as little as 1 minute each) per day so it's very versatile and suitable for turning the pump on/off for small doses of chlorine through the day to maintain levels. It also has a built in battery backup to maintain programming. Yes, I know it's NOT waterproof, but again..quick and dirty at this point - it will be tucked away in the waterproof cabinet before weather is expected next.
So, I programmed it initially with 4 dispensing cycles. Each cycle corresponds to when my pump (which is also on a timer) is running to ensure that the chlorine is promptly picked up and mixed. The pool filter pump runs for at least 15 minutes before chlorine injection starts, and runs for at least 45 minutes after each injection cycle ends...so there's NO worry about any chlorine damaging the liner near the skimmer from building up too strong. Yes, I understand how absolutely important it is that the pump runs when injection is occurring, and I take no responsibility for anyone destroying their liner trying this project and screwing up the timing. For those who run their pumps 24/7 this obviously isn't a worry, but if you use a filter pump timer like me for whatever purpose, careful timing is an absolute necessity obviously!
So far, so great - instead of my usual peaks and valleys of chlorine levels the system (which is injecting metered doses about 4 times per day now) is maintaining levels much more consistent, and best of all, I can go away for a day or two now without fear of coming home to a green disaster. Adjusting the duration of the injection cycles will require some homework still - as the weather changes my current settings may end up with too much or too little chlorine being injected, so obvioully it's not a "set it and forget it" solution, but at least I can go to work in the morning now and not have to freak out if I forgot to glance at the pool before leaving.
Worst case scenario, I'm out about $25 if the pump fails in short issue (because of with Chlorine intolerance) and I abandon the project. Rebuild kits for this pump are fairly inexpensive, so even if I need to rebuild it once or twice a season I'll still be happy.
Thoughts/Comments?
Like many here I'm not big on pucks. I'll use them when we're going away for a weekend because there's few other options, and I hate bugging friends to come do my pool maintenance. And of course, one slip up or forgotten visit to add chlorine and I end up with a frog pond. I keep my pool quite warm with solar (90-91) so chlorine demand can get up there, and with direct sun for many hours a day, it can bleed off quickly. My CYA is 30, and in my comfort zone, leaving me some room for occasional puck use.
But, I wanted to add a basic level of automation to things. Yes, it's not an excuse for still maintaining and checking manually, but it's a backup - I've almost forgot a few times to add the morning and evening liquid chlorine doses and it's only a matter of time before I slip up and end up fighting an algae bloom.
So....I was on the hunt for a peristaltic pump...but being in Canada the prices were high at retail, and anything used I was finding was on eBay after shipping costs would have ended up being unreasonable for me...or worse yet, taking a chance on an "as is" type deal (as many peristaltic pumps seem to be on eBay) could have backfired and I end up out a bunch of money.
So I started Googling for cheap liquid/chemical pumps, and came across a bunch of references on aquarium forums for the "Aqua Lifter AW-20" by TOM equipment. I was hesitant initially figuring the chlorine may eat the internals, but it was listed in many places as designed for "chemical dosing" usage for aquariums, and with a price of only $21 at my local aquarium shop I thought I'd give it a shot.
So, a project was hatched. PIctures of the current "quick and dirty" setup - if it works out I'll tidy up the install and make it more permanent, but I didn't want to spend an inordinate amount of time with a fancy/tidy setup for something that may need to be changed or tweaked in the coming weeks.
The pump:
As you can see...it's small. Best as I can figure (based on parts availability) it's very similar internally to an aquarium pump except that it's plumbed for both inlet and outlet. The pump itself does appear to be rubber so longevity may be the big question, but a few days of initial testing have proven it resistant to liquid chlorine so far. I have plumbed it with chlorine tolerant tubing.
So, I hooked it up today and tested it's flow rate which conveniently came to exactly 100ml/minute. That makes dosing calculations easy. Your mileage may vary, it's rated for twice the flow rate versus my testing, but I attribute it to the fairly long hose run I have (probably 20 or so feet), so testing is necessary to confirm and time injection cycles accordingly.
One thing I noted is that the flow WILL SIPHON through the pump if the tank is higher than the pump. Don't ask me how I found this out initially, but thankfully it didn't end in disaster. Keeping the pump ABOVE the chlorine supply is absolutely necessary for this pump in particular!
So, continuing, I drilled a small hole in my skimmer above the water line and ran the feed line from the pump, securing it with hot glue. (Yes, my skimmer needs a good scrubbing. Out of sight, out of mind..
Again, as mentioned earlier, quick and dirty for now, I ran the lines and situated my chlorine container in an out of the way area (with little/no sun) under the back edge of my deck. I drilled a small hole in the lid (obviously I'll need a new one now, or a plug, for when I transport the jug to/from the pool store to refill) to run the feed line. I weighted the feed line to ensure it sat on the bottom as initially it wanted to float and sucked air.
Again, I temporarily setup the pump out in the open. I will tuck it carefully away in the cabinet in the picture before weather arrives, although in all honestly, it looks pretty waterproof - it is designed for aquarium use so although it's obviously not submersible, it's probably reasonably waterproof. However, if this project works out I will certainly tidy up the install - run the plumbing neatly under the deck, make a bracket or something to hold the chlorine jug (although this section of my yard is basically a dead zone, no activity goes on there), and put the pump inside the cabinet in this pic..
Last but not least, and most importantly, a good high end electronic timer with multiple on/off program cycles. I've used this timer for a year or so now to do a nightly reset on my DVR security system and it's worked perfectly, so I trust it. Best of all it had 20 programmable on/off cycles (at as little as 1 minute each) per day so it's very versatile and suitable for turning the pump on/off for small doses of chlorine through the day to maintain levels. It also has a built in battery backup to maintain programming. Yes, I know it's NOT waterproof, but again..quick and dirty at this point - it will be tucked away in the waterproof cabinet before weather is expected next.
So, I programmed it initially with 4 dispensing cycles. Each cycle corresponds to when my pump (which is also on a timer) is running to ensure that the chlorine is promptly picked up and mixed. The pool filter pump runs for at least 15 minutes before chlorine injection starts, and runs for at least 45 minutes after each injection cycle ends...so there's NO worry about any chlorine damaging the liner near the skimmer from building up too strong. Yes, I understand how absolutely important it is that the pump runs when injection is occurring, and I take no responsibility for anyone destroying their liner trying this project and screwing up the timing. For those who run their pumps 24/7 this obviously isn't a worry, but if you use a filter pump timer like me for whatever purpose, careful timing is an absolute necessity obviously!
So far, so great - instead of my usual peaks and valleys of chlorine levels the system (which is injecting metered doses about 4 times per day now) is maintaining levels much more consistent, and best of all, I can go away for a day or two now without fear of coming home to a green disaster. Adjusting the duration of the injection cycles will require some homework still - as the weather changes my current settings may end up with too much or too little chlorine being injected, so obvioully it's not a "set it and forget it" solution, but at least I can go to work in the morning now and not have to freak out if I forgot to glance at the pool before leaving.
Worst case scenario, I'm out about $25 if the pump fails in short issue (because of with Chlorine intolerance) and I abandon the project. Rebuild kits for this pump are fairly inexpensive, so even if I need to rebuild it once or twice a season I'll still be happy.
Thoughts/Comments?
