Materials for an island.

Let me try this idea.

Say I built a box out of 2x4's 5 feet long x 2 feet wide and 3 feet high

And I wanted to use exterior based siding (Its very thin). Should I use a stronger plywood (1/2 inch or 3/8) underneath on the sides to make it more sturdy. Possibly wrap in tyvex before adding the exterior siding? The floor and top would be 3/4 plywood.

Just need to figure out how to make doors and drawers. Any help on that would be great. For the top I still do not know what to use. Will just put a piece of 3/4 plywood on it for now that gives me a 2 inch lip all around and paint it for now I guess.
 
A few recommendations for a project like this:

1) If you use pressure treated lumber, use kiln-dried PT. They usually don't sell it at the box stores, but a lumberyard should have it. But KD will be more stable and less prone to twisting as it dries out than the much wetter PT they sell at the box stores.

2) If you use a cement board to skin the structure, use a true cement board; Durock or Wonderboard. Do not use Hardie. Hardie is not rated for exterior use. Durock is a little easier to cut and use than WonderBoard, they are both available in the box stores in my area of CT. They are usually in the flooring area with the tile, they come in 3' by 5' sheets.

http://www.homedepot.com/p/DUROCK-N...-Cement-Board-172965/202263276#specifications

3) Tile adhesive. Use a true thinset, it comes in powdered form in bags. You add water to it. Do not use any sort of mastic, or anything "premixed" that comes ready-to-use in a resealable plastic tub. Those plastic tub adhesives are different versions of mastic. And mastic is water soluble. Not something you'd want to use on an exterior project. :hammer:

For exterior use, use a highly modified thinset. Example, at HD, their thinset is by Custom. They sell an unmodified thinset (MasterBlend) for about $10 a bag, a lightly modified thinset (VersaBond) for about $15-20 a bag, and a highly modified thinset (FlexBond) for about $25-$30 a bag. Go with the Flexbond since this will be exterior use in a freeze/thaw climate and it will be movable. As an alternative you could use the unmodified thinset (MasterBlend) and instead of adding water, use a latex admix in place of water to modify the thinset on your own.

http://www.homedepot.com/p/Custom-B...d-Thin-Set-Mortar-FB50/100122448#.UgU0uFOXIrU

4) Grout. If you really want bulletproof/stainproof, you could use an epoxy-based grout. If you go with a regular cement-based grout, consider using a darker grout color. Even if you seal it it'll eventually stain. Darker colored grouts show stains less than lighter colors.

5) Home Depot does have exterior or outdoor-rated tile. You probably just have to do the research yourself. Start with the porcelain tiles.

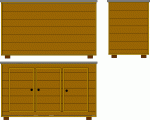
If I was building a mobile island on casters, I'd:

a) make the frame, then

b) skin it with 1/2" plywood at a minimum, 3/4" is better. Screw and PL adhesive the plywood to the wood frame. Then mark out your openings for doors and storage bays and cut out the ply with a circular saw.

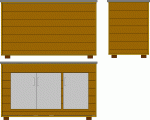
c) wrap it with tar paper. Staple it to the ply.

d) Now skin the exterior with cement board, going right over the tar paper. Do not use Hardie (which is fiber-cement), use Durock or Wonderboard, which are true cement boards. 1/4" thick board is okay since it will be fully backed by the plywood. Use screws to fasten the cement board to the plywood.

e) Tile over the cement board using a highly modified thinset.

A concern for me is the weight of this fully tiled and stone/concrete-topped unit on a deck. Pretty heavy. You could lighten the load by using something like T-111 (sold 4' x 8' sheets in the plywood section at HD) as your decorative wood siding screwed and PL'd directly on to the wood frame. Then use a stone or a concrete top.

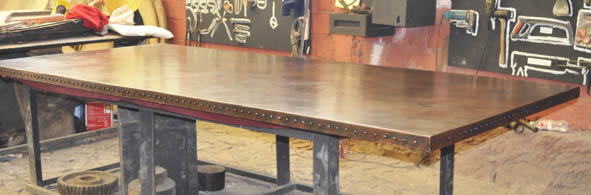
Thin-gauge metal tops. Yes, you can laminate sheet copper or some other thin gauge metal on the top of the unit. It's usually done with contact cement. Do be aware that the heat of a hot pot could delaminate the metal top off from the plywood substrate. So you could choose to just let the metal top float over the plywood with no adhesive and have the metal top be held in place by it simply being folded down over the sides of the top with same-metal fasteners driven into the sides. Too many here, but this is the idea:

copper_tabletop_custom_nailhead_m040811_800.jpg


For mobility, use the largest diameter wheels that you can fit, the larger the wheel, the easier it'll be to roll. If you go with a pneumatic tire, make sure you have a way to access the fill stem in case your tires lose air. :hammer:

Sorry for rambling. :sleep: Good luck!
 
thanks for the great info.

What about these for the frame? Do I need pressure treated since its being covered?

2 x 4 x 8 Premium Kiln Dried Whitewood Stud

Or metal studs?

I am thinking the T1-11 siding may work - just have to stain and seal it. Would I still need the Durock is I am going with wood. Maybe just 3/4 plywood and wrap with tar paper then apply the T1-11. Will make it allot lighter.

I may or may not go with wheels. is no wheels I will put 2 x 4 or maybe larger squares in the corners to lift it up a little for air flow.

Dont know how I am making the doors yet. I do not have a router/tablesaw so I do not know where I will go with that.

Shelves inside should not be that hard and I may buy those kitchen cabinet pull out racks for ease of access to the grill stuff.

I wanted drawers as well but I guess I can put a small rubbermaid drawer things inside behind a door.
 
If it will be stationary, then the typical lightweight way to build a tiled finish would be a stud-frame (either metal or PT wood) covered with cement board. Then tile on the cement board. That's it.

If instead of tile you want T-111 on a stationary island, then just apply 5/8" or 3/4" thick T-111 directly to the studs, either metal or PT wood. No need for tar paper or durock or that initial skin of plywood in my previous post. Just T-111 over the studs.

T-111 is a rated exterior sheathing. One caveat, your fasteners. You'd want the T-111 to be securely fastened to the framing to prevent the unit from racking. If you think the required number of fastener heads might be unsightly on the T-111, you could cover most of the fastener heads with added trim pieces (corner boards, for example).

If you wanted no additional trim pieces but still wanted to use minimal fasteners, then you could skin the framing with regular plywood. That plywood skin will provide rigidity to the structure. Then you could veneer a thinner (3/8" thick, or example) T-111 over the ply with fewer nails where needed and PL adhesive. While adhesive by itself can usually do a pretty god job, some fasteners at the panel edges can help to prevent curling.

Though pricier, and again, it depends on the look you are going for...you could consider stainless steel ring shank siding nails for attaching the T-111. The nails heads are small so they'd be less visible. And they won't rust.

I wouldn't use whitewood studs in an exterior application, even if well protected. "Whitewood" can be one of several fast growing, sort of semi-trash trees. Nothing wrong with it for interior use, but I wouldn't use "whitewood" for exterior use. Even when protected, it can punk out over time due to humidity swings. It's just not that resilient of a wood in an outdoor situation, even when protected from the elements.
 
Thank you very much. Not sold on the T1-11 yet but looking at option for the sides. I do not think they sell exterior Wainscoting. They do see the Airstone (Fake stone veneer) that may be an option.
 
Had a trip to the local lumber yard. Guys in the yard were great at showing me all types of wood and ideas. Looked at marine plywood, finished plywood, pressure treated lumber. And red cedar tongue and groove planks. This is what I am goin to go with.

Frame wi have PT 4x4's in the corners and 2x3 or 2x4's as the frame. The red cedar will be joined together and attached to the frame. Molding to hide he nails/screws. They lumber yard will even cut all my pieces for me so they are exactly the same. Will use the red cedar as the floor inside as well. Doors will be made out of the cut outs. Still researching how to fancy them up and what type of hinges.

Now I just need a top. We agreed that tile will not last with the cold/heat seasons and will crack eventually.

If I go with a quartz style top I will make the cabinet 60 inches by 22 inches to use a standard 24 top with a 1 inch lip a around. Thought about going to a stone/marble yard too see I they have any 5ft remnants as well. Stainless would be great but do not know any metal fabricators around here that would do that type of work. THe lumber yard did not know either.

So that's he plan for now. Any helpful ideas please chime in. Thanks
 
robny71 said:
I just do not know how I would build the whole thing at all. I was guessing screwing a frame together and adding hardie backer to the outside would do it. But there is allot more like making it square and sturdy. Shelves - boxing out for doors or making doors. Waterproofing it. I have seen lots of pics of tables and outdoor kitchens but nothing on how to do the true build of making sure it all ties in and how its finished off without looking like junk.
Been away for a couple of days & just catching up. Here's the general build process:
  • 1. Basically, what I did is build the base (floor) first. Built a frame, topped it with 3/4" plywood, then installed the casters on the underside.
    2. Built wall frame and attached to floor.
    3. Attached 3/4" plywood "counter" on top. The thick plywood plays a leading role in rigidity of the counter. That along with cement backerboard result in a sturdy surface on which to install the tile.
    4. Tightened frame using Simpson Strong Ties for increased rigidity
    5. Added cement backerboard to top of 3/4" plywood counter
    6. Installed tile over backerboard.
    7. Attached cement board & trim to the outside of the structure.
    8. Measured door openings, then cut & attached cedar doors.

One thing that I did which saved a lot of headaches is to sketch out a plan. I started with the ending height I wanted. Then..
  • 1. I measured the height of the base which was already built. The base included the casters.
    2. Measured the thickness of each layer of the counter (tile, backerboard, plywood). Summed the thickness of these items and added it to the height of the base (item 1).
    3. Accounted for the 2x4 top and bottom of frame. These 2x4's run horizontally across the top and bottom of frame. These added another 3" total.
    4. I took the ending height I wanted and subtracted the numbers obtained from Steps 1 -3. This gave me the height that I needed to cut the vertical 2x4's that serve as the framing "walls".

The tiles nearest the grill heat up a bit when the grill is on. In addition, the structure has been moved several times since it was built. Not one tile has cracked in 7 years. Although we do not get the freeze-thaw cycle that the Northeast does, we do get a fair amount of below freezing weather during winter (mostly at night). In your case, since you currently do not plan on mounting a grill directly to the structure, you have several other options that you can use for your countertop, such as the copper & stainless steel that other have suggested.

Here's a few pics that may help...

This is the top of the frame. The metal fasteners are the Simpson Strong Ties which secure the top part of the framing. Each fastener is held in place with 9 screws. Also visible is the underside of the 3/4" plywood counter.
[attachment=2:xucvfhel]GrillCartFrameUpper.jpg[/attachment:xucvfhel]

Lower part of framing. The block with 4 bolts sticking up is to hold the casters (underneath) in place. This installation method also allows me to tighten the nuts from above without having to access them from underneath.
[attachment=1:xucvfhel]GrillCart_FrameLower.jpg[/attachment:xucvfhel]

This shows the metal sleeves I referred to in an earlier post within this thread. This set of framing is where part of the grill flange rests on top.
[attachment=0:xucvfhel]GrillCartStainlessSleeves.jpg[/attachment:xucvfhel]
 

Attachments

  • GrillCartFrameUpper.jpg
    GrillCartFrameUpper.jpg
    100.9 KB · Views: 90
  • GrillCart_FrameLower.jpg
    GrillCart_FrameLower.jpg
    118.9 KB · Views: 90
  • GrillCartStainlessSleeves.jpg
    GrillCartStainlessSleeves.jpg
    132.6 KB · Views: 90
May have found a restaurant supply store that can order me a 60 in x 24 in kitchen prep table. I can have them order that and remove the legs and mount it to the cabinet.

Now the table top is exactly 60x24. I am guessing I want a lip around the cart to help keep the water out. Would making the cabinet 58x22 me the best way for this or smaller?

Also should I go with the 4 inch backsplash or just a flat top? The back of the cabinet will be up against the deck railing. Visible form the back.
 
yu can order prep tables with a back lip or all flat. Most of the stainless prep tables will have a lip you could work inside of. You may find a shop in town that sells used tops. You could buff it out to make it look pretty or you could skip it an not worry about your "first scratch"
 

Enjoying this content?

Support TFP with a donation.

Give Support
Now the only thing to figure out is the cabinet doors. I was going to do vertical cedar planks for the sides but now that I have been looking at some pictures I am thinking horizontal planks would look much nicer. If the planks were vertical I would just use the wood that was cut out for the door openings (1/4 smaller all around with trim applied) and that would look OK. But if I go horizontal I do not know how the doors will look/work? Plus have hinges installed somehow. Any ideas for doors?

Making allot of progress on the design but still need to figure out these last few details before ordering/cutting wood.
 
Change of plans possible as I do not have as much room as I though to put the cart (Forgot about the swinging gate for the deck stairs). Either I move everything around on the deck (then smoke from the Egg (grill) will blow (normal direction)across the whole deck, a small 3 foot cart on wheels - or forget it and get rid of all the accessories I have for the Egg (grill).

When I just had just the Weber Genesis there were no issues as it had its own small cabinet underneath plus it did not need allot of add on grates, stones, etc like the Egg smoker uses. I have not used the Weber in over a year and a half and am planning on getting rid of it.
 
Thread Status
Hello , This thread has been inactive for over 60 days. New postings here are unlikely to be seen or responded to by other members. For better visibility, consider Starting A New Thread.