Intellivalve Autopsy

dgreenb

Active member
Feb 9, 2021
25
Austin, TX
Pool Size
28000
Surface
Plaster
Chlorine
Liquid Chlorine
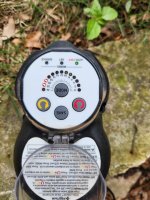
When I opened up my pool this spring I learned that my heater bypass actuator wasn't working. I seemed to have fallen victim to the blinking Auto light like so many more on this site:

What's interesting is this is my newest actuator. I added it to my heater bypass valve about 18 months after the pool was built. The new valve didn't even last a year, while the others are still going.
Anyway, I did the warranty phone dance with Pentair and they actually sent out a replacement, which seems to be working just fine.

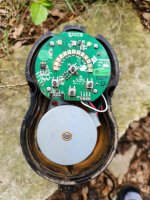
Now that I had no use for the old one, I got curious as to the actual fault. As soon as I unscrewed the old one I could tell a problem with it -- it was sloshing around like it was completely full of water. And after I cracked it open, it absolutely was.
About opening it... there are no mechanical fasteners keeping the cover on, looks like only a bit of glue. I just cracked it open by twisting a large screwdriver at the seam.
There seems to be a channel around the edge that might be for a gasket, but none was there -- could just be for aligning the top half properly, can't be sure.

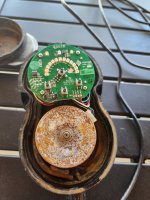
But the motor's really rusted and even after drying out for a couple days in the sun, the valve still gives the same blinking result. My guess is the motor's seized. I couldn't turn the sprocket with pliers.

In short (ha!), it seems the only thing keeping water out is a bit of glue. I'm going to spread some silicon on the seams of all my other valves this weekend.

20230416_123024.jpg
 
Last edited:
Thanks for figuring out why IntelliValves are failing. Let’s see if some silicone sealant around the seam is the fix.

It seems like Pentair designers do not know how to design waterproof and weatherproof products. It looks like the same people who designed the Globrite and Microbrite lights designed the IntelliValves. Also looks like symptoms of low cost manufacturing.

Very disappointing at the way quality has gone down on their newest products.
 
Last edited:
When I opened up my pool this spring I learned that my heater bypass actuator wasn't working. I seemed to have fallen victim to the blinking Auto light like so many more on this site:

What's interesting is this is my newest actuator. I added it to my heater bypass valve about 18 months after the pool was built. The new valve didn't even last a year, while the others are still going.
Anyway, I did the warranty phone dance with Pentair and they actually sent out a replacement, which seems to be working just fine.

Now that I had no use for the old one, I got curious as to the actual fault. As soon as I unscrewed the old one I could tell a problem with it -- it was sloshing around like it was completely full of water. And after I cracked it open, it absolutely was.
About opening it... there are no mechanical fasteners keeping the cover on, looks like only a bit of glue. I just cracked it open by twisting a large screwdriver at the seam.
There seems to be a channel around the edge that might be for a gasket, but none was there -- could just be for aligning the top half properly, can't be sure.

But the motor's really rusted and even after drying out for a couple days in the sun, the valve still gives the same blinking result. My guess is the motor's seized. I couldn't turn the sprocket with pliers.

In short (ha!), it seems the only thing keeping water out is a bit of glue. I'm going to spread some silicon on the seams of all my other valves this weekend.View attachment 483767
Out of curiosity, what is the orientation of your valve? I have noticed a spot of rust on the pipe below one of my intellivalves that is laying face up and could not pinpoint the source but this would make sense. As a side note, amazon currently has the motors in stock (asin B0B3SG3XSW) if you want to attempt a rebuild, i was hoping to keep one of my dead ones to attempt the repair for post warranty but the service tech said he had to return it.
 
  • Like
Reactions: dgreenb
Ahultin, it was mounted flat -- with the leds pointing straight up. Great find on the motor! It was my intention to try replacing it, but I hadn't gotten around to searching... It's cheap enough on Amazon to just give it a whirl. I'll let you know what happens in a few weeks when it gets in.
 
  • Like
Reactions: Ahultin
Ahultin, it was mounted flat -- with the leds pointing straight up. Great find on the motor! It was my intention to try replacing it, but I hadn't gotten around to searching... It's cheap enough on Amazon to just give it a whirl. I'll let you know what happens in a few weeks when it gets in.
Half of mine (including the one with the spot of rust below it) are mounted face up. Mine have 2 yrs of the 3yr warranty left, I wonder if sticking some sealant around them now would negatively impact the warranty??
 
I have 2 that mount face up like that. One was part of the OG install in early 2020, and the other I installed on my heater bypass later in 2020. I have not noticed anything going awry with them yet. I'll keep an eye on those though to make sure.

--Jeff
 
I got the replacement motor yesterday, a full 2 weeks earlier than they originally said! It was pretty simple to swap it out, there's a small slot below each wire on the control board harness that you push to add or remove the wire. They're even labeled nicely. I plugged it into my intellicenter to get power, and it works just perfectly. It even still had my old presets!

Now the question is how to securely reattach the lid. There's not much room to put some sort of through-bolt, plus I'd be worried about waterproofing the new hole. I think a bead of silicone along the inner ring and along the outer seam would provide decent waterproofing. I worried about hold-down force on the lid, but it's a pretty snug fit, so maybe that's not going to be a problem.

If I get some time this week, I'm going to swap it back into use and see how long it lasts. Then the warrantee replacement can be a back-up.


20230423_175819.jpg20230423_175757.jpg
 
Out of curiosity, what is the orientation of your valve? I have noticed a spot of rust on the pipe below one of my intellivalves that is laying face up and could not pinpoint the source but this would make sense. As a side note, amazon currently has the motors in stock (asin B0B3SG3XSW) if you want to attempt a rebuild, i was hoping to keep one of my dead ones to attempt the repair for post warranty but the service tech said he had to return it.
I am looking for these motors as one of our Intellivalves is on its way out, it looks like the asin doesnt match a product on Amazon when i search it, any other details about the motor that you can share?
 

Enjoying this content?

Support TFP with a donation.

Give Support
Huh, looks like I got lucky when I needed it.
Also, for the record, I swapped the repaired valve back in a couple weeks ago and smeared silicone caulk in the seam and wire penetration of all my intellivalves. I want to make a datestamp here in case any of them fail in future. But, the repaired valve has been working fine so far!
 
Picked up a dead valve for $30 to do some destructive testing and was able to successfully repair it 🥳
I used a heat gun to soften the casing which allowed release of the epoxy holding the two halves together. The epoxy does NOT go all the way around which I beleive is how water is getting in. Failure mode appeared to be the same as @dgreenb , water intrusion leading to rusting of the motor.
20230614_132917.jpg
20230614_133025.jpgI dug a little deeper though and disassembled the rusted motor.
20230614_145844.jpg
It appears that the water gets into the motor, swelling and cracking the core.
20230614_150111.jpg
Since the cable was cut on the one I was repairing I removed it (they epoxy the cable gland 😳) . The cable is not soldered to the board, it just takes a thin flat head to release each wore. Then removed the interior plate to view the gears. They appear to be all stainless steel.
20230614_165028.jpg
There was one screw hole retaining the center divider that was cracked so I repaired that with some epoxy.
I cleaned then re-lubed the gears with some marine grease and started re-assembly. Everything is pretty well indexed so there is really only one way for it to go back together. 20230614_173454.jpg20230614_175046.jpg20230614_175407.jpg
And like that it was done.
20230614_190715.jpg
Tested and all is working! I plan on grabbing some silicone to reassemble it with which should seal it nicely.
 
This thread saved me hundreds of dollars! It was very helpful troubleshooting and fixing my intellivalve. I took it apart as described above and was planning to buy a new motor but couldn't find one on Amazon, they were out of stock. Luckily this runs my water feature so I wasn't in a huge bind.
My spindle was not spinning freely and the outter case of the motor was super rusted. I couldn't even read the motor name on the side because the paper was dissolved. My husband had the idea of trying to clean the motor, so he put it in an ultrasonic cleaner (we own one) with windex and suprisingly the spindle moved freely. We figured it would be a 10% chance of working but when I plugged everything back together it worked. I was amazed. It has been working for the past week and I thought I would add in my two cents. We love to repair stuff (my husband is a mechanical and electrical engineer by training) and with me not working right now money is tight. This fix cost us about 1/2 a windex bottle and some elbow grease. Thanks again! Super helpful.
 
Thread Status
Hello , This thread has been inactive for over 60 days. New postings here are unlikely to be seen or responded to by other members. For better visibility, consider Starting A New Thread.