Greetings!
I'm a very green newbie here, jumping into the pool with both boots on. My immediate objective is to connect my new Atlas ORP and PH probes to the above software and, if possible, to connect the software to Home Assistance. My short-term objective is to integrate my Stenner pump into this mix.
I have been researching for a month, hoping to obtain everything I needed without bothering anyone. Well, the more I researched and tested the more I became confused. Too much information! This is my first RBPi venture, and it has been a steep learning curve. Trying to find the current information on how to install the software has been a bit confusing. I am stuck on getting the software installed. Thus, I am now posting for community assistance, for which I apologize. I followed the Quick Start Guide: Quick Start Guide. After completing the Quick Start Guide, I included PM2. I updated the Node.js to 22.2.0. From the RBPi's Chromium browser, I entered http://local ip:8080/, but it didn't connect. I failed. I feel like I am missing additional steps.
My hardware for my PoolPi:
RBPi 4B 4GB
Atlas ORP & PH probes
Atlas EZO ORP & PH Circuits
Atlas i3 InterLink
I2C Toggler
I have a few questions.
- How can I verify that the three programs are running in RBPi OS Task Manager?
What is the command name for the programs?
- Is all of the software installed? (See the screenshots from the RBPi File Manager)
- After installing the pool controller components via the Quick Start Guide (nodejs-poolController, nodejs-poolController-dashPanel, and relayEquipmentManager), do I need to do anything else to launch the software?
Follow the steps below to install the prerequisites and software.
1. To get started on a Raspberry pi it is a good idea to update your OS.
To do this open a command prompt and run the following command.
sudo apt update
2. Install Git. If you have already done this you can skip this step. From the command prompt run the following command.
sudo apt install git
3. Install Node Version Manager. This is the most direct way to install and manage Node.js versions on a Raspberry Pi. From the command prompt run the following command. After you run this script close the command prompt.
curl -o- https://raw.githubusercontent.com/nvm-sh/nvm/v0.39.3/install.sh | bash
4. Exit the terminal and restart the terminal session for NVM to be recognized in the environment.
5. Install Node.js From a new command prompt window use the following command to install a supported version of Node.JS as of this writing the software has been thoroughly tested on versions 16.x to 18.x of the node platform.
nvm install 18
Pool Controller Components
Install the packages you need for your installation. You can install all of them on the same platform or install the pre-requisites above on multiple platforms and choose the software you would like install on this pi. Once the software is installed you may perform the update procedure to download and install new versions.
nodejs-poolController
cd ~
git clone GitHub - tagyoureit/nodejs-poolController: An application to control pool equipment from various manufacturers.
cd ~/nodejs-poolController
npm i
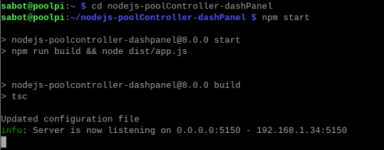
nodejs-poolController-dashPanel
cd ~
git clone GitHub - rstrouse/nodejs-poolController-dashPanel: A dashboard panel for tagyoureit/nodejs-poolController
cd ~/nodejs-poolController-dashPanel
npm i
relayEquipmentManager
cd ~
git clone GitHub - rstrouse/relayEquipmentManager: A hardware controller for GPIO, I2c, SPI, and generic devices.
cd ~/relayEquipmentManager
npm i
- I assume I don't need to run the npm install since I believe npm i does this?
- While researching, I found the following commands: npm start, npm run start:cache
Do I need to use either of these commands?
Any suggestions?
Thank you so much for reading this!
@rstrouse
@MyAZPool


I'm a very green newbie here, jumping into the pool with both boots on. My immediate objective is to connect my new Atlas ORP and PH probes to the above software and, if possible, to connect the software to Home Assistance. My short-term objective is to integrate my Stenner pump into this mix.
I have been researching for a month, hoping to obtain everything I needed without bothering anyone. Well, the more I researched and tested the more I became confused. Too much information! This is my first RBPi venture, and it has been a steep learning curve. Trying to find the current information on how to install the software has been a bit confusing. I am stuck on getting the software installed. Thus, I am now posting for community assistance, for which I apologize. I followed the Quick Start Guide: Quick Start Guide. After completing the Quick Start Guide, I included PM2. I updated the Node.js to 22.2.0. From the RBPi's Chromium browser, I entered http://local ip:8080/, but it didn't connect. I failed. I feel like I am missing additional steps.
My hardware for my PoolPi:
RBPi 4B 4GB
Atlas ORP & PH probes
Atlas EZO ORP & PH Circuits
Atlas i3 InterLink
I2C Toggler
I have a few questions.
- How can I verify that the three programs are running in RBPi OS Task Manager?
What is the command name for the programs?
- Is all of the software installed? (See the screenshots from the RBPi File Manager)
- After installing the pool controller components via the Quick Start Guide (nodejs-poolController, nodejs-poolController-dashPanel, and relayEquipmentManager), do I need to do anything else to launch the software?
Follow the steps below to install the prerequisites and software.
1. To get started on a Raspberry pi it is a good idea to update your OS.
To do this open a command prompt and run the following command.
sudo apt update
2. Install Git. If you have already done this you can skip this step. From the command prompt run the following command.
sudo apt install git
3. Install Node Version Manager. This is the most direct way to install and manage Node.js versions on a Raspberry Pi. From the command prompt run the following command. After you run this script close the command prompt.
curl -o- https://raw.githubusercontent.com/nvm-sh/nvm/v0.39.3/install.sh | bash
4. Exit the terminal and restart the terminal session for NVM to be recognized in the environment.
5. Install Node.js From a new command prompt window use the following command to install a supported version of Node.JS as of this writing the software has been thoroughly tested on versions 16.x to 18.x of the node platform.
nvm install 18
Pool Controller Components
Install the packages you need for your installation. You can install all of them on the same platform or install the pre-requisites above on multiple platforms and choose the software you would like install on this pi. Once the software is installed you may perform the update procedure to download and install new versions.
nodejs-poolController
cd ~
git clone GitHub - tagyoureit/nodejs-poolController: An application to control pool equipment from various manufacturers.
cd ~/nodejs-poolController
npm i
nodejs-poolController-dashPanel
cd ~
git clone GitHub - rstrouse/nodejs-poolController-dashPanel: A dashboard panel for tagyoureit/nodejs-poolController
cd ~/nodejs-poolController-dashPanel
npm i
relayEquipmentManager
cd ~
git clone GitHub - rstrouse/relayEquipmentManager: A hardware controller for GPIO, I2c, SPI, and generic devices.
cd ~/relayEquipmentManager
npm i
- I assume I don't need to run the npm install since I believe npm i does this?
- While researching, I found the following commands: npm start, npm run start:cache
Do I need to use either of these commands?
Any suggestions?
Thank you so much for reading this!
@rstrouse
@MyAZPool
@Katodude

Last edited: