Im drowning and I cant get it right

Do you have a solar cover? If not, you can be losing water to evaporation as well. this will also help your chlorine survive the sun with such low CYA.
you can also use dyes or food coloring near suspected underwater leaks, as they will have a vacuum effect. if indeed sucking water
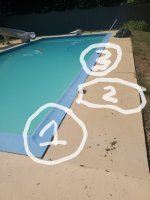
Cover is pictured in photo, not sure the difference between solar or any other cover. Will explain the circles and numbers below 20220531_153848.jpg
1) furthest return location from pump house (located in line with the deck on other side of the blue fence). Return gets good pressure but the drop in the deck leaves me concerned of a possible Crack in the plumbing at this point since my remaining leaks are only during pump operation.

2)Crack running from skimmer to the grass, it's all the way through from grass until about 3/4ths way to skimmer. This could be caused by erosion under the deck due to leak in return, but this skimmer gets lower pressure than the one pictured further up at the deep end of the pool making me believe I might have an issue here as well.

3) location of wall port for vacuum. No cracks on this slab, but obvious recession. Vacuum pressure does not seem impeded at all, but this could also be the location of a leak in the pipes for the skimmer and/or the return noted in '1'.

There is no damage to any surface of the pool itself, only to the decking. I will be removing the deck slabs and exposing the plumbing to the return and the skimmer next week when I can get the tongs for the tractor installed to make sure I do not damage the pool during removal. These are the last of the major plumbing issues that I have to repair with the pool. In the pump house, I need to redo a LOT of the plumbing due to the previous owners "repair guy" using improper joint glue, improperly rated PVC, down sizing plumbing instead of buying the proper couplings (he used 2.5" to 2" converter couplings), need to add lock fasteners to be able to actually remove the filter valve without causing damage. Need to replace 2 shut off valves that are 'frozen' in the open position because the cement poured into the ball joint area when they were originally installed.
 
So let’s recap since I’m lazy and didn’t read everything. 😂 Are these all true?
  1. Your pool is stubborn and won’t clear up
  2. There’s been a ton of stuff dumped in
  3. Water there is expensive
  4. You’ve already replaced a lot of water
  5. You’ve ordered a TF-100 kit arriving Friday

Does this look right?
Math is not my strong suit but this appears to add up. Answer is 42!

This is accurate, I am currently in the process of using my well to do a slow fill, water level will be achieved tomorrow.
 
  • Haha
Reactions: newdude
So a couple of things, I just did my own math and my pool is 30,000 gallons not 32,000 as the pool store had calculated (updating my account info to reflect the same). Seeing that most measurements are done in ppm per 10k gallons, this actually makes things easier I would presume.

I am setting up the pool math app and have 100% 0 idea of what 99.8% (I love statistics in percentages by the way because they are all made up on the spot usually to reflect some level of sophistication... I however use them to insist how naive I actually am currently to this subject matter haha.) Of these things mean. In the attached screen shot, with my pools specs and info what should I turn on to monitor? Also, the reminders section would be an incredible help to me as I have a brain injury and set reminders on my phone for pretty much everything. Can someone help guide me of which reminders (they all appear to be necessary to me) and what time intervals is best practice to set them to please?

Screenshot_20220531-165119.jpg
 
So a couple of things, I just did my own math and my pool is 30,000 gallons not 32,000 as the pool store had calculated (updating my account info to reflect the same). Seeing that most measurements are done in ppm per 10k gallons, this actually makes things easier I would presume.

I am setting up the pool math app and have 100% 0 idea of what 99.8% (I love statistics in percentages by the way because they are all made up on the spot usually to reflect some level of sophistication... I however use them to insist how naive I actually am currently to this subject matter haha.) Of these things mean. In the attached screen shot, with my pools specs and info what should I turn on to monitor? Also, the reminders section would be an incredible help to me as I have a brain injury and set reminders on my phone for pretty much everything. Can someone help guide me of which reminders (they all appear to be necessary to me) and what time intervals is best practice to set them to please?
You'll want to track CSI (a calculation on how aggressive your pool is for calcium deposits or etching), and temperature with that. Combined Chlorine doesn't hurt to track either. I like tracking filter pressure as it helps me as well, but that's up to you. The rest doesn't really apply to your pool.

Backwashing is dependent upon filter pressure - when it goes 25% over the clean PSI you backwash. (That's why I like tracking it.) Brushing/Vacuuming should be done at least weekly. Filter cleaning doesn't apply as you have a sand filter, so you backwash to clean the filter. (It's more for cartridge filters.)
Thank you and this also reminds me: when I vacuum manually, should I vacuum to waste each time? This is what I had been told by 'the other guys' but see it as a substantial waste of water. Should vacuum to waste be more of a function only if things like flocculant are involved or something that will only jam up the sand in the filter? For larger debris it is getting caught in the pump basket before the filter anyways, so never going into the sand filter.

I run the Polaris automatic vacuum daily, It's on auto timer to start at 3am and finishes at 630 am so I can empty it right after I drink my first cup of coffee each morning.
 
For the test kit capability at a minimum you would need:

FAS DPD chlorine test
Combined chlorine
Ph
Total alkalinity
Calcium
Cyuaranic Acid (CYA)

Optional would be
Smart stir (though its highly recommended)
Salt (you would need it if you had a salt water pool)
Total dissolved solids
Phosphates
Borates
I would recommend the TF100 as a minimum. I would also add the smart stir. It makes life so much easier.
I'd remove the smart stir from the optional list and drop it in the necessity list and that's absolute. One of the key components to testing is EASE /REPEATABILITY testing so you won't get lazy at it and that's key in my book. Once you use it you almost can't test without it.
 
Last edited:
Thank you and this also reminds me: when I vacuum manually, should I vacuum to waste each time? This is what I had been told by 'the other guys' but see it as a substantial waste of water. Should vacuum to waste be more of a function only if things like flocculant are involved or something that will only jam up the sand in the filter? For larger debris it is getting caught in the pump basket before the filter anyways, so never going into the sand filter.

I run the Polaris automatic vacuum daily, It's on auto timer to start at 3am and finishes at 630 am so I can empty it right after I drink my first cup of coffee each morning.
You are correct - vacuuming to filter is typically fine. But I would recommend getting a vacuum plate so you can have the larger debris get caught in the skimmer basket instead of the pump basket. Saves some time and less stuff potentially reaching your pump.
 
  • Like
Reactions: SeanThePoolFreshman
Thank you and this also reminds me: when I vacuum manually, should I vacuum to waste each time? This is what I had been told by 'the other guys' but see it as a substantial waste of water. Should vacuum to waste be more of a function only if things like flocculant are involved or something that will only jam up the sand in the filter? For larger debris it is getting caught in the pump basket before the filter anyways, so never going into the sand filter.
Vacuum to waste is when you have something major going on, like vacuuming up after nuking a major algae bloom. Of if you use flocculant (which we don't recommend). Basically, if it's something very major that will clog your filter to do it, you would vacuum to waste. Otherwise, vacuum with normal filtering is fine and won't waste the water (but may cause you to backwash after--which will use some water, but probably not as much as vacuuming to waste).
 
  • Like
Reactions: SeanThePoolFreshman
You are correct - vacuuming to filter is typically fine. But I would recommend getting a vacuum plate so you can have the larger debris get caught in the skimmer basket instead of the pump basket. Saves some time and less stuff potentially reaching your pump.
Vacuum plate? What is this? How does debris get to the skimmer when my suction is located in the wall?
 
I'd remove the smart stir from the optional list and drop in the necessity list and that's absolute. One of the key components to testing is EASE /REPEATABILITY testing so you won't get lazy at it and that's key in my book. Once you use it you almost can't test without it.
I made sure, especially after watching multiple videos on the TFP YouTube channel, to get the smart stir with the kit. I also went ahead and did the XL just because the pool was a cesspool of chemicals over the last few years and not sure how things will look come my first test Friday. Figured if nothing else it will also help to have a but of extra reagent to account for some 'user error' as I learn to be a chemist.

Vacuum to waste is when you have something major going on, like vacuuming up after nuking a major algae bloom. Of if you use flocculant (which we don't recommend).

Thank you, yeah I pray to never have to be in the fiasco of flocculant usage in my pool again.
 
  • Like
Reactions: ghall6292

Enjoying this content?

Support TFP with a donation.

Give Support
The plate gets used instead of the vacuum port which gets placed on top of the skimmer basket with an orifice for the hose to connect on to. Slightly weaker suction then the designated port but well worth it as the debris gets caught in the skimmer basket never making it in the plumbing to the pump.
 
The plate gets used instead of the vacuum port which gets placed on top of the skimmer basket with an office for the hose to connect on to. Slightly weaker suction then the designated port but well worth it as the debris gets caught in the skimmer basket never making it in the plumbing to the pump.
Appreciate it, this looks like a relatively quick and efficient setup that I can do now and save some trouble going back and forth to the pump house. Question I have, with the shallow end skimmer currently having a minor leak in it and getting reduced pressure to it, should I rubber stopper that skimmer and use the deep end skimmer to vacuum from until I can repair that line?

Currently I do not use the plugs in the skimmer and have them both open, just thinking during vacuuming it might help to keep pressure stable. Thoughts?
You can do that just make sure to make sure the basket doesn't completely plug flow to the pump. With 1 skimmer open if basket plugs up you can reduce amount of water into pump and potentially run it dry. But if your careful it will be fine. I only have 1 skimmer and when it gets full I can hear change in pump noise but my pump is also right near the pool
 
  • Like
Reactions: SeanThePoolFreshman
Sean,
Can we get some pictures of the equipment pad. You may have a separate valve for each skimmer making it a better option.
Absolutely!!! Welcome to Nightmare #1, before even the chemical/pool itself nightmare. I have listed 10 things by number in picture amd will explain below. Long story short, the filter upright and arms were heavily damaged when I bought the house, capacitor was bad on old pump (found out later the internal turbine had been ripped apart as well so replaced the whole thing). Pool store hired an independent contractor to so the plumbing at no charge for me since they "opened" my pool and missed the major issues last year. After nearly 8 months of trying to get them to come fix it, I am just resolved to spending the money to repair it correctly myself.

Wouldn't mind additional feedback but these are my thoughts:
20220531_191351.jpg
1) Main drain line from bottom of the pool
2) Vacuum line from the wall of the pool
3) Skimmer line for both deep and shallow end of the pool
4) Return from filter to pool

Not numbered/listed is the timer box which needs to be replaced all together. Only operates in on/off, timer features don't work as a few of the sprockets inside seem to be broken and it is not activating when hitting the pins on the time disc. The wiring housing from timer box to pump is heavily damaged near the pump as seen in a later photo.

20220531_191414.jpg

5) Ball valve to regulate flow to.water slide and prevent back flow from pool for service work between filter and ball valve. This is cemented in the wide open position and has to be removed and replaced to operate water slide properly.
6) Water slide water line from ball joint adjuster

20220531_191406.jpg

7) Main inlet line from skimmer/drain/vacuum to the pump. Contractor did nit use proper pvc or cement to affix the new pump.
8) Pump to filter line. Improper size, threaded inlet coupling was too large and contractor used flex tape over cement to prevent overflow leaking if cement failed.... it has.
9) No twist lock/threaded joint to be able to remove the valve regulater from filter without breaking the pipes to do so. Improper size and positioning, no hangars or joist to counter weight.
10) Return line, Improper size and cement used, no lock/threaded joint to remove valve/regulator from filter without damage.


Unfortunately, my chemical headache is only one of the challenges that I am facing. I will be doing more research to make sure I get the proper components to fix the plumbing and electrical issues in the pump house this weekend.

This picture (below) shows the power supply from timer to pump and you can see the extensive damage to the exterior guard of the wiring. Interior sheathing around the wires is undamaged.
20220531_191335.jpg


Open to thoughts, advice, information, guidance and resources for all things pool. Criticism is welcomed as I already know I need to clean the leaves out of the and remove the groundhog from the burrow in the corner and close that off 😀
 
I use an inline mesh net for vacuuming and creepy crawler. Catches anything I wouldn’t want going to pump/filter
Thank you, this would actually be great as I am in the middle of the woods and have nothing but trees all around!!! Will look this up and get one of these asap!
 
  • Like
Reactions: Mdragger88
Absolutely!!! Welcome to Nightmare #1, before even the chemical/pool itself nightmare. I have listed 10 things by number in picture amd will explain below. Long story short, the filter upright and arms were heavily damaged when I bought the house, capacitor was bad on old pump (found out later the internal turbine had been ripped apart as well so replaced the whole thing). Pool store hired an independent contractor to so the plumbing at no charge for me since they "opened" my pool and missed the major issues last year. After nearly 8 months of trying to get them to come fix it, I am just resolved to spending the money to repair it correctly myself.

Wouldn't mind additional feedback but these are my thoughts:
View attachment 417772
1) Main drain line from bottom of the pool
2) Vacuum line from the wall of the pool
3) Skimmer line for both deep and shallow end of the pool
4) Return from filter to pool

Not numbered/listed is the timer box which needs to be replaced all together. Only operates in on/off, timer features don't work as a few of the sprockets inside seem to be broken and it is not activating when hitting the pins on the time disc. The wiring housing from timer box to pump is heavily damaged near the pump as seen in a later photo.

View attachment 417773

5) Ball valve to regulate flow to.water slide and prevent back flow from pool for service work between filter and ball valve. This is cemented in the wide open position and has to be removed and replaced to operate water slide properly.
6) Water slide water line from ball joint adjuster

View attachment 417774

7) Main inlet line from skimmer/drain/vacuum to the pump. Contractor did nit use proper pvc or cement to affix the new pump.
8) Pump to filter line. Improper size, threaded inlet coupling was too large and contractor used flex tape over cement to prevent overflow leaking if cement failed.... it has.
9) No twist lock/threaded joint to be able to remove the valve regulater from filter without breaking the pipes to do so. Improper size and positioning, no hangars or joist to counter weight.
10) Return line, Improper size and cement used, no lock/threaded joint to remove valve/regulator from filter without damage.


Unfortunately, my chemical headache is only one of the challenges that I am facing. I will be doing more research to make sure I get the proper components to fix the plumbing and electrical issues in the pump house this weekend.

This picture (below) shows the power supply from timer to pump and you can see the extensive damage to the exterior guard of the wiring. Interior sheathing around the wires is undamaged.
View attachment 417771


Open to thoughts, advice, information, guidance and resources for all things pool. Criticism is welcomed as I already know I need to clean the leaves out of the and remove the groundhog from the burrow in the corner and close that off 😀
I can see right away the elbows for the new pump install are DMV fittings and are not meant to hold any kind of pressure.those should probably be replaced.

Not really sure why you would want a valve at the discharge of the pump like valve 4. To me thats asking to accidentally dead head the pump and cause a failure.

I am sure others will chime in with some more/better advice soon.
 
Last edited:
@W.J.Christy beat me to it, but you definitely need to replace those DWV fittings with fittings meant for pressure. The sockets on DWV fittings are only 1/2 the depth of the pressure sch. 40 fittings. From you mentioning he used the wrong pipe, maybe this is what you were talking about. Check to make sure he didn't use DWV piping as well. That stuff isn't made for pressure. Look at the labeling on the pipe itself. I'm sure you can do much better yourself. The guy that did that hadn't a clue about pool plumbing, and probably plumbing in general judging from how sloppy the work is.

I suppose valve #4 is supposed to be an isolation / stop valve. I suppose it's there because you said the stop downstream of it (#5) is nonfunctional, welded in the open position. I'm not sure how #5 is supposed to regulate the slide. I suppose by providing back-pressure on the pool return it's supposed to feed the slide. That's not the way to do it. Put a working service stop (either a GOOD ball valve--preferably a union ball valve) or a Jandy 2-way valve where the existing ball valve is. Upstream of that put a 3-way Jandy valve (diverter valve). You can use that to dial in the right flow. Heck, if you want to go cheap, you can just put in a tee and a gate valve (hose bib).

One thing you kind of have going for you is you at least have 10"+ of straight run right into the pump. Put unions on both ports of the pump and plumb off of those. Put unions on everything attached to the multiport valve on the filter. I don't know how anyone expects you to be able to open the filter up and work on it.

Definitely get that power whip to the pump fixed.

I could be missing it, but I don't see a bond wire anywhere. That pump needs to be bonded to the pool frame with a heavy gauge (like #6) copper wire.
 

Enjoying this content?

Support TFP with a donation.

Give Support
Thread Status
Hello , This thread has been inactive for over 60 days. New postings here are unlikely to be seen or responded to by other members. For better visibility, consider Starting A New Thread.