
My Jandy PDA is 5 years old. It started having problems about a year ago when the "Select" button partially detached from the silicone membrane causing us to have to pick it up with a fingernail every time we needed to press it. More recently the other buttons became unresponsive and/or double triggered. When the "Back" button died completely the PDA became essentially unusable.
Since the PDA is the only means of controlling my pool I had no choice but to replace it. With new PDAs going for $300 I figured I had nothing to lose by trying to fix the old one. The results were better than expected, and the PDA now works as good as new. Total cost was about $15 which is a heck of lot less than a new PDA.
Here's what I did:
1) Open the PDA.
At first glance the PDA looks pretty impenetrable with its overmolded rubber housing, but actually, the front panel comes off fairly easily. The idea is to pull the rubber away from the edge just enough to get a screwdriver or spudger tool under the lip. To make this easier use a heat gun on the lowest setting to soften the rubber (don't overdo it). Once you've created enough clearance, use your tool to carefully pull up on the edge of the top cover. With steady pressure the top will begin to release.
The rubber tends to have a memory, so try to deform it as little as possible. You will thank yourself when you put it back together.


Once it starts to let go, slide your finger along the edge to carefully release the top from the housing. There are no wires connecting the top to the guts, basically it's just the silicone keys and the clear display window.

The hard part is done.

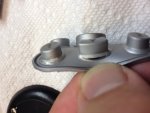
2) Remove the membrane.
Remove the six small Philips screws on the black plastic retaining bracket and remove. It may not come off easily, since the little alignment pins tend to get stuck. One of my pins broke off which was no big deal since the six screws are sufficient to hold the bracket in position.

3) Repair the buttons.
First I needed to reattach the "Select" button. I used Loctite Plastics Bonding System which is a two part system.

Apply the activator to the mating surfaces, let dry for 60 seconds, the apply the super glue sparingly. As always when using super glue make sure the parts are lined up correctly before making contact.


While everything was apart I noticed a few of the other buttons were deteriorating, so I glued them too.

4) Restore the contacts.
When a button is pressed, a carbon pad on the underside of the button makes contact with the corresponding set of traces on the circuit board, which triggers the controller circuit in the PDA. After a time the carbon breaks down and no longer makes good contact, and that's when you get dead buttons, double triggers etc.
First, carefully clean the gold fingers (circled in red) with a cotton swab and pure acetone. Don't use nail polish remover, get the good stuff from a paint store or home center. Let dry completely. Repeat. If you have a compressor a gentle blast of air won't hurt.

After doing a bit of research I decided to use "Keypad Fix" to restore the carbon contacts. $8.99 shipped from Amazon. You get a little jar which is enough to fix probably hundreds of these buttons. It also works on TV remotes, phones, calculators, computer keyboards - any device that uses rubber membrane technology.

To use "Keypad Fix" just follow the directions. Clean the pads (circled in red) gently with isopropyl alcohol on a swab and let dry. Stir "Keypad Fix" well, then apply a thin coat with a swab. Make sure no strands of fiber remain on any pad. Let dry overnight. Done.

5) Reassemble and test.
Reassemble the keypad. Don't over tighten the six screws as they will strip easily if you're not careful. Replace the top cover on the housing and press it into place. Power up the PDA and do a function check. Enjoy the 285 bucks you just saved. Happy swimming!

Since the PDA is the only means of controlling my pool I had no choice but to replace it. With new PDAs going for $300 I figured I had nothing to lose by trying to fix the old one. The results were better than expected, and the PDA now works as good as new. Total cost was about $15 which is a heck of lot less than a new PDA.
Here's what I did:
1) Open the PDA.
At first glance the PDA looks pretty impenetrable with its overmolded rubber housing, but actually, the front panel comes off fairly easily. The idea is to pull the rubber away from the edge just enough to get a screwdriver or spudger tool under the lip. To make this easier use a heat gun on the lowest setting to soften the rubber (don't overdo it). Once you've created enough clearance, use your tool to carefully pull up on the edge of the top cover. With steady pressure the top will begin to release.
The rubber tends to have a memory, so try to deform it as little as possible. You will thank yourself when you put it back together.
Once it starts to let go, slide your finger along the edge to carefully release the top from the housing. There are no wires connecting the top to the guts, basically it's just the silicone keys and the clear display window.
The hard part is done.
2) Remove the membrane.
Remove the six small Philips screws on the black plastic retaining bracket and remove. It may not come off easily, since the little alignment pins tend to get stuck. One of my pins broke off which was no big deal since the six screws are sufficient to hold the bracket in position.
3) Repair the buttons.
First I needed to reattach the "Select" button. I used Loctite Plastics Bonding System which is a two part system.
Apply the activator to the mating surfaces, let dry for 60 seconds, the apply the super glue sparingly. As always when using super glue make sure the parts are lined up correctly before making contact.
While everything was apart I noticed a few of the other buttons were deteriorating, so I glued them too.
4) Restore the contacts.
When a button is pressed, a carbon pad on the underside of the button makes contact with the corresponding set of traces on the circuit board, which triggers the controller circuit in the PDA. After a time the carbon breaks down and no longer makes good contact, and that's when you get dead buttons, double triggers etc.
First, carefully clean the gold fingers (circled in red) with a cotton swab and pure acetone. Don't use nail polish remover, get the good stuff from a paint store or home center. Let dry completely. Repeat. If you have a compressor a gentle blast of air won't hurt.
After doing a bit of research I decided to use "Keypad Fix" to restore the carbon contacts. $8.99 shipped from Amazon. You get a little jar which is enough to fix probably hundreds of these buttons. It also works on TV remotes, phones, calculators, computer keyboards - any device that uses rubber membrane technology.
To use "Keypad Fix" just follow the directions. Clean the pads (circled in red) gently with isopropyl alcohol on a swab and let dry. Stir "Keypad Fix" well, then apply a thin coat with a swab. Make sure no strands of fiber remain on any pad. Let dry overnight. Done.
5) Reassemble and test.
Reassemble the keypad. Don't over tighten the six screws as they will strip easily if you're not careful. Replace the top cover on the housing and press it into place. Power up the PDA and do a function check. Enjoy the 285 bucks you just saved. Happy swimming!
Attachments
Last edited by a moderator:
