Green swamp at opening

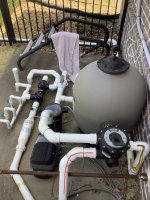
Sometimes it is more economical to simply replace the entire thing (or bulk of it) as opposed to smaller parts. By the time you buy the key diverter, gasket, etc, it's about the same. This way the entire head unit is new and a bit easier to install.
 
+1. One school of thought is that the new parts will be new. Another school of thought are that the other parts are still old. If I was to be replacing a considerable amount of the MPV, I'd start new instead if the budget allowed.
 
  • Like
Reactions: WhitB08
Hmmm, he said the part that I ordered is factory glued and you have to re-order the entire diverter. I may be using some of the wrong terms here. Anyway, I don’t want to re-order the entire huge thing, but if I could get just the key cover assembly and diverter which I think would include all of the parts that may have worn out I might be interested in just ordering that, but I’m only able to find individual part numbers and not that entire top piece for my model.
Correct, because he is rebuilding the SP0714T which has a fixed gasket. Yours does not have a glued in gasket.

I gave you the video because they are similar and you will have a sense for the general process.

I would try the gasket when you get it. We will also have a better sense of the condition of the unit. It will likely fix the issue.
 
  • Like
Reactions: WhitB08 and Newdude
Correct, because he is rebuilding the SP0714T which has a fixed gasket. Yours does not have a glued in gasket.

I gave you the video because they are similar and you will have a sense for the general process.

I would try the gasket when you get it. We will also have a better sense of the condition of the unit. It will likely fix the issue.
I realized that I was just worried mine would be glued in, but I guess it still might be depending on how the pool builder did it. I’m reading lots of stories of people finding theirs difficult to remove due to glue. The video was very helpful and made me realize I could order the key cover and handle assembly which I was considering, but after further investigation it appears that part (spx0715ba3) doesn’t even include the gasket or o- ring. So I will start with the gasket as you suggested.
 
I don't recall if the key diverter installed in that upper MPV replacement unit has a gasket already applied. Let's ask @1poolman1 who has probably seen his fair share of these in 3 decades. :)

OP is planning on ordering the upper MPV assembly for the Hayward SP0715X62.
 
I don't recall if the key diverter installed in that upper MPV replacement unit has a gasket already applied. Let's ask @1poolman1 who has probably seen his fair share of these in 3 decades. :)

OP is planning on ordering the upper MPV assembly for the Hayward SP0715X62.
Gasket is in the lower portion of the valve body. Hayward gaskets are usually easy to remove. I dry the gasket slots and put a bit of silicone sealant in them to hold the gasket in place. I always ask the customer to not run the pool or turn the diverter at least overnight. You don't want silicone to get on top of the gasket and then have it stick to the diverter.
 
@WhitB08, here you go if you're still interested. Upper key assy unit, new spider gasket, some silicone adhesive, and you're good to go.

** so far I have only ordered the gasket. I figured I would try that first and if there is no improvement in next couple of days after that, I will go ahead and order the upper key assembly.
This is the video I watched and saved yesterday! So helpful. The only issues I’m still unsure of are
1. Clarification on what position to put the valve in after cutting power off and before starting - I‘Ve watched conflicting videos…. I am clear that it needs to go back on exactly as it was taken off.
2. Will there be water down in the area that I need to work when I remove the key assembly unit, and if so what do I do? Drain the filter?
 
Last edited:
  • Like
Reactions: Texas Splash
Clarification on what position to put the valve in after cutting power off and before starting - I‘Ve watched conflicting videos…. I am clear that it needs to go back on exactly as it was taken off.
I would place it in FILTER before starting so that you know exactly how it should point when you go to reinstall it. Tip - Take a cell phone pic before disassembly. The only water that might pour out of the MPV when you remove the top is any water "above" that height in the filter. So if you want to drain a little water of the filter before hand that's fine.

Don't forget to have the silicone available for when the gasket arrives. No need to smear a huge glob on there. Just a simple, smooth amount on the lower mating surface to keep the gasket in place as it dries. I like to wear a disposable glove when doing it and use my finger tip.
 
I‘m in and the old gasket looks perfect. 😫 As does the assembly and o-ring on there. Im draining water out of the filter, but there’s is still lots of water in there that’s not going out.
 

Enjoying this content?

Support TFP with a donation.

Give Support
I think we’re done. My husband missed an important work call and put it back together and told me to call a professional. And now air bubbles are coming out of one return line. 🤪 I’ll let you guys know if I ever get an answer. Thanks again for the guidance on everything!
 
  • Like
Reactions: Newdude
I‘m in and the old gasket looks perfect. 😫 As does the assembly and o-ring on there. Im draining water out of the filter, but theirs is still lots of water in there that’s not going out.
They can look perfect, but not be. Any plumbing related gasket and o Ring is like that. Every toilet flapper I have ever replaced looked perfect, but replacing them always stopped my toilet from running.
 
They can look perfect, but not be. Any plumbing related gasket and o Ring is like that. Every toilet flapper I have ever replaced looked perfect, but replacing them always stopped my toilet from running.
We were going to replace it, but it’s the water would not stop flowing into the space where the gasket is.
 
  • Like
Reactions: Orion7319
We were going to replace it, but it’s the water would not stop flowing into the space where the gasket is.
You probably need to shut off all the valves, then drain the filter. If your equipment is lower then the pool you definitely have to do that. Mine is several feet below the pool and I have to shut off every single valve just to clean out my pump basket. I’m sure it’s a bit intimidating, but folks here are here to help. Good news is that it doesn’t sound like you made things any worse.
 
Last edited:
  • Like
Reactions: Mdragger88
You probably need to shut off all the valves, then drain the filter. If your equipment is lower then the pool you definitely have to do that. Mine is several feet below the pool and I have to shut off every single valve just to clean out my pump basket.
You mean the skimmers and main drain valves right? My equipment is definitely above the pool. We open the pump basket and the drain plug for the filter and thought gravity would just do it‘s thing but we stood there for so long and water still just kept filling in.
 
Last edited:
You mean the skimmers and main drain valves right? My equipment is definitely above the pool. We open the pump basket and the drain plug for the filter and thought gravity would just do it‘s thing but we stood there for so long and water still just kept filling in.
You also might want to shut off the valve going to the returns.
 
Did you resolve the water issue into the MPV? With all pad shut-off valves closed (before the pump and after the filter) the only water remaining is what was in the filter. Did you manage to the everything replaced and back together?
We are trying again later this afternoon. 👍🏻
 
Great. First pic I’ve scribbled with my big finger in blue “B” is for the bubblers that are capped on the same valve as the returns. The slide and the deck jets off the same big black valve, but the deck jets have little individual valves turned to off. Then the yellow lines are on the main drain and 2 skimmers. The other pic I just colored the backwash/waste pipe brown and the red goes to my heater.
 

Attachments

  • F6FDB23B-8B1B-4478-9C38-070EA428E570.jpeg
    F6FDB23B-8B1B-4478-9C38-070EA428E570.jpeg
    569.1 KB · Views: 26
  • D200D221-315B-4242-94F5-FF2DBD1A5364.jpeg
    D200D221-315B-4242-94F5-FF2DBD1A5364.jpeg
    547.4 KB · Views: 26
  • Like
Reactions: Mdragger88

Enjoying this content?

Support TFP with a donation.

Give Support
Thread Status
Hello , This thread has been inactive for over 60 days. New postings here are unlikely to be seen or responded to by other members. For better visibility, consider Starting A New Thread.