Getting Started Using the TF-100 Test Kit - My Experience

Liquid

Silver Supporter
May 11, 2023
28
Jacksonville, FL
Pool Size
4240
Surface
Fiberglass
Chlorine
Salt Water Generator
SWG Type
Jandy Aquapure 700
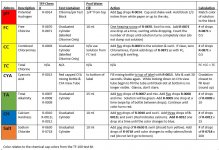
When I received the TF-100 (salt) test kit it seemed a bit overwhelming with the various chems so wanted to share my experience and thoughts, having used it for the first time today. It all really does make sense. In my opinion the instructions can be written a little differently, but I am a linear thinker which I know is not everyone's style. Either way, I compiled a chart that made sense to me and wanted to share it in the event it would benefit other first time TF-100 users. I seem to be unable to upload the Excel version so people could modify it to serve their needs. Sorry about that.
  • Before starting the testing I found it helpful to have a towel (to dry my hands after getting the pool samples), a paper towel (upon which to set all the test containers after rinsing them) and a pen/pencil. And reading glasses if you are of a certain age! I also grouped the chemicals into the tests for which they were needed.
  • To take a sample from a foot below the surface keep the test container upside down when dunking it in the pool and then turn it right side up at about the foot under water mark, which will fill the container. Shake it to splash out the water down to the necessary level.
  • Before getting started on the CYA test, the top of the mixing bottle dropper needs to be cut off with a sharp knife. Also, the R-0013 solution has a seal on the top which must be removed by unscrewing the cap.
  • Mixing the chemicals is not quite like swirling a wine glass. I found swirling it while on a table worked best.
  • It helped me to think about how many potential drops of chemicals I would estimate to be needed on the FC, TA, CH & Salt tests as the final result calculation is based on the number of drops to have the solution change color. For example, my FC was unusually high and used 32 drops. We aren't talking one or two, but would normally expect about 10. Be patient though when you believe you are getting close to the solution turning the necessary color. Swirl a little extra before adding the next drop.
It took me about an hour the first time going through the testing, taking my time to understand everything and ensure I was doing the tests correctly. I expect when I am more comfortable it will all take under 10 minutes from taking out the test kit to putting it away.

I hope this is in some way helpful to people getting started with the TF-100 test kit.

View attachment 491520TF-100 Chart.JPG
 
Welcome to TFP! :wave: Yeah, the whole testing thing can be a bit overwhelming or intimidating to some at first, but you get the hang of it pretty quickly. I used to have all kinds of cheat-cheat products I made for myself, but almost never refer to them now becasue they are stuck in my head. :hammer:

Enjoy the forum. :swim:
 
  • Mixing the chemicals is not quite like swirling a wine glass. I found swirling it while on a table worked best.
Time to get a speed stir! Game Changer! My brother, who owned a pool for 30 years came to visit. We did back to back FC test comparison, me with smart stir, him swirling. His results were 1ppm higher. Smart stir makes the mixing of chemicals consistent.

Nice chart!
 
Thanks for the chart! I just received the TFS-100 salt kit and the instructions did not include how to test for salt content, so your post is very helpful.
 
When I received the TF-100 (salt) test kit it seemed a bit overwhelming with the various chems so wanted to share my experience and thoughts, having used it for the first time today. It all really does make sense. In my opinion the instructions can be written a little differently, but I am a linear thinker which I know is not everyone's style. Either way, I compiled a chart that made sense to me and wanted to share it in the event it would benefit other first time TF-100 users. I seem to be unable to upload the Excel version so people could modify it to serve their needs. Sorry about that.
  • Before starting the testing I found it helpful to have a towel (to dry my hands after getting the pool samples), a paper towel (upon which to set all the test containers after rinsing them) and a pen/pencil. And reading glasses if you are of a certain age! I also grouped the chemicals into the tests for which they were needed.
  • To take a sample from a foot below the surface keep the test container upside down when dunking it in the pool and then turn it right side up at about the foot under water mark, which will fill the container. Shake it to splash out the water down to the necessary level.
  • Before getting started on the CYA test, the top of the mixing bottle dropper needs to be cut off with a sharp knife. Also, the R-0013 solution has a seal on the top which must be removed by unscrewing the cap.
  • Mixing the chemicals is not quite like swirling a wine glass. I found swirling it while on a table worked best.
  • It helped me to think about how many potential drops of chemicals I would estimate to be needed on the FC, TA, CH & Salt tests as the final result calculation is based on the number of drops to have the solution change color. For example, my FC was unusually high and used 32 drops. We aren't talking one or two, but would normally expect about 10. Be patient though when you believe you are getting close to the solution turning the necessary color. Swirl a little extra before adding the next drop.
It took me about an hour the first time going through the testing, taking my time to understand everything and ensure I was doing the tests correctly. I expect when I am more comfortable it will all take under 10 minutes from taking out the test kit to putting it away.

I hope this is in some way helpful to people getting started with the TF-100 test kit.

View attachment 491520View attachment 491528
Good chart.
One thing I did was put the number of drops on each bottle
For example for testing TA, with a sharpie, put 2x on R-0007 bottle and 5x on the R-0008 bottle. I also always put the sample size, ie. 10ml.
This way when you pick up the bottle it is a reminder of how many drops for each And your sample volume.

Over time, as you add more “stuff” (just like adding lures to a tackle box), I use a dedicated cylinder for each test.
Some else mentioned a Speedstirrer, I went about 3 months manually swirling and then found the best tool in the box is a Speedstirrer. It helps with consistency of your testS. I have a dedicated magnetic stirrer pill for each test as well.
 
  • Like
Reactions: craigie and Newdude
From the chart posted above I see the TF-100 Calcium Hardness test uses 10 drops of R-0010 and 3 of R-0011L before adding R-0012 drop wise. I've the Taylor K-2006 test kit which instructs me to use 20 drops of R-0010 and 5 drops of R-0011L before adding R-0012. Since the same reagents are used could I also use 10/3 drops with the Taylor kit? The color change is what is important, no?
 
From the chart posted above I see the TF-100 Calcium Hardness test uses 10 drops of R-0010 and 3 of R-0011L before adding R-0012 drop wise. I've the Taylor K-2006 test kit which instructs me to use 20 drops of R-0010 and 5 drops of R-0011L before adding R-0012. Since the same reagents are used could I also use 10/3 drops with the Taylor kit? The color change is what is important, no?
No.

The chart is for a 10 ml sample.

The Taylor test instructions is for a 25 ml sample.

The drops used depend on the sample size.
 
I've the Taylor K-2006 test kit which instructs me to use 20 drops of R-0010 and 5 drops of R-0011L before adding R-0012. Since the same reagents are used could I also use 10/3 drops with the Taylor kit?
You're doing the 25ml test. Switch to a 10ml sample, follow the above instructions and each drop is 25 CH instead of 10. There's no need for that resolution.
 
When I received the TF-100 (salt) test kit it seemed a bit overwhelming with the various chems so wanted to share my experience and thoughts, having used it for the first time today. It all really does make sense. In my opinion the instructions can be written a little differently, but I am a linear thinker which I know is not everyone's style. Either way, I compiled a chart that made sense to me and wanted to share it in the event it would benefit other first time TF-100 users. I seem to be unable to upload the Excel version so people could modify it to serve their needs. Sorry about that.
  • Before starting the testing I found it helpful to have a towel (to dry my hands after getting the pool samples), a paper towel (upon which to set all the test containers after rinsing them) and a pen/pencil. And reading glasses if you are of a certain age! I also grouped the chemicals into the tests for which they were needed.
  • To take a sample from a foot below the surface keep the test container upside down when dunking it in the pool and then turn it right side up at about the foot under water mark, which will fill the container. Shake it to splash out the water down to the necessary level.
  • Before getting started on the CYA test, the top of the mixing bottle dropper needs to be cut off with a sharp knife. Also, the R-0013 solution has a seal on the top which must be removed by unscrewing the cap.
  • Mixing the chemicals is not quite like swirling a wine glass. I found swirling it while on a table worked best.
  • It helped me to think about how many potential drops of chemicals I would estimate to be needed on the FC, TA, CH & Salt tests as the final result calculation is based on the number of drops to have the solution change color. For example, my FC was unusually high and used 32 drops. We aren't talking one or two, but would normally expect about 10. Be patient though when you believe you are getting close to the solution turning the necessary color. Swirl a little extra before adding the next drop.
It took me about an hour the first time going through the testing, taking my time to understand everything and ensure I was doing the tests correctly. I expect when I am more comfortable it will all take under 10 minutes from taking out the test kit to putting it away.

I hope this is in some way helpful to people getting started with the TF-100 test kit.

View attachment 491520View attachment 491528
I just got my tf pro salt kit yesterday. I plan to try it out for the first time this evening. I hope your chart helps me as I feel a little overwhelmed with the kits directions. Thanks for making this!
 

Enjoying this content?

Support TFP with a donation.

Give Support
feel a little overwhelmed
I promise you, every last line on the instructions is a joke.

Every. Last. One.

It's a mindset thing, not an ability thing. Read this thread for a better mindset :

New To Testing
(the idiots guide written by the big kahuna idiot himself)
 
  • Like
Reactions: HermanTX
So it has been two years since my original post. I thought adding a few comments might help speed up the lerarning curve or give some other new pool owners more confidence that they will figure out the testing procedure. If I did, anyone could.

It did initially take me a few weeks to get comfortable performing all the tests and some are more interpretive than others. Within a few months I had the testing procedures memorized as to how many drops of each agent and testing is pretty efficient. Now, on a normal basis I test pH and Chlorine every few days, TA once a week, CH, CYA & Salt every ten days/two weeks. If there is severe weather or a significant change to the water level I will test more frequently. Now, I think I understand my pool better, anticipate what it needs and when based on usage, temperature, weather and changes in water level.

I changed some of the testing equiptment which made a difference for me. First off, I threw the pH test block in the trash. The colors faded and my pH was way off, which caused me a lot of headache in trying to balance the pool and all along it was a shoddy test block. That story is here. I now use the Taylor pH Test Block, which is also more granular than the block that comes with the TF test kit (.2 v.s .3 if I remember correctly), helping me better interpret the pH level. You have to use R-0004 in the Taylor block and not R-0014 that comes with the TF kit. I also replaced both the test cylinders as the lines faded on them quite quickly. I bought glass beakers, a 25 ml for 10ml tests and a 50 ml for TA. It gives plenty of room to swirl the contents well. I don't use a Speed Stir, though you could find a dozen threads on TFP and the benefits/debates of using one. I opted not to go there.

The one test method I changed around was CYA. Rather than filling with pool water to the bottom of the label and agent to the top of the label, I just measure out equal parts of each and add them individually to the test bottle. For me that works better than using the label as a guide.

I will say it was pretty easy getting initially established but is a constant learning process. I have so much more to learn just about pool chemistry, not to mention all the other aspects of maintaining a pool, but TFP is a HUGE help!
 
I now use the Taylor pH Test Block, which is also more granular than the block that comes with the TF test kit (.2 v.s .3 if I remember correctly), helping me better interpret the pH level. You have to use R-0004 in the Taylor block and not R-0014 that comes with the TF kit. I also replaced both the test cylinders as the lines faded on them quite quickly.
I also like the pH comparator that comes with the K-2006 kit. If you purchase your refill kit from TFTestKits.net you can purchase a refill for the K-2006 instead of the TF 100 kit and you will get the R-0004 reagent.

The test vials (cylinders) measurement lines do fade over time due to handling them. I take a Sharpie and make a dark line at the 10ml and 25ml lines which tend to last longer. Also, I have a separate vial for each test so each wears a little differently.

Many of us swirled for a long time before moving to a speedstir device. If you are getting consistent results then stay with what works.
Thanks for sharing your learnings.