First Pool - Jumped in feet first

ruleandrews

Well-known member
May 12, 2021
71
Southern Ontario
First off, great site and such a wealth of knowledge! I have learned quite a bit just lurking around for the past year.

Hoping to get some advice from this thread and maybe it might help someone else along their journey.


A little back story on how I got to where I am now with my pool. This is going to be a long one.

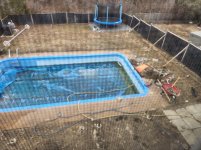
I bought a house last year with a concrete pool that was in bad shape. Its a 16x32 (approx. 19,000 gallons) salt free chlorine pool.

We bought the house during the winter months when everything was covered in snow but was told that the pool worked fine and all the equipment was in working order. From what we could see, the equipment looked old, and the concrete deck was sloping with a rubber deck coating on it. We figured we could open the pool and use it for the season and come the following year, get the deck torn out and a new pattern concrete deck installed.

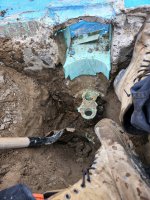
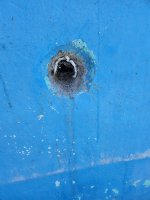
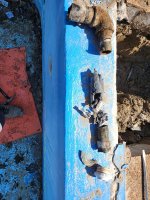
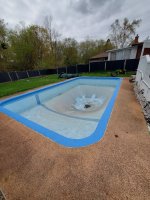
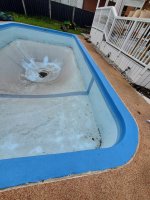
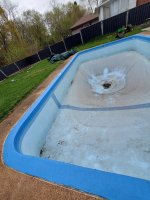
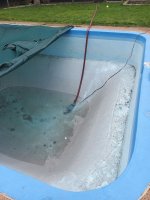
Come springtime, I peeled back the cover and it was a mess. First thing I noticed was the pool was painted, but the paint was all chipped off and floating in the water. There was also no coping stone or any coping for that matter. The walls were painted blue and right up and cover to the top of the on beam. The skimmer was cracked and heled together with JB weld or something. For the equipment, it was only a sand filter and pump, but the sand filter was cracked and held together with the same thing the skimmer was and the pump was burnt out. Moreover, I found a hole in one of the basement windows where they strung an extension cord out to hook the pump up. Unbelievable!

Right off the hop, pool needed to be opened for the season as per the boss' instructions. Kids are home all summer due to Covid.

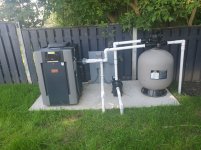
Before we moved in, we talked about getting a heater and that was still a priority. So, on top of buying a new Hayward Pump and Jandy sand filter, we also purchased a 266 BTU gas heater.

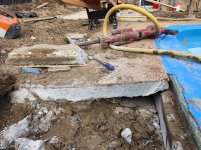
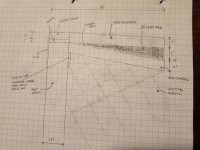
Due to building code requirements, we were unable to put the heater to where the old equipment was so, I had move everything to the to the other side of the yard. which is about 100 ft from where the old equipment was and about 130 ft away from my gas meter. I poured a concrete pad ran the electrical and had the gas ran to the pad. I didn't want to break up the deck this year, so I left the plumbing as it was and just tapped into where the old equipment was and ran new plumbing from where the old equipment was to the new equipment and back. Then pressure tested the lines and back filled the trench.

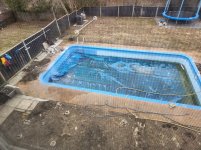
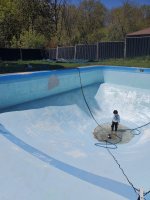
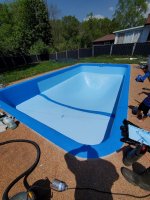
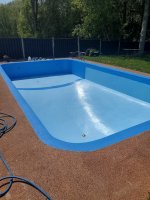
With that out of the way, I needed to drain the pool to repaint it with the same acrylic pain that was originally used. Chipped off all the lose paint and sanded/scuffed the walls and floors. Repainted and filled the pool.

Yay! pool was ready for summer.

Some issues I noticed over the summer while using the pool.

New paint kept bubbling in spots almost right away, not a big deal though.

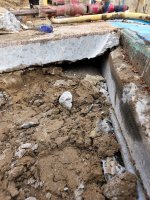
Losing about an inch of water a day. Thought it was evaporation but turns out its a leak. I figured it was leaking from the skimmer and would just keep toping off and address the issue next year when digging up to replace the skimmer.
 

Attachments

  • 20210505_155005.jpg
    20210505_155005.jpg
    207.2 KB · Views: 243
  • 20210505_155010.jpg
    20210505_155010.jpg
    179.3 KB · Views: 229
  • 20210505_155014.jpg
    20210505_155014.jpg
    171.4 KB · Views: 215
  • 20210512_140422.jpg
    20210512_140422.jpg
    147.6 KB · Views: 218
  • 20210518_121107.jpg
    20210518_121107.jpg
    191.6 KB · Views: 228
  • 20210518_121427.jpg
    20210518_121427.jpg
    187.1 KB · Views: 229
  • cover off.jpg
    cover off.jpg
    130.7 KB · Views: 238
  • equipment.jpg
    equipment.jpg
    323.7 KB · Views: 240
Were now into spring and the real renos have begun.


The plan for the back yard is:

1) Break out old pool deck and skimmer

2) New coping stones around pool

3) New plumbing to new pad, abandon all existing plumbing in the ground

4) New water line tile

5) Excavate and grade pool deck and patio area leading up the house

6) Install deck drains, form for concrete, granular “a” and wire mesh

7) Pour new concrete and stamp it

8) Misc. landscaping and gazebo build, not pool related.


Break out old pool deck and skimmer (currently)

I cut a section on each side of the skimmer and boke it out and noticed the existing concrete pad is resting on the pool shell. I am now thinking that once the coping stones are installed around the pool edge, I can just pour the new pad right over the old pad as it can’t really sink anywhere seeing is resting on a concrete ledge.

I would have about 3” of concrete right near the coping stone and then 4” everywhere else.

I was hoping someone can provide some advise on this.

Other wise, I am going to need to break out the whole deck and possibly dig up around the whole pool as it was back filled with sand, and I would prefer to have crushed gravel seeing I am going to be pouring a new deck.

Also, after breaking out the skimmer, there seems to be a lot of water, but its not coming from the skimmer as its already been removed and the pool has been drained down below the returns.

I can’t tell if its ground water coming up, or if its coming from inside the pool and leaking out through the shell…

There is basically where I am now.

I will keep this thread updated and lots of picture for anyone who is interested!


Thanks!
 

Attachments

  • 20220401_164924.jpg
    20220401_164924.jpg
    242.9 KB · Views: 144
  • 20220331_183116.jpg
    20220331_183116.jpg
    219.3 KB · Views: 144
  • 20220401_164929.jpg
    20220401_164929.jpg
    451.2 KB · Views: 152
  • over view 2.jpg
    over view 2.jpg
    348.7 KB · Views: 156
  • Overview 1.jpg
    Overview 1.jpg
    244.9 KB · Views: 160
WOW! This is going to be quite an adventure! Thanks for letting us come along for the ride! My back and shoulders hurt just looking at the pics!!!

Kim

Was that an old Hybrid pool- concrete bottom and fiberglass walls?
No, its 100% concrete, but it is old.
I looks as if the inside was coated with some type of parging before being painted.
 
Age should not matter. If it's 100% concrete and structurally sound, you should be good to strip the paint and any coatings and plaster/pebble resurface. That should end any seepage issues and will prove more durable so you can spend your time enjoying the pool. While you're running new plumbing, I'd also run any new lighting while everything is stripped to the shell. It sounds like you are rescuing it the right way, so better to spend the money up front. By the time your done, you will basically have a new pool!
 
  • Like
Reactions: kimkats
Age should not matter. If it's 100% concrete and structurally sound, you should be good to strip the paint and any coatings and plaster/pebble resurface. That should end any seepage issues and will prove more durable so you can spend your time enjoying the pool. While you're running new plumbing, I'd also run any new lighting while everything is stripped to the shell. It sounds like you are rescuing it the right way, so better to spend the money up front. By the time your done, you will basically have a new pool!
Awesome advice!

The pool doesn't have any lighting currently.
I was thinking about doing lighting from above. Some lighting shining down from a water feature as well as some lighting from the gazebo that will be pool side.

In the next two year, we plan on changing the depth of the pool. It's about 10ft deep right now and want to bring it up to 6ft.
I'm thinking I'll just prime and paint the inside for now and when I'm ready, we will break the bottom on the shell, back fill and repour a new floor at the new depth.
At that point, were either going with marblite or just tile the whole pool.
 
  • Like
Reactions: kimkats
This took alot of brute force and ignorance to get out. I bought a cordless sds to get the next return line out. I had to make the hole a bit bigger too.
 

Attachments

  • 20220408_122501.jpg
    20220408_122501.jpg
    490.8 KB · Views: 81
  • 20220408_130510.jpg
    20220408_130510.jpg
    808.1 KB · Views: 81
  • 20220408_130515.jpg
    20220408_130515.jpg
    535.2 KB · Views: 81
  • Wow
Reactions: kimkats
I am no structure guru but it looks like you have no expansion joint and if pouring the new pad over the old, might not be building one in.

There are structural gurus on this site who will chime in

Take a look at this for background


Enjoying this content?

Support TFP with a donation.

Give Support
I am no structure guru but it looks like you have no expansion joint and if pouring the new pad over the old, might not be building one in.

There are structural gurus on this site who will chime in

Take a look at this for background

Great advice!
There will be 12" coping stone which will be three inches thick. That will be put into a bed of mortar which will be approx. 1" thick. The new concrete will be poured up to the coping stone and there will be an expansion joint in-between the concrete and coping.
The existing pad has a pretty crazy slop on it. Its slopped away from the pool about 6" in a 3ft distance. This will give me room to have a bed of gravel under the majority of the deck.
The previous owners had troweled a 1\2" layer of rubber over the whole deck, so where the new concrete may touch the old, that rubber should act as an expansion joint.

I made a little sketch.
 

Attachments

  • 20220409_112204.jpg
    20220409_112204.jpg
    386.6 KB · Views: 30
I know the concept of the expansion joint is to allow for some horizontal movement between pool and deck. Leaving the existing deck in place it seems like it doesn’t have that allowance and I wonder if that might lead to problems. Then again….its been in place this long….

Like I said, Ive got zero expertise on this but imagine this might catch the eyes of someone who does
 
g the depth of the pool. It's about 10ft deep right now and want to bring it up to 6ft.
I'm thinking I'll just prime and paint the i

we plan on changing the depth of the pool. It's about 10ft deep right now and want to bring it up to 6ft.
I'm thinking I'll just prime and paint the inside for now and when I'm ready, we will break the bottom on the shell, back fill and repour a new floor at the new depth.
At that point, were either going with m
Awesome advice!

The pool doesn't have any lighting currently.
I was thinking about doing lighting from above. Some lighting shining down from a water feature as well as some lighting from the gazebo that will be pool side.

In the next two year, we plan on changing the depth of the pool. It's about 10ft deep right now and want to bring it up to 6ft.
I'm thinking I'll just prime and paint the inside for now and when I'm ready, we will break the bottom on the shell, back fill and repour a new floor at the new depth.
At that point, were either going with marblite or just tile the whole pool.
You should get a core drill and put in some nicheless lights like microbrites. You will be happy you did if you want lighting... it will transform the pool at nighttime. Since the deck is gone and you are already working on some of the returns other things - this is the time to do it.
 
I know the concept of the expansion joint is to allow for some horizontal movement between pool and deck. Leaving the existing deck in place it seems like it doesn’t have that allowance and I wonder if that might lead to problems. Then again….its been in place this long….

Like I said, Ive got zero expertise on this but imagine this might catch the eyes of someone who does
I figure the 1/2" rubber deck would be acting like one.
I'd be curious to see what others say.
Worst comes to worst, for the few inches the new concrete would be touching the old, I could always use some styrofoam and put that on top of the rubber coating.
 
Rule - I think you’re referring to the 1/2” rubber as providing a buffer in the horizontal plane (horizontal may not be entirely accurate with the slope of the old deck but close enough for the description) between the old deck and new deck. The expansion joint I am talking about is a buffer in the vertical plane between the pool shell and deck. The ‘old’ deck seems to have no expansion joint as it comes right up to the pool shell. If you leave the old deck in place, your reconstructed pool I think will not have an expansion joint either. Even with a gap between the new deck and coping, I would be concerned about the ‘no gap’ still in place underneath.

Then again like I said, its been like this for how long so maybe its ok if the shell isn’t cracked yet?
Ahh now I understand what your saying!
I didn't even think of that.
That could be the cause of a fracture I see in one of the corners that the pervious owner had fixed.
 
Nope....................great question to make sure you don't make a HUGE mistake. Even if it is stainless it may end up rusting and causing oh so many problems down the road. I know this is not want you wanted to hear but better do a bit more work now to avoid problems later.
 
Nope....................great question to make sure you don't make a HUGE mistake. Even if it is stainless it may end up rusting and causing oh so many problems down the road. I know this is not want you wanted to hear but better do a bit more work now to avoid problems later

Nope....................great question to make sure you don't make a HUGE mistake. Even if it is stainless it may end up rusting and causing oh so many problems down the road. I know this is not want you wanted to hear but better do a bit more work now to avoid problems later.

Thanks!!

I've been using a diamond cup wheel on my angle grinder. It's a slow go, but it's not too labour intensive.
Besides sand blasting, is there any tip or tricks to get the paint off faster?
 

Enjoying this content?

Support TFP with a donation.

Give Support
Thread Status
Hello , This thread has been inactive for over 60 days. New postings here are unlikely to be seen or responded to by other members. For better visibility, consider Starting A New Thread.