DIY Exposed Pipe Outdoor Shower Plans?

Hmmmm.. tested by whom and for how long? :scratch: I'm pretty sure Roundup was tested as well..

In my humble opinion, copper just has a better rugged look to it. Awesome work for the first time.. đź‘Ť

Copper is the superior technology for plumbing. Not denying that. And it will look better to most people when done. And if you can solder, by all means this is the way to go.

But most people cannot sweat copper fittings. And as I said far above, sharkbites are expensive fittings. I only suggested CPVC, for future people who search this thread and think a DIY shower would be great but I cant solder and dont want to hire a plumber. As with just about anything I type here in these forums, I have 3 goals. 1.) Encourage and congratulate 2.) Offer any guidance to the OP that I might have 3.) Remember that what I type will help future people, just like when I search the forums to get answers.

So based upon #3, I simply wanted to offer a future tip.

But to the OP, this is awesome, job well done, congrats on a new skill, and its always nice to get to buy a new tool.

CPVC has been around since the 1950's BTW (and used very regularly in place of copper in the past couple of decades as the cost of copper has risen and copper thieves became a thing), as a DIY technique for people who are unable or scared to solder copper.
 
Pex plumbing is done on pretty much all new construction homes. Pex can withstand freezing temps no problem. (As long as there is an expansion loop installed in the system) Pex however can not stand UV light, so it’s not meant to be used in places outside. All the fittings used in PEX are clamp fittings that can withstand the test of time easily.
 
  • Like
Reactions: Newdude
For a project like this, I'd always go with copper/sweat fittings. For anyone looking to do this, it's very easy to learn. Get some scrap pipe and practice soldering (and unsoldering) to get used to the prep, flux and the time it takes to heat up. I think copper has gone the way of the creative arts, but it's a nice discussion point when it's sitting on the OUTSIDE of your house for everyone to see. It does weather, tho, so you'll want to steel wool it every once in a while.... Either way, VERY nice work to the OP. I may have to copy this (unless my HOA notices it first as I'm in a corner lot...haha).
 
For anyone looking to do this, it's very easy to learn. Get some scrap pipe and practice soldering (and unsoldering) to get used to the prep, flux and the time it takes to heat up.
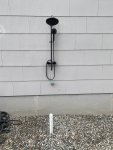
It was surprisingly easy. I watched the youtube video below, made a test solder and then went to work. Knock on wood, none of the ~20 solder joints I had to do leaked. The most challenging part was figuring out the various fittings to go from the hose to the copper pipe, and then the copper 3/4 pipe to the 1/2" shower heads.

 
  • Like
Reactions: kazamali
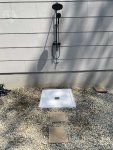
They make nice wooden outdoor shower floors that should work perfectly over the gravel. Google teak outdoor shower mat and you should get lots of results, including this one:


Yeah I was looking at something like that, but would any water actually make it into the drain?
 

Enjoying this content?

Support TFP with a donation.

Give Support
I bet if you cut it off and made the drain flush with the rock it should work fine since the water from the shower will just drain through the slats in the teak. You could even dig out the gravel a bit to make sure the drain was at the low spot.

If you wanted something where the water went directly into the drain, you could encase it in cement and even top it with some stone or other material for a really nice floor.
 
Exactly. Dig down so the drain is 1/2” above the dirt, then install your drain cover. I would also install a screen cover to keep small debris out of the pipe. Cover with gravel then place your teak shower floor on top. It will look nice and function well. :goodjob:
 
Mine is simply a leftover replacement shower head threaded onto painted pvc to blend into my pergola column. I fitted a pvc male garden hose thread end at the floor. A short piece of garden hose with a female end at both ends screws into garden hose spigot 10’ away. I lay 50’ of coiled hose out in the Texas sun for 10 mins for warm short showers.
I broke open the wallet for this, I know, probably all of $10, was mostly parts lying around the shop! :D
 

Attachments

  • FD284DC3-30D2-463B-B4DE-8555269901F0.jpeg
    FD284DC3-30D2-463B-B4DE-8555269901F0.jpeg
    704.8 KB · Views: 45
Mine is simply a leftover replacement shower head threaded onto painted pvc to blend into my pergola column. I fitted a pvc male garden hose thread end at the floor. A short piece of garden hose with a female end at both ends screws into garden hose spigot 10’ away. I lay 50’ of coiled hose out in the Texas sun for 10 mins for warm short showers.
I broke open the wallet for this, I know, probably all of $10, was mostly parts lying around the shop! :D
I like it.. its like a tropical shower coming out of the vines!
 
  • Like
Reactions: Cap'n Hook

That was easily remedied. Water heater for pool house is directly on the other side of the wall. Plumber installed it during construction so it was really easy. Blowout at waterline in basement of main house to blow out the pipes for winter. Base is just left over trek from another job and PT 2x6. Directly over sand as I added the rocks after.
 
  • Like
Reactions: kimkats and Newdude

Enjoying this content?

Support TFP with a donation.

Give Support
Thread Status
Hello , This thread has been inactive for over 60 days. New postings here are unlikely to be seen or responded to by other members. For better visibility, consider Starting A New Thread.