DIY 20' x 40' In-Ground Build - In Progress!

jastudee

Active member
Feb 20, 2022
35
Wisconsin
After spending a fair amount of time last year attempting to find a pool builder, and coming up unsuccessful(Most were 2+ years out, or willing to do it for insane amounts of money) - we decided to tackle this project ourselves.

The pool build is as follows:
-Pool Warehouse/Hydra Pools 20'x40' 42" steel wall kit, 6" corner radius
-7' Corner Step, liner over steel
-Auto365 Auto Pool Cover
-Hayward OmniLogic Cat5 Smart Phone controlled 40k Salt System
-Hayward TriStar 2.7HP Vs900 Pump
-Hayward C5030 Cartridge Filter
-2 AquaGenie Skimmers
-4 1.5" Hayward Color LED Lights
-Hayward H-Series 350k btu Heater
8' Diving Board

I will be contracting out the excavation(sort of a joint effort - my son and I have been able to help and we're having a lot of fun with it!), and the concrete decking - everything else will be done DIY.

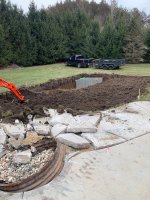
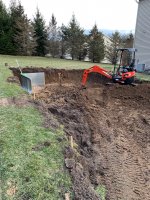
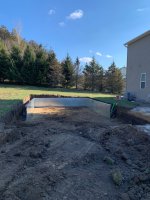
As you will be able to see in the photos, there is a fair amount of regrading with the landscape to be done - and potentially a retaining wall in the deep end corner. I plan on installing french drains around the pool as well to control moisture.

We started the dig just over a week ago and have made good progress! Have the 42" depth dug in nearly the entire pool, will finish that tomorrow as well as digging the hopper.

I have one question at this point: On the deep end panels, everything is level and square. Even when we push the panels in as tight as they can go in the corners, we still measure to 20' 1/2". Is this normal? Maybe I am overlooking something?

Thanks in advance!

Joe

image-16-04-22-06-15-1.jpegimage-16-04-22-06-15.jpegimage-16-04-22-05-54-15.jpegimage-16-04-22-05-54-14.jpegimage-16-04-22-05-54-13.jpegimage-16-04-22-05-54-8.jpegimage-16-04-22-05-54-5.jpegimage-16-04-22-06-29-1.jpegimage-16-04-22-06-29-2.jpegimage-16-04-22-06-29.jpeg
 
Hey J !!!

Twinsies !!!! Us 20X40 diving board folks gotta stick together. (y)

I've watched 1.5 cement walled vinyl pools get built so i don't know about the steel measurements. I'll keep my eyes peeled if anything else comes up. Lets call @duckcmmndr. He had a time with his build but KILLED it in the end. Check out his story when you have a minute. There might be something good to know for your next steps when you get there
@Newdude Thanks for the kind words :)

@jastudee My pool walls were polymer, but my steps/sun deck were steel. I remember for a fact that the width of my steps was 1/2" wider than the plans called for. It could not be any closer because the steel pieces that form the front of each step were bolted in between the walls. It stressed me...but was not an issue. The polymer walls were a little bigger than spec'ed too...but closer to 1/4". In the end it did not matter at all, liners are stretchy and fairly forgiving as long as you are square.
Capture.JPG

Let me give you a tip when you start measuring your diagonals to make sure it's square. It is almost impossible to do this from the top of the wall because if the walls are not plumb yet and it will throw off your measurement. Do your squaring from the bottom of the panels at the location that the plans show you to. Once you have it squared you can stake the walls in place and plumb the walls. At that point you can double check the diagonals measuring from the top. I had a pool builder tell me that as long as you are within 1 inch on diagonals you are fine...I fudged with mine till they were within 1/4" and my liner fit like a glove...not a wrinkle one.

You look like you are going to have to install a retaining wall with a drain. You are going to have a bunch of topsoil to do something with.
 
  • Like
Reactions: Newdude
@duckcmmndr - thanks a lot for that information! This really helped out. Made some good progress over the past 2 days - majority of walls up and so far everything is nice and square and plumb. Going to get rest of walls up hopefully yet this week in hopes to get the bond collar poured at the end of the week. Plan to start the pool base next week.

I did eventually reach out to the pool manufacturer on the question of the .5" extra wall distance on the deep end. I actually measured the panels to confirm that each panel was about 1/8" longer than what the plan called for. Sounds like exactly what you confirmed as well. Their recommendation was to follow this width all the way down and ensure squareness at the end.

And you are correct, going to for sure be installing a retaining wall with a French drain system.

On the bright side - I have had some real luck recently finding outlets for the soil, have a steady stream of local individuals hauling it away for me(free to them, and free to me). It's a win/win!
 
Some progress was made over the past weekend. On Friday we had heavy rains which lead to about a foot over water needing to be pumped out of the deep end.

At this point, we need to finish digging the hopper end for the excavation to be complete. Hoping for continued dry weather to get that done this week, pool base next week.

The majority of the walls are set, and checked square to within 1/4" - pretty happy with that!
 

Attachments

  • IMG_1613.jpg
    IMG_1613.jpg
    782.5 KB · Views: 129
  • IMG_1614.jpg
    IMG_1614.jpg
    905.1 KB · Views: 126
  • IMG_1615.jpg
    IMG_1615.jpg
    703.5 KB · Views: 129
  • IMG_1616.jpg
    IMG_1616.jpg
    713.7 KB · Views: 131
Good progress! The hopper dig was 100% the hardest most labor intensive thing I have ever done. Lots of flat shovel and pick axe work for mine. I used a big trackhoe for the dig...and it could only get it so close and you really don't want any overdig in this area if you can help it.

You are going to deal with rain filling the hole at least once. I had to pump 3' to 4' of water out of the deep end a couple of times. I was lucky that I got the bond beam poured the day after I finished setting/squaring the walls before any rain had a chance to fall, so my walls never moved and no washout under the walls like I have seen.
 
  • Like
Reactions: jastudee
jastudee

If you haven't already, check your auto cover box placement on the the deep end. The turn buckles may interfere with the box. I may or may not have had to cut some braces off at the base collar when I was in your shoes (I had to).
 

Enjoying this content?

Support TFP with a donation.

Give Support
You guys that can do these dyi pools are my heros. I am fairly handy and love dyi projects but this is so beyond my ability. I have priced out this pool your building, but I couldn’t afford someone to put it in, especially around here. I live so remote that it’s hard to find anyone even willing to come out to give me estimates to do anything. Shoot. It took over a year of calling and begging someone to replace our metal roof. Finally got someone 150 miles away. I can’t wait to see this pool finished.
 
Good progress! The hopper dig was 100% the hardest most labor intensive thing I have ever done. Lots of flat shovel and pick axe work for mine. I used a big trackhoe for the dig...and it could only get it so close and you really don't want any overdig in this area if you can help it.

You are going to deal with rain filling the hole at least once. I had to pump 3' to 4' of water out of the deep end a couple of times. I was lucky that I got the bond beam poured the day after I finished setting/squaring the walls before any rain had a chance to fall, so my walls never moved and no washout under the walls like I have seen.
Thanks @duckcmmndr! I suspected the hopper will be a slow go process to get it perfected - hoping to get it done shortly so I can move onto the next steps. I was actually going to ask that question about the bond beam. Am I better off aiming to get this poured even before the hopper end is fully dug/pool base in place?

jastudee

If you haven't already, check your auto cover box placement on the the deep end. The turn buckles may interfere with the box. I may or may not have had to cut some braces off at the base collar when I was in your shoes (I had to).
@SEiowaClone - thanks for the advice! I was actually starting to prep the auto cover components for install, I will make sure to check into this first thing. I have a good hacksaw if necessary ;)
You guys that can do these dyi pools are my heros. I am fairly handy and love dyi projects but this is so beyond my ability. I have priced out this pool your building, but I couldn’t afford someone to put it in, especially around here. I live so remote that it’s hard to find anyone even willing to come out to give me estimates to do anything. Shoot. It took over a year of calling and begging someone to replace our metal roof. Finally got someone 150 miles away. I can’t wait to see this pool finished.
@Selenap Thanks for that encouragement, I'm going to start wearing a cape lol! DIY is all the same, it just scales with the larger the project. I was in your same exact shoes on pricing, can do it myself for $55k or pay a builder $90k-$100k for the same pool. Although it's a stressful project, the whole family is getting involved and at the end of the project we can sit back and say we did that!
 
  • Like
Reactions: KfenTx and Selenap
Thanks @duckcmmndr! I suspected the hopper will be a slow go process to get it perfected - hoping to get it done shortly so I can move onto the next steps. I was actually going to ask that question about the bond beam. Am I better off aiming to get this poured even before the hopper end is fully dug/pool base in place?
That is up to you...I got mine to a point it was close enough that I could carry out the rest of the material I had to dig out with 5 gallon buckets. I think you want it to a point where you don't need to get in/out with heavy equipment before you pour the bond beam.

Before I set the walls I had the large trackhoe positioned at the center of the deep end. As the hopper was shaped the dirt was pulled to the center and scooped out one bucket full at a time. I took my plans and figure out how much the hopper drops over a given interval and drove stakes that I pulled string across to measure down. This got me close enough for a start (blue line is inside edge of pool wall).
20200914_182137.jpg


This is the point I took mine to before I set the walls. I used a corner section to mark the 2' radius for the hopper back corners. On this surface one would look at this and say "it looks ready for pool krete". I promise you it was not anywhere close to ready. The side slopes bowed out in the center to a point where the pool krete would have only been 1/4" thick. I had to shave a ton off after I got the walls up...which was harder because you have to work off of a ladder to reach the top whereas before I could stand on the shelf.
20200915_190903.jpg


This is the day I poured my bond beam (day 7). The hopper walls at this point are still being fine tuned.
20200921_143911.jpg

Here is a close up of the last pic. You will see a string with spacers (top and bottom) that represent the 2" thickness of the pool krete at the correct depth based off the top of the walls. It was lots of work to get the hopper walls shaped correctly and accurately. You will want to leave the pins in the corners of the hopper as well as a few on the slope when you are done to help with pool krete install.
Untitled.jpg

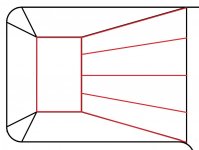
I did not do the pool krete on my pool. It was the only part of the pool that I did not do. I had a friend that paid to have a pool put in the year before and I got the name of the guy that did the pool krete on his pool and got him to do mine. I had seen his work and it was fantastic. He used my pins and put in some more of his own and then pulled strings where the red lines are at (at the correct height measured off the top of the walls). He used these as a guide for how thick to put on the pool krete and took them up as he went.
Capture.JPG

Lots of info here...but I hope it helps. I had to figure this stuff out as I went along and this worked good for me, so I hope it guides you in a direction that works for you. :)
 
@duckcmmndr - incredibly helpful, thanks for the detailed response! This helps me out a bunch.

Made some progress since the last post, but not a lot. Weather has been absolutely against me for this phase, rain with a few nice days in between - just not quite enough to let everything dry, followed by another rain storm.

Started shaving in the walls, this was actually a lot more fun than I expected!

Also, the pool just got dry enough for me to work today on it for about an hour. Of course there’s another .5” of rain in the forecast through the night… ugh!

I figure I can’t control the weather, but I can fight it! Bought some tarps and have the area covered, hope it mitigates the water. 07F8917E-29EC-4A16-84FC-FBCC70F89DB8.jpegEB631AE8-6593-482B-B681-4C3DC9D7D6C5.jpeg
 
@duckcmmndr - or anyone else who may have the answer to this: I sometimes tend to be a bit OCD and somewhat of a perfectionist. When you were shaving in your walls, how critical was exactly 2" in depth? I'm trying to get it as close as possible, but some places are 1/4" higher or deeper - i can certainly keep blending it in but don't want to do a bunch of unnecessary work. As I think about it, I can't imagine it is super critical to have this precise - the finished grade of the pool krete needs to match perfectly but this doesnt seem quite as critical. Will just use more material if its deeper in spots?

That was a long rambled out question... lol

Thanks for any help.
 
I am no technical expert by any means, but I think it’s a 1-2” range, and if you go too thick it’s actually not helpful. @jimmythegreek should be able to shed some light.
 
@duckcmmndr - or anyone else who may have the answer to this: I sometimes tend to be a bit OCD and somewhat of a perfectionist. When you were shaving in your walls, how critical was exactly 2" in depth? I'm trying to get it as close as possible, but some places are 1/4" higher or deeper - i can certainly keep blending it in but don't want to do a bunch of unnecessary work. As I think about it, I can't imagine it is super critical to have this precise - the finished grade of the pool krete needs to match perfectly but this doesnt seem quite as critical. Will just use more material if its deeper in spots?

That was a long rambled out question... lol

Thanks for any help.
I am in that same OCD boat as you and I believe that 1/4" is plenty close enough. I tried to error on the sided of deeper rather than shallower, just a little more pool krete, but I promise I have places that are shallower by 1/4". I really would not worry about the deeper spots at all, within reason, and some shallow spots here and there are understandable. I have only done my pool...so maybe someone that does them for a living will chime in.
 
  • Like
Reactions: Newdude
Sorry to OP, not trying to hijack their post (I can make my own post if that would be better) but I'm about to undertake a similar DIY project and wanted to ask @jastudee and @duckcmmndr at what point in the process could you 'relax' with regard to weather concerns? From what I understand, from the day you break ground excavating until when you get the bond beam poured you're really trying to race mother nature to not wash out any of your work. Did you find that to be the case? Did you feel rushed to get the pool base/pool krete put down before rains as well?
 
Sorry to OP, not trying to hijack their post (I can make my own post if that would be better) but I'm about to undertake a similar DIY project and wanted to ask @jastudee and @duckcmmndr at what point in the process could you 'relax' with regard to weather concerns? From what I understand, from the day you break ground excavating until when you get the bond beam poured you're really trying to race mother nature to not wash out any of your work. Did you find that to be the case? Did you feel rushed to get the pool base/pool krete put down before rains as well?
I did not really relax until I had my pool krete complete. Having said that...the goal should be to get the walls set and bond beam poured before tons of rain if possible or you might have to do some re-plumbing and squaring.

I took a week of vacation that started on a Monday. I did the pool dig layout over the weekend and I broke ground Monday morning. I was pouring my bond beam exactly 1 week later on a Monday morning. Not 1 drop of rain fell during that first week (I was blessed). I did breath a little sigh of relief once the bond beam was poured. I did pay a guy to help me dig that first week...two people get twice as much done and there is no way I would have been able to do the bond beam 7 days after breaking ground without 2 shovels working all week long. I started on plumbing immediately after the bond beam and due to the fact that I was contracting someone to do my pool krete...I had to work off of his schedule, so I did things slightly out of order and did the pool krete before the pool deck (not normal). Not a big deal...but pool krete, unlike concrete, does not get really hard. So you have to be careful knocking rocks and stuff on the pool krete and using ladders from inside or you will put little divots in it. I had some divots and patched them the day before I hung my liner.

If you are doing liner over steps or steps/tanning ledge, I would also advise you use concrete there instead of pool krete on the steps/ledge. The steps/tanning ledge are relativity shallow and if you jump on it/them you may dent it if it were pool krete. The pool bottom is not really an issue because by the time you are that deep in the water you have some buoyancy and your weight is not really a factor. You could do this when you pour the bond beam or when you pour the pool deck.

I did have rain, I ended up having 2 really big tropical storms, that made it all the way to Arkansas, that dumped 3-4 feet of water into my deep end. This was while I was doing plumbing and while it made the trench around the outside of the walls a muddy mess, it did not stop me. I had to pump the water out and buck out a bunch of mucky sludge that ended up settling in the bottom of the hopper.

That was a lot of typing to say...you can breath a little easier after the bond beam is poured and locked your walls in their plumb and square position. :)
 
  • Like
Reactions: dleonard1122

Enjoying this content?

Support TFP with a donation.

Give Support
Thread Status
Hello , This thread has been inactive for over 60 days. New postings here are unlikely to be seen or responded to by other members. For better visibility, consider Starting A New Thread.