
This post will walk you through the anatomy of a sand filter, and then provide a video at the end for how to deep clean your sand filter. The filter used in the photos and videos is a Hayward S180T top mount sand filter. The images are of a similar filter. Obviously not all filters are configured in the same way, but this tutorial should get you well on your way.
This post is intended to provide a more in-depth look at how the filter works. This post is NOT a substitute for understanding how to perform the basic functions of your filter in the daily operation of your pool. Please see the Pool School article for that information.
Many new members with sand filters ask the question, "When should I change my sand?" The short answer is, usually never. Sand existed for millions of years before it ended up in your filter. A few years of working on your pool won't change it. While there are some rare circumstances where sand may need to be changed, in general a deep cleaning can do wonders for your filter's efficiency.
Anatomy of a Filter
Hayward S180T sand filter
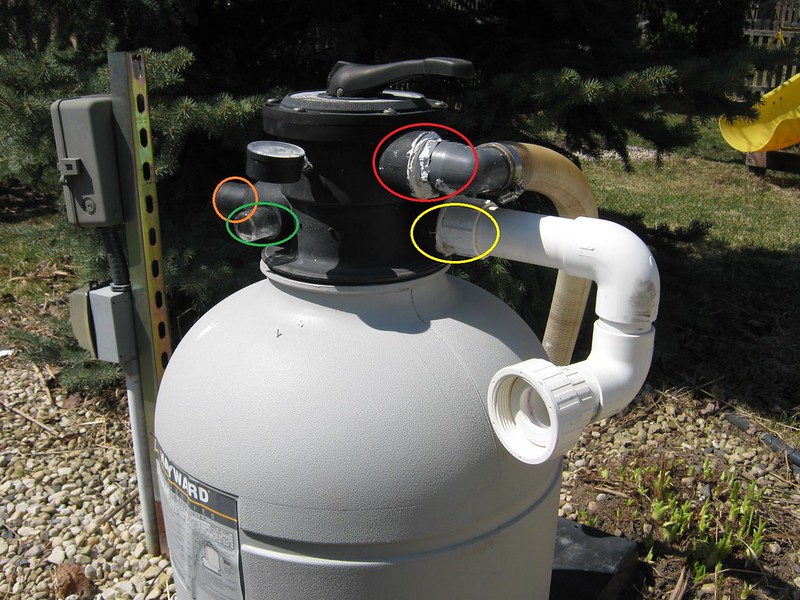
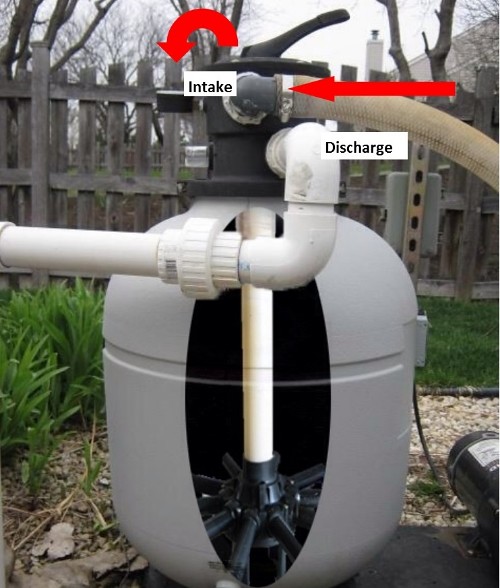
This is a picture of the filter. The Red circle is the "Intake" from the pump. The yellow circle is the "discharge" to the return. The orange circle is the waste port and the green circle is the sight glass.
Not pictured is the band collar that secures the multiport to the filter body.
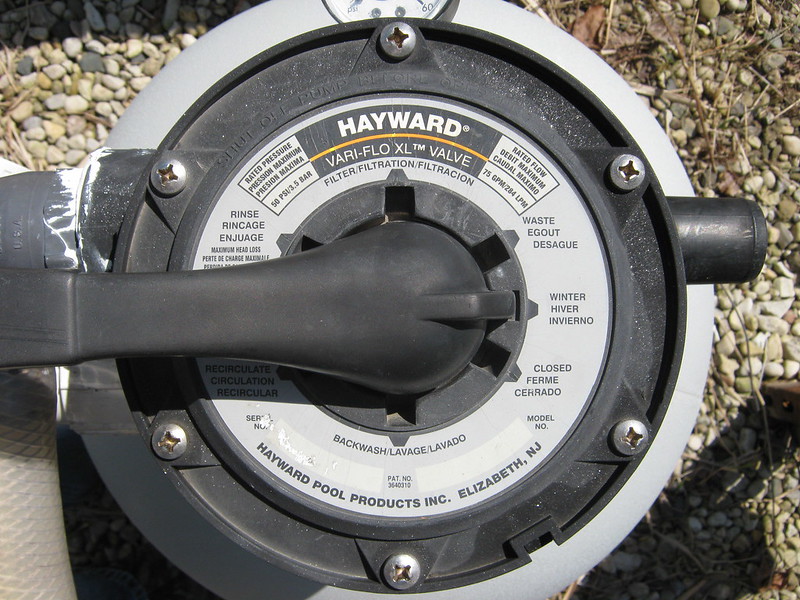
This is the top view of the multiport with all of the settings. These six screws will disassemble the multiport, not separate the multiport from the filter body. Disassembly is necessary only to get to the spider gasket (where serviceable). To disassemble, remove all six phillips head screws. This will reveal the key, cover, and handle assembly, as well as the spider gasket. The spider gasket on this particular multiport is not a serviceable item.

This is the multiport, removed from the filter, as viewed from the bottom. Small leaks from under the band collar are usually explained by the blue o-ring not being seated properly or being damaged (if tightening the band collar doesn't fix the leak). The bottom of the multiport will be seated on the standpipe in the next picture.
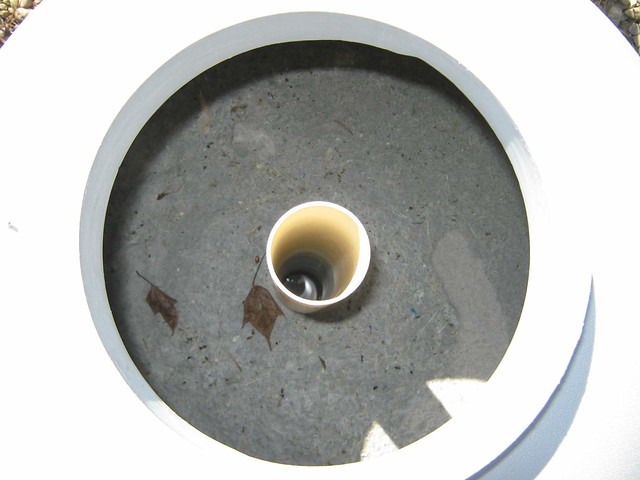
This is a bird's eye view of the filter with the multiport removed. The pipe in the middle is the standpipe. Notice the thin layer of debris on top of the sand bed. As you will see later in the video, this layer will be removed, followed by a deep clean of the sand bed, before reassembling the filter.
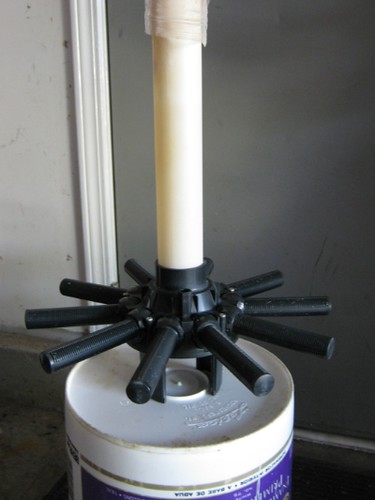
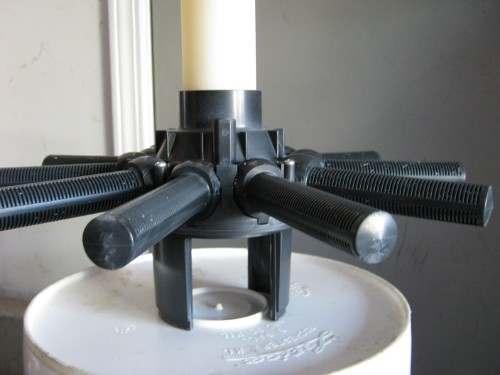
This is the lateral assembly removed from the filter. As seen in the second photo, the openings in the lateral fingers are each just thinner than a grain of sand. Always use extreme caution when working with the laterals to prevent damage. On this model, the laterals themselves do not screw in to the standpipe. The screws at the base of the assembly must be removed and the base separated to access each lateral. Other styles have each lateral finger threaded so that it can screw into the base of the assembly.
Sand Filtration 101
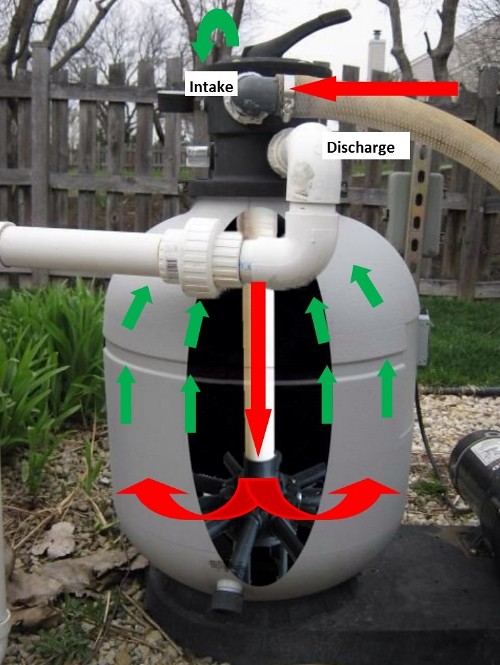
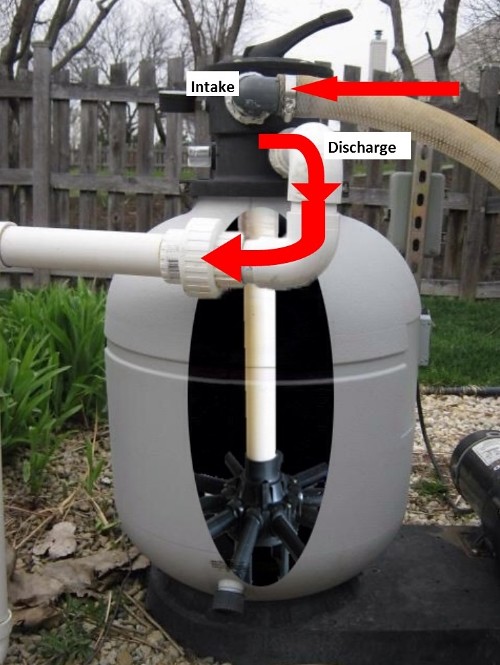
So how exactly does the water get clean? Remember those settings on the top of the multiport? Let's walk through them. Red arrows represent unfiltered water from the pool. Blue arrows represent clean filtered water. Green arrows represent dirty water.
WARNING - When you turn the handle, the water is diverted in different directions based on the settings chosen. All changes must be made with the pump off! Put another way, never turn the multiport handle while the pump is running.
Special thanks goes to Leebo for virtually cutting open then rebuilding my filter so you all can see the inside.
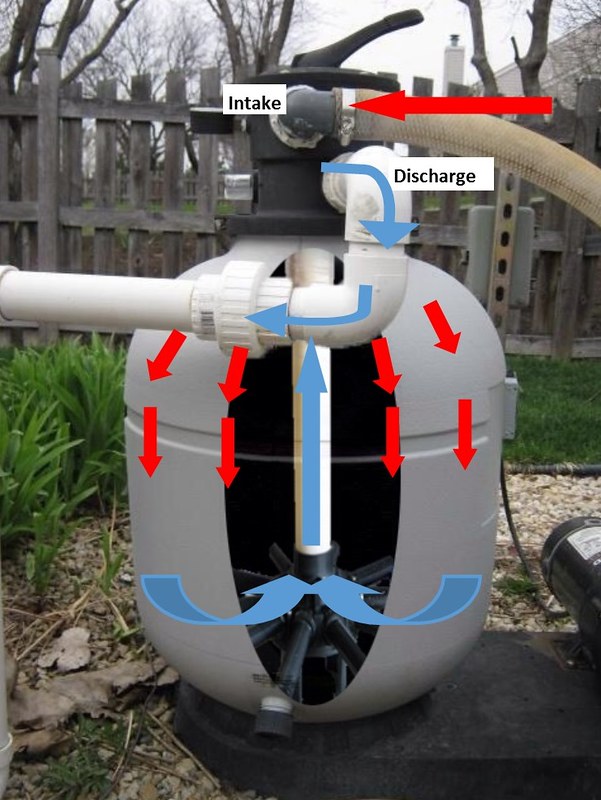
FILTER - Filter is normal operation. On this setting, pool water enters the intake and is sprayed on top of the sand bed. It travels through the sand bed under pressure, where the sand filters out particulates. This now clean water enters the laterals at the bottom of the filter, travels up the standpipe to the multiport, and out the discharge where it returns to the pool.
BACKWASH - As your filter cleans your pool, it becomes clogged with all of the particulate matter that was in the pool. Filter pressure will increase while flow decreases. Backwashing is necessary to clear out that sand and return the filter to normal flow. TFP recommends backwashing when filter pressure rises 20-25% above the clean pressure operation. In backwash mode, the flow is reversed from normal filter operation. Unfiltered pool water enters the intake and is directed down the standpipe, out the laterals and up through the sand bed. This action dislodges all of the dirt and particulate matter that has been trapped in the sand. This dirty water is sent out the waste port on the back of the multiport. Backwashing not only "washes" the sand, but also leads to resettling it in the next step, which is....

RINSE - ....rinsing. Rinse is exactly the same as filter, except the filtered water is sent out the waste line instead of back into the pool. This step should always happen after backwashing for two reasons. First, any dirt and debris in the filter that did not get ejected during the backwash is now in suspension with the sand. Immediate filtering could put some of it in the pool. Second, the rinse helps resettle the sand bed for when the system is placed back in filter mode.
RECIRCULATE - This mode bypasses the filter completely, as if it was removed from the plumbing loop. Unfiltered pool water enters the intake, skips the sand, and immediately goes out the discharge and back to the pool. The most practical use of this setting is during the early stages of a SLAM overnight, where mixing of the pool water is desired, but filtration would reduce flow too quickly.
WASTE - In this mode, unfiltered pool water bypasses filtration and is ejected out the waste port. The most common uses for this mode would be "vacuuming to waste," or for draining the pool.
The final settings on this multiport (and pictures don't really help) are as follows:
WINTER - The multiport is intentionally placed between two settings, completely opening up the passageways. This setting is used while the filter is empty over winter.
CLOSED - This turns the filter into a giant ball valve, cutting off and blocking water flow between intake and discharge.
The Ultimate Deep Clean
Backwashing is a maintenance action that should be taken during the swim season (or the SLAM process) when flow slows down and pressure rises. Sometimes a backwash just isn't good enough. This is when a deep clean is required.
The deep cleaning should be done once a year at the beginning of your season to ensure the sand bed is settled properly. It will also help dislodge the debris from underneath the laterals at the very bottom of the filter. Finally, it is possible that filters get so dirty, packed and clumped together, small channels form in the sand. Water can take this route instead of through the sand, greatly reducing the cleaning power of the filter.
Waterbear gave us the following instructions from this post:
**WARNING -- Before starting this process, be sure that the filter is isolated from the pool plumbing. I filmed this video at the very beginning of the swim season, and my plumbing was not hooked up yet. If the filter is still connected, turn off valves, disconnect plumbing, or do whatever you need to do to isolate your filter from the system. If you don't do this step, as you fill the filter with water, the junk and crud will fall into the standpipe and go right back into your pool.**
The following videos show the deep cleaning.....
This post is intended to provide a more in-depth look at how the filter works. This post is NOT a substitute for understanding how to perform the basic functions of your filter in the daily operation of your pool. Please see the Pool School article for that information.
Many new members with sand filters ask the question, "When should I change my sand?" The short answer is, usually never. Sand existed for millions of years before it ended up in your filter. A few years of working on your pool won't change it. While there are some rare circumstances where sand may need to be changed, in general a deep cleaning can do wonders for your filter's efficiency.
Anatomy of a Filter
Hayward S180T sand filter
This is a picture of the filter. The Red circle is the "Intake" from the pump. The yellow circle is the "discharge" to the return. The orange circle is the waste port and the green circle is the sight glass.
Not pictured is the band collar that secures the multiport to the filter body.
This is the top view of the multiport with all of the settings. These six screws will disassemble the multiport, not separate the multiport from the filter body. Disassembly is necessary only to get to the spider gasket (where serviceable). To disassemble, remove all six phillips head screws. This will reveal the key, cover, and handle assembly, as well as the spider gasket. The spider gasket on this particular multiport is not a serviceable item.
This is the multiport, removed from the filter, as viewed from the bottom. Small leaks from under the band collar are usually explained by the blue o-ring not being seated properly or being damaged (if tightening the band collar doesn't fix the leak). The bottom of the multiport will be seated on the standpipe in the next picture.
This is a bird's eye view of the filter with the multiport removed. The pipe in the middle is the standpipe. Notice the thin layer of debris on top of the sand bed. As you will see later in the video, this layer will be removed, followed by a deep clean of the sand bed, before reassembling the filter.
This is the lateral assembly removed from the filter. As seen in the second photo, the openings in the lateral fingers are each just thinner than a grain of sand. Always use extreme caution when working with the laterals to prevent damage. On this model, the laterals themselves do not screw in to the standpipe. The screws at the base of the assembly must be removed and the base separated to access each lateral. Other styles have each lateral finger threaded so that it can screw into the base of the assembly.
Sand Filtration 101
So how exactly does the water get clean? Remember those settings on the top of the multiport? Let's walk through them. Red arrows represent unfiltered water from the pool. Blue arrows represent clean filtered water. Green arrows represent dirty water.
WARNING - When you turn the handle, the water is diverted in different directions based on the settings chosen. All changes must be made with the pump off! Put another way, never turn the multiport handle while the pump is running.
Special thanks goes to Leebo for virtually cutting open then rebuilding my filter so you all can see the inside.
FILTER - Filter is normal operation. On this setting, pool water enters the intake and is sprayed on top of the sand bed. It travels through the sand bed under pressure, where the sand filters out particulates. This now clean water enters the laterals at the bottom of the filter, travels up the standpipe to the multiport, and out the discharge where it returns to the pool.
BACKWASH - As your filter cleans your pool, it becomes clogged with all of the particulate matter that was in the pool. Filter pressure will increase while flow decreases. Backwashing is necessary to clear out that sand and return the filter to normal flow. TFP recommends backwashing when filter pressure rises 20-25% above the clean pressure operation. In backwash mode, the flow is reversed from normal filter operation. Unfiltered pool water enters the intake and is directed down the standpipe, out the laterals and up through the sand bed. This action dislodges all of the dirt and particulate matter that has been trapped in the sand. This dirty water is sent out the waste port on the back of the multiport. Backwashing not only "washes" the sand, but also leads to resettling it in the next step, which is....
RINSE - ....rinsing. Rinse is exactly the same as filter, except the filtered water is sent out the waste line instead of back into the pool. This step should always happen after backwashing for two reasons. First, any dirt and debris in the filter that did not get ejected during the backwash is now in suspension with the sand. Immediate filtering could put some of it in the pool. Second, the rinse helps resettle the sand bed for when the system is placed back in filter mode.
RECIRCULATE - This mode bypasses the filter completely, as if it was removed from the plumbing loop. Unfiltered pool water enters the intake, skips the sand, and immediately goes out the discharge and back to the pool. The most practical use of this setting is during the early stages of a SLAM overnight, where mixing of the pool water is desired, but filtration would reduce flow too quickly.
WASTE - In this mode, unfiltered pool water bypasses filtration and is ejected out the waste port. The most common uses for this mode would be "vacuuming to waste," or for draining the pool.
The final settings on this multiport (and pictures don't really help) are as follows:
WINTER - The multiport is intentionally placed between two settings, completely opening up the passageways. This setting is used while the filter is empty over winter.
CLOSED - This turns the filter into a giant ball valve, cutting off and blocking water flow between intake and discharge.
The Ultimate Deep Clean
Backwashing is a maintenance action that should be taken during the swim season (or the SLAM process) when flow slows down and pressure rises. Sometimes a backwash just isn't good enough. This is when a deep clean is required.
The deep cleaning should be done once a year at the beginning of your season to ensure the sand bed is settled properly. It will also help dislodge the debris from underneath the laterals at the very bottom of the filter. Finally, it is possible that filters get so dirty, packed and clumped together, small channels form in the sand. Water can take this route instead of through the sand, greatly reducing the cleaning power of the filter.
Waterbear gave us the following instructions from this post:
Open up the filter so the sand bed is exposed. Stick a garden hose into the sand and turn on the water. The sand should loosen up and all the dirt and gunk should float and overflow out of the filter. You might need to stir up the sand a bit. Keep this up until the water overflowing out of the filter is clean. If any sand is clumped together CAREFULLY break it up with something like a broom handle but BE VERY CAREFUL NOT TO DAMAGE THE LATERALS. You will be surprised at how much stuff this gets out of your filter than backwashing doesn't and I feel this 'deep cleaning' should be done yearly. This should take care of the channeling but if the sand has a lot of calcium deposits you might want to follow this up with an acidic sand filter cleaner from the pool store.
**WARNING -- Before starting this process, be sure that the filter is isolated from the pool plumbing. I filmed this video at the very beginning of the swim season, and my plumbing was not hooked up yet. If the filter is still connected, turn off valves, disconnect plumbing, or do whatever you need to do to isolate your filter from the system. If you don't do this step, as you fill the filter with water, the junk and crud will fall into the standpipe and go right back into your pool.**
The following videos show the deep cleaning.....
Last edited:
