Correct way to repair cracks at the level of the bond beam (cracked tile)?

Thanks, I am reading the post now. Trying to find what type of epoxy to use. I have used PC super epoxy and like it, just have not used it on pools.


Read the comments on the methods in this video below...


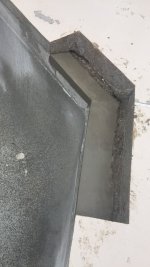
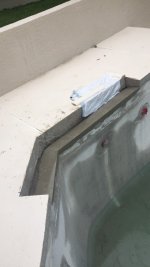
This may be overkill for a bond beam repair...

 
I was reading about this "Rapid Set high strength structural repair mortar" This stuff is incredible if it does what it says. "drive or build on in one hour", sets in 15 minutes, 6,500 psi, hydraulic cement formulation, durable in wet environments, 1/2 to 6 in. thick. superior resistance to chemicals, sounds perfect
 
I saw in one post they used "Rapid set high strength structural repair mortar" rather than high strength concrete. So the bond beam repair should use mortar rather than concrete?

Have a link to where you read that? The long thread had a long discussion about different mixes and the use of plasticizer in the mix.

Some discussion about using "plastic cement".
 
I was reading about this "Rapid Set high strength structural repair mortar" This stuff is incredible if it does what it says. "drive or build on in one hour", sets in 15 minutes, 6,500 psi, hydraulic cement formulation, durable in wet environments, 1/2 to 6 in. thick. superior resistance to chemicals, sounds perfect

I don't have any hands on experience with it. I think they all different formulations of basic concrete mix. Pick whichever one sounds best to you. I don't think any of them will be a bad choice.
 
Thanks for the epoxy videos. Looks like I am good to go. Will hopefully pour the new beam tomorrow. The other side of the spa has a small 4 inch crack close to the back of the spa. I assume that they GC poured on top of the bond beam without isolating the deck from the bond beam. It would likely be subject to similar stressors, just not as much. Although I know it would be best to do the same on the other side I am trying to avoid a complete demo of the other side. Rather, I was thinking of cutting and expansion joint on the other side of the spa and pinning attached deck and second pour to the original pour by drilling holes through the deck and second pour into the original bond beam to tie everything together. In this way the deck could move freely from the spa coping. What do you think?
 
Rather, I was thinking of cutting and expansion joint on the other side of the spa and pinning attached deck and second pour to the original pour by drilling holes through the deck and second pour into the original bond beam to tie everything together. In this way the deck could move freely from the spa coping. What do you think?

That should work.

Make sure you truly get the remaining deck isolated from the tied together pool area. That is the key to it being successful.
 
I agree. You have helped me to understand much better the mechanics of pool and deck isolation from each other and I appreciate your input very much. I think I am going to use the high strength structural mortar mix. It will be much easier to get a solid pour with no air spaces with mortar rather than concrete. The only thing is is it sets up in 15 minutes. I will need to mix fast to get a continuous pour but it can be done. Mix one bag, pour, by yourself another 15 minutes, pour and keep pouring against a wet edge and mix into the edge or I guess I could just rent a cement mixer which seems a waste for 4 or 5 bags of mix.
 
Yeah, I was just watching the HD videos on it and thinking that you have to work rapidly with the 15 minute set time. I hope you have someone helping you and planning your setup. You don't have lots of time to fumble around.
 

Enjoying this content?

Support TFP with a donation.

Give Support
I just poured a new pool equipment pad with ten 80 lb bags of concrete mixed by hand and did that in 45 minutes. Five 55 lb bags should be manageable. Just make sure my forms are secure, level and true.
Thanks again ajw22. I will post some pics when the pool is done. Sincerely, Darren
 
@MinerJason @bdavis466 @jimmythegreek if you are around your expertise would be helpful.
I would normally say use whatever looks best and you're comfortable with, but in this case I think I'd recommend something easier to work with. The 15 min initial set time is going to make things very difficult, without offering any significant advantage.
I agree. You have helped me to understand much better the mechanics of pool and deck isolation from each other and I appreciate your input very much. I think I am going to use the high strength structural mortar mix. It will be much easier to get a solid pour with no air spaces with mortar rather than concrete. The only thing is is it sets up in 15 minutes. I will need to mix fast to get a continuous pour but it can be done. Mix one bag, pour, by yourself another 15 minutes, pour and keep pouring against a wet edge and mix into the edge or I guess I could just rent a cement mixer which seems a waste for 4 or 5 bags of mix.
It's going to be very difficult to keep a wet edge between batches with that short set time. The slower the set time the easier it will be to work with and the better the final product will look. It's not like you need structural strength right away, which is the only reason I can see for choosing a quick setting product. Other products will be much more forgiving to use.

Whatever mortar you choose, pay very close attention to the water to cement ratio. Even a tiny bit of extra water can drastically reduce the strength and the quality of the bond. Should be just wet enough to be workable, ideal water to cement ratio for most mortars is around 0.5 (by weight).
 
Thank you for your input Miner Jason. I agree with you. I would have preferred a longer set time however I needed a relatively short set time as I needed to create a slope. Reason - This pool utilizes a cantilever tapered bond beam where the bond beam slopes down towards the outside edge of the pool and upwards towards the inside of the pool (see images). I believe that the idea is to allow deck expansion / movement (over the slip sheet between the deck and bond beam) and slide up and over any set tile (provided that someone has not mortared the tile to the bottom of the coping). You are also right on not thinning the mix to much. To prolong set time I mixed with very cold water to prolong the set time. I used Rapid Set Cement All for pours up to 4 inches (images attached) and will use the Rapid Set High Strength Mortar Mix for pours up to 6 inches. (These are recommendations of Rapid Set) Interestingly the Cement All uses finer aggregate than the HIgh Strength Mortar Mix which seems backwards to me ... ie. normally mortar = finer aggregate than concrete however I didn't name them). I saturated the old concrete with water (no standing water), prepared multiple separate containers of dry mix and had multiple containers of premeasured cold water (ready to go to add the Cement All to), and used a power mixer. In this way I prepared small batches and was able to mix and trowel the Cement All in about 10 minutes per batch. In this way I was able to work and maintain a wet edge.

The spa requires a much longer 8 foot long by 6 inch deep bond beam pour as well as rebar. Rebar pins will be drilled and epoxied into the existing bond beam at 12 inch intervals joined by rebar along the length of the bond beam repair. As the pool and spa are supposed to be stationary, and not "movable objects" theoretically I think that one could actually pour the bond beam together with deck as there is the pool on the outside and the spa on the inside however I am not comfortable with this. Thermal expansion in Florida is about 1/2 inch per 100 feet so I find it hard to believe that 1/32 of less of an inch thermal expansion over 8 feet caused the spa bond beam to shear. I feel that it must have been movement of the deck at the rear of the spa. There is only a control joint where the rear of the spa deck abuts the deck but not an expansion joint. (control joint = cut 1/4 of the way into the slab to draw cracks in one direction vs. expansion joints which go all the way through the concrete filled with a waterproof compressible material to allow free for expansion). I am going to replace the control joints where the spa deck meets the deck at the rear of the spa. Keep in mind that all of the bond beam cracks which occurred in this pool and spa occurred where the deck was bonded directed to the bond beam. In areas where the deck was isolated from the bond beam no cracks occured.

When replacing the pool deck I will isolate the new deck pour from the bond beam with roofing felt paper (x two layers) and horizontally drill pins into the existing deck which extend into the new pour. The old deck seems adequately supported however I will add a little sand to minimize any downward pressure on the new bond beam.

Thank you everyone for your input, it has been most appreciated and any suggestions and comments are most appreciated.

Sincerely,
Darren
 

Attachments

  • New Bond Beam 1.jpg
    New Bond Beam 1.jpg
    197.3 KB · Views: 15
  • New Bond Beam 2.jpg
    New Bond Beam 2.jpg
    134.4 KB · Views: 15
Last edited:
Updated photos. At this point all cracked bond beams have been removed, rebuilt with 6000 psi concrete and rebar where appropriate. 3 of the 4 areas have had the deck re-poured fully isolated from the new bond beam by two layers of 30 lb roofing felt. The new deck pours were tied to the existing deck with concrete adhesive and horizontal rebar drilled and epoxied into the existing deck to prevent cracking of the deck at the joint. Expansion joints were used rather than control joints between slab sections. The left side of the spa (1 st photo) is ready to have the deck poured tomorrow. Rebar for the deck was only used in the small area which directly connects to the existing deck. The remainder of the deck is independent to spa however is also isolated from the bond beam by two layers of roofing felt with expansion joints at appropriate intervals. The smaller section (weighing about 250 lbs) is insolated from the bond beam by roofing felt however has two short rubber encased steel pins (not epoxied into bond beam, just sitting securely in 1-1/2 deep holes to prevent accidently movement of this small section of deck during activities. The larger section is also floating however it weighs 500 lbs so accidental movement is unlikely making pins unnecessary. The next step is to repair a vertical crack in one side corner of the pool using torque lock staples. This crack is not leaking however I would like to make sure it is permanently fixed prior to resurfacing the pool. The edge of the coping/deck has been cut back in preparation for remodel coping and the cantilever deck bond beam control joint has been cleaned to help maintain bond beam from deck isolation.
 

Attachments

  • Spa bond beam left side repaired and ready to repour deck.jpg
    Spa bond beam left side repaired and ready to repour deck.jpg
    159.9 KB · Views: 13
  • Spa bond bearm right side repair with deck repoured.jpg
    Spa bond bearm right side repair with deck repoured.jpg
    213.1 KB · Views: 13
  • Left end of pool bond beam repaired with deck repoured.jpg
    Left end of pool bond beam repaired with deck repoured.jpg
    163.7 KB · Views: 11
  • Spa bond bearm right side repair with deck repoured.jpg
    Spa bond bearm right side repair with deck repoured.jpg
    213.1 KB · Views: 13
Thread Status
Hello , This thread has been inactive for over 60 days. New postings here are unlikely to be seen or responded to by other members. For better visibility, consider Starting A New Thread.