Clean a used Intex Ultra XTR 16 x 32 before or after install?

Lucylocket74

Active member
Jun 19, 2020
34
Madisonville, TN
Pool Size
14000
Surface
Vinyl
Chlorine
Liquid Chlorine
SWG Type
Intex Krystal Clear
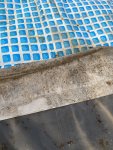
We purchased a used 1-year old Intex Ultra XTR rectangular pool from someone who couldn't keep up with the maintenance under his trees. We are first time pool owners and we have used TFP as our primary source for all our site prep and future chemical undertakings. The problem is there is some dirt that does need to be cleaned off on the outside, but our biggest concern is the stain around the top edges inside and outside the top rail that looks like a combo of mildew/algae. Would you recommend cleaning this before filling or wait until legs are set up in place? Any recommendations for type of cleaner would be wonderful. I thought of possibly oxiclean, but don't know the impact of this on the liner. Much obliged for your expertise!
 
I use a bleach solution for similar stains on anything else. In the pool its even better because you never get all the cleaner off (inside the pool) and it will be a head start as opposed to using something soapy. 10:1 is probably plenty but i tend to use more.
 
Definitely diluted bleach! Just don’t let it dwell too long & u should be fine. Have the hose ready & don’t wear your good clothes 🤣 & don’t forget any seems/flaps.
My first pool 13 yrs ago was a “new to me” mildewed easy set with a blow up ring - the biggest one they made - that had been laying in someone’s yard in a wet pile for over a year. 🤢
I would also suggest after u fill & get your cya in to do aSLAM Process.
Happy scrubbing 😊
 
I agree. Your pool should be up and probably partially filled for stability while you scrub it.
Mr. Clean MAGIC ERASER SPONGES have worked really well for cleaning the top rail of my Ultra Frame with no damage to the liner..
It takes a little elbow grease, buy it's worth the effort.
 
We finished the cleaning this morning with diluted bleach as suggested after about two hours. It really was nasty. Where the worst gunk was on the top light gray portion above the water line, we decided it would be easiest for us at least to scrub while it was already spread out on the ground warming up. We were able to get the corners of the bottom and portions of wall that were stained from leaves sitting as well, thinking this might save us some chemical waiting time for it to get clear. We’re not patient people, but we’re not afraid of some elbow grease! While the bleach mixture didn’t make it exactly pristine, I’d give it a B+ and we’ll take the magic eraser to the lingering stains after install. Thanks everyone! Getting ready to post a new thread of our install pics.
 

Enjoying this content?

Support TFP with a donation.

Give Support
Thread Status
Hello , This thread has been inactive for over 60 days. New postings here are unlikely to be seen or responded to by other members. For better visibility, consider Starting A New Thread.