Building your own chaise loungers?

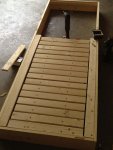
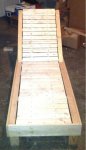
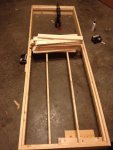
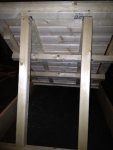
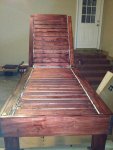
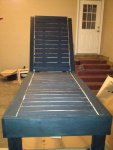
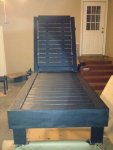
Bottom section completed. Still have the back rest and legs. Then sanding and staining/ polyurethane

[attachment=0:376xczu3]ImageUploadedByTapatalk1341091168.394105.jpg[/attachment:376xczu3]


Sent from my iPhone using Tapatalk
 

Attachments

  • ImageUploadedByTapatalk1341091168.394105.jpg
    ImageUploadedByTapatalk1341091168.394105.jpg
    124.2 KB · Views: 163
Finally got it put together. Between the crappy bracing in the directions and the 108 degree ,122 degree heat index, heat it took a while. The bracing in these directions is a joke. Any decent sized human flopping down in this thing with their bracing would break it. Basically I added 2 2x2s in each the bottom and top section as seen in the last picture of the top section. Now just got some sanding and staining which I hope to get done tomorrow depending on the heat, suppose to be another scorcher tomorrow.

[attachment=2:v08q5c0x]ImageUploadedByTapatalk1341121510.934934.jpg[/attachment:v08q5c0x]
[attachment=1:v08q5c0x]ImageUploadedByTapatalk1341121532.347243.jpg[/attachment:v08q5c0x]
[attachment=0:v08q5c0x]ImageUploadedByTapatalk1341121558.949214.jpg[/attachment:v08q5c0x]


Sent from my iPhone using Tapatalk
 

Attachments

  • ImageUploadedByTapatalk1341121510.934934.jpg
    ImageUploadedByTapatalk1341121510.934934.jpg
    115.4 KB · Views: 160
  • ImageUploadedByTapatalk1341121532.347243.jpg
    ImageUploadedByTapatalk1341121532.347243.jpg
    120 KB · Views: 159
  • ImageUploadedByTapatalk1341121558.949214.jpg
    ImageUploadedByTapatalk1341121558.949214.jpg
    120.9 KB · Views: 160
Here is the bracing. The 1st is of the bottom before I added bracing. The 2nd is of the top after adding additional bracing.

[attachment=1:dd6vzkiu]ImageUploadedByTapatalk1341121647.463624.jpg[/attachment:dd6vzkiu]

[attachment=0:dd6vzkiu]ImageUploadedByTapatalk1341121675.473295.jpg[/attachment:dd6vzkiu]


Sent from my iPhone using Tapatalk
 

Attachments

  • ImageUploadedByTapatalk1341121647.463624.jpg
    ImageUploadedByTapatalk1341121647.463624.jpg
    124.3 KB · Views: 157
  • ImageUploadedByTapatalk1341121675.473295.jpg
    ImageUploadedByTapatalk1341121675.473295.jpg
    87.9 KB · Views: 156
Been slow going on finishing up the lounger as I have been busy. I found this thing as lowes called a Kreg jig that I wish I had when making this. It makes joining the wood a whole lot faster and better as you do not have to fill the screw holes with wood filler and sand it down after it dries. Had some free time today so I built a table for the Lounger with the new jig and man it makes life easier. Took 1 1/2 hours including cutting and sanding to make the table. I am applying the 1st stain to both pieces tonight and will post up pics.

[attachment=1:106q98qm]ImageUploadedByTapatalk1342309252.152190.jpg[/attachment:106q98qm]

[attachment=0:106q98qm]ImageUploadedByTapatalk1342309282.503628.jpg[/attachment:106q98qm]


Sent from my iPhone using Tapatalk
 

Attachments

  • ImageUploadedByTapatalk1342309252.152190.jpg
    ImageUploadedByTapatalk1342309252.152190.jpg
    99.4 KB · Views: 136
  • ImageUploadedByTapatalk1342309282.503628.jpg
    ImageUploadedByTapatalk1342309282.503628.jpg
    109.8 KB · Views: 135
After 1st staining.

[attachment=1:y7rv4kdu]ImageUploadedByTapatalk1342330954.745852.jpg[/attachment:y7rv4kdu]
[attachment=0:y7rv4kdu]ImageUploadedByTapatalk1342330971.060510.jpg[/attachment:y7rv4kdu]


Sent from my iPhone using Tapatalk
 

Attachments

  • ImageUploadedByTapatalk1342330954.745852.jpg
    ImageUploadedByTapatalk1342330954.745852.jpg
    131.9 KB · Views: 125
  • ImageUploadedByTapatalk1342330971.060510.jpg
    ImageUploadedByTapatalk1342330971.060510.jpg
    104.5 KB · Views: 124
Those look really great! I'm concerned about the use of th 1x4 legs. They look pretty flimsy, as was brought up in the comments to the post you linked. As they are screwed in to the front and back 1x4 cross members, it would be a simple matter to cut equivalent sized 1 x 4 pieces and screw these along the side members butted up against the existing legs on sides. You would also want to glue and screw the new pieces to the existing legs. Thus, the legs would be made of right angles, making them much less likely to move or break when someone sits down on them.

Thanks for the plans. I was considering buying some teak loungers, but I think I may have to consider building some. It just doesn't look that hard.
 

Enjoying this content?

Support TFP with a donation.

Give Support
I ended up building the plans diva linked to and used 2x4 legs and some extra 2x2 bracing on the back and bottom rests. It's fairly easy if you know how to work with wood but as I mentioned above a Kreg jig makes life a whole lot easier. I actually by not paying attention bought inside stain and had to strip it back off with a 60 grit belt sander and am now having to re stain with outside stain.


Sent from my iPhone using Tapatalk
 
Yeah, I just noticed the 2x4 legs when I looked more closely at your pics. I think I'd still go with my idea just to add additional strength to the legs and to prevent shifting. As for Kreg pocket holes, I use them all of the time as they really are time-savers. For unseen joints, they do an excellent job, esp. when supplemented by some hearty glue. It appears that on the original plan, these were used for holding the top 1x4 slats. That was probably rather time-consuming compared to just running the screws through the top as you have done.
 
CraigMW said:
Yeah, I just noticed the 2x4 legs when I looked more closely at your pics. I think I'd still go with my idea just to add additional strength to the legs and to prevent shifting. As for Kreg pocket holes, I use them all of the time as they really are time-savers. For unseen joints, they do an excellent job, esp. when supplemented by some hearty glue. It appears that on the original plan, these were used for holding the top 1x4 slats. That was probably rather time-consuming compared to just running the screws through the top as you have done.

Well when I done this project I didn't have the Kreg jig so I used decking screws and have since counter sunk them and filled holes with wood filler and sanded it down so there are no visible screws.


Sent from my iPhone using Tapatalk
 
Finally got the lounger and table stripped back down of the indoor stain I put on by mistake. It was a PITA to say the least. Now got the 1st coat of OUTDOOR stain. Decided to go black and really like it. It will need a 2nd coat and some touchups in between the seat slats but overall love the black stain. Hope to have these done tomorrow and starting another set table/lounger this weekend. This time i will cut the pieces, sand, stain then assemble. Think i can get it done in probably 20 working hours doing it that way. Getting in between the slats while it is put together is very time consuming and a PITA because it wants to drip through.

[attachment=0:2go7jdwc]ImageUploadedByTapatalk1342670594.296177.jpg[/attachment:2go7jdwc]


Sent from my iPhone using Tapatalk
 

Attachments

  • ImageUploadedByTapatalk1342670594.296177.jpg
    ImageUploadedByTapatalk1342670594.296177.jpg
    118 KB · Views: 69
Got the 2nd coat on. May put a 3rd on the top. Plan to start a 2nd set Saturday and think it will go faster with the kreg jig, sanding and staining before putting together and knowing where I need to make corrections.

[attachment=1:2cnk6hbp]ImageUploadedByTapatalk1342791572.290342.jpg[/attachment:2cnk6hbp]

[attachment=0:2cnk6hbp]ImageUploadedByTapatalk1342791587.259077.jpg[/attachment:2cnk6hbp]


Sent from my iPhone using Tapatalk
 

Attachments

  • ImageUploadedByTapatalk1342791572.290342.jpg
    ImageUploadedByTapatalk1342791572.290342.jpg
    99.1 KB · Views: 51
  • ImageUploadedByTapatalk1342791587.259077.jpg
    ImageUploadedByTapatalk1342791587.259077.jpg
    111.5 KB · Views: 51
Thread Status
Hello , This thread has been inactive for over 60 days. New postings here are unlikely to be seen or responded to by other members. For better visibility, consider Starting A New Thread.