They chip around fittings and tile to make room for a thicker coat. If you are already proud then it should be ok as is. Just make sure they use bondkote of some kind and roll the dice. Your there you know the condition of the current plaster adhesion best

Bond beam repair
- Thread starter Davileet
- Start date
You are using an out of date browser. It may not display this or other websites correctly.
You should upgrade or use an alternative browser.
You should upgrade or use an alternative browser.
Some incredible work here and I'm learning how and why things are done the way they are. I'll say when I found this thread 30 minutes ago and saw how fast the work was proceeding I was excited to think I would see a finished pool at the end of the thread, but a few weeks have passed and no updates. Did you get the plaster in?

The reason for the delayed finish is because I hit a snag with the pool company I chose to hire the first go around, (PM me for the company name if you are in my area). The contract stipulated that an acid wash was to be completed before the bond kote, and the middle man PB tried to cut corners by not requiring the sub-contractor to acid wash. I asked them to do it, and they then did a very diluted rinse, using less than one bottle for the entire pool. Also, the sub-contractor did a very diluted coat with the bond kote and did not mix to the instructions on the bag, I did not realize this at the time of install. Lastly, there was some argument to who damaged the hydrostat in the deep end of the pool, and we "mutually" walked away from each other. I am still working on a chargeback / acceptable refund amount as the company is trying to profit off their shoddy work.
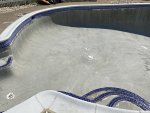
The biggest negative here is that I have a diluted layer of bond kote on essentially a pressure washed old plaster surface. The bond kote has been baking in the sun and potential creating bonding issues, and now plaster companies don't want to warranty work they didn't prep for. I am hoping that come plaster time I won't have hollow sounding bond kote, but this could potentially end up costing me a chunk of money in the longer term.
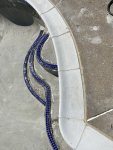
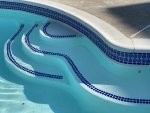
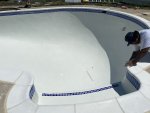
I have already lined up a new company to do the plaster, and was told this morning that it will be done later this week or next. I have installed the transition tiles on the steps in preparation for the plaster also. I used the same Laticrete 254 to create a mud bed for the tile. And yes, I need to scrub/sand the coping where it has gotten dirty.
Some lessons I learned during this process that I wish I had done differently:
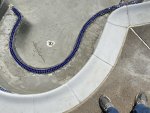
- After old perimeter tile was removed, I should have cut the plaster where the bottom of the new tile would rest, and then chipped up to that line to allow more room for plaster. Now the risk of damaging the newly installed tile is not worth taking, and as such my plaster won't have as much grab.
- I wish I had put a thin layer of grout/mortar or whatever on the face of the bond beam to smooth it out before installing tile so that I could have achieved a more uniform tile.
- I probably should have left a bit more room between the coping and where the tile meets.
- Lastly, I should have probably chosen a slightly shorter coping so that I didn't have as much overhang into the pool. In some places however, this would have created a larger epoxy gap.
Will update final pictures after the plaster is in.
The biggest negative here is that I have a diluted layer of bond kote on essentially a pressure washed old plaster surface. The bond kote has been baking in the sun and potential creating bonding issues, and now plaster companies don't want to warranty work they didn't prep for. I am hoping that come plaster time I won't have hollow sounding bond kote, but this could potentially end up costing me a chunk of money in the longer term.
I have already lined up a new company to do the plaster, and was told this morning that it will be done later this week or next. I have installed the transition tiles on the steps in preparation for the plaster also. I used the same Laticrete 254 to create a mud bed for the tile. And yes, I need to scrub/sand the coping where it has gotten dirty.
Some lessons I learned during this process that I wish I had done differently:
- After old perimeter tile was removed, I should have cut the plaster where the bottom of the new tile would rest, and then chipped up to that line to allow more room for plaster. Now the risk of damaging the newly installed tile is not worth taking, and as such my plaster won't have as much grab.
- I wish I had put a thin layer of grout/mortar or whatever on the face of the bond beam to smooth it out before installing tile so that I could have achieved a more uniform tile.
- I probably should have left a bit more room between the coping and where the tile meets.
- Lastly, I should have probably chosen a slightly shorter coping so that I didn't have as much overhang into the pool. In some places however, this would have created a larger epoxy gap.
Will update final pictures after the plaster is in.
Attachments
Last edited:
Sorry to hear of those issues, no fun at all. Thanks for the updates. Definitely some inspiration for a do it yourself repair, not sure I would tackle, but very nice to see the help and advice given here. I hope the new company can do it right and you have it finished up soon, look forward to the end of the story and pics.
No!!! I have a BIG MAD and SAD for you!! GURRRRRRRR You and I both know they would not do it that way on THEIR pool! GUrrrrr some more!!
Glad to hear you found a company that will finish the job for you.
Glad to hear you found a company that will finish the job for you.
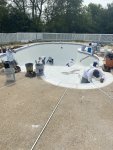
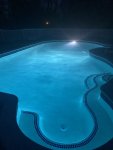
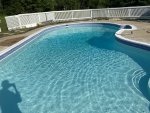
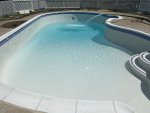
Finishing this pool renovation chapter in life. On to controlling chemicals and daily sweepings now. Pictures attached. Whew!!
Attachments

Turbo1Ton
Gold Supporter
- Dec 26, 2019
- 2,015
- Pool Size
- 14500
- Surface
- Plaster
- Chlorine
- Salt Water Generator
- SWG Type
- Pentair Intellichlor IC-40
Amazing transformation! What a great job! I am not typically a fan of the white, but with the tile you chose it works amazingly well!
--Jeff
--Jeff
Thanks for the kind words Jeff. If my budget would have afforded it, I would probably have gone with a bluish shade of quartz plaster. However, I am still very happy with the way the plain white plaster turned out and its awesome having a new/used pool.
Everyone needs to go back to the 1st page to see all of his hard work and how it paid off!! DUDE! You did It!!!! WOWZER!
Kim, I have that feeling at least twice a day. When I am out doing landscaping around the pool and dealing with chemicals, every now and again I think to myself how I can't believe I am finally done with renovation and the long trip its been.
You know what you NEED to do is make a time line of pics with the pool and frame it to put up somewhere outside so everyone can see you hard work! When you moved in and first saw the pool, when you busted out all of that stuff, then DONE!!!
I for one love a plain white plaster with a blue tile. It's my Mediterranean look. Came out good be proud of it
Thanks Jimmy. I definitely like the look of it also, feels timeless in my opinion. I am very proud of the work I did, it's hard for me to believe I did all that work looking back on it.
Very timeless like a classic mercedes......never goes out of style.
I know the pain I sit on these builds sometimes for months and look back to pre excavation pics and wonder how we do it sometimes
I know the pain I sit on these builds sometimes for months and look back to pre excavation pics and wonder how we do it sometimes
Thread Status
Hello , This thread has been inactive for over 60 days. New postings here are unlikely to be seen or responded to by other members. For better visibility, consider Starting A New Thread.