I would get something like the Milwaukee M12 if I were doing my own plumbing. Cuts through pipe like butter, perfect cuts. It's $140 but you can probably sell it on eBay when done.

Austin Owner Build (Raised Pool with Infinity Edge)
- Thread starter GregSS
- Start date
You are using an out of date browser. It may not display this or other websites correctly.
You should upgrade or use an alternative browser.
You should upgrade or use an alternative browser.
I like the Laticrete products but super blockade is good as well
Brian,
Do you recommend cementitious or elastic waterproofing (which specific Laticrete product do you like for positive and negative pressure)? I am unsure if I will have a pebble finish or plaster/aqua bright (if that makes a difference for the non-tiled portion of the weir wall).
I would get something like the Milwaukee M12 if I were doing my own plumbing. Cuts through pipe like butter, perfect cuts. It's $140 but you can probably sell it on eBay when done.
I have a cheesy tool by Black and Decker called the Navigator that cuts PVC pipe like it is nothing. The blade is taller than most reciprocal saw blades and seems to flex less.
Question to SPA experts: Do folks put jets down by feet/calves? I plan on 8 jets on the body. I purchased Waterway slip tees for the Spa; they seems to be more complicated than necessary to install.
I have a single jet in the footwell and it works well in that small space. In other words, I don't need to be directly in front of it to feel its effect.
Question to SPA experts: Do folks put jets down by feet/calves? I plan on 8 jets on the body. I purchased Waterway slip tees for the Spa; they seems to be more complicated than necessary to install.
I used the Waterway Poly Storm jets. Did you order the kit or just the bodies? They look complicated, but they are actually very easy to install. This is a case where the instructions are very detailed which make it look complicated. After plaster you will need the Gunite Jet Measuring tool. I have one if you want it. For now just get the body installed with a 2 1/2" pipe stubbed out and capped. The plaster crew will install the niche to ensure it is flush with the plaster then the rest is just some measuring, cutting and gluing 1" pipe.
Brian,
Do you recommend cementitious or elastic waterproofing (which specific Laticrete product do you like for positive and negative pressure)? I am unsure if I will have a pebble finish or plaster/aqua bright (if that makes a difference for the non-tiled portion of the weir wall).
I don't know that it really matters so long as you use the correct material for the positive/negative side. This is much less important if you go with AquaBright as well.
Once you decide on finishes give Laticrete a call and discuss it with them. They are usually very helpful.
I used the Waterway Poly Storm jets. Did you order the kit or just the bodies? They look complicated, but they are actually very easy to install. This is a case where the instructions are very detailed which make it look complicated. After plaster you will need the Gunite Jet Measuring tool. I have one if you want it. For now just get the body installed with a 2 1/2" pipe stubbed out and capped. The plaster crew will install the niche to ensure it is flush with the plaster then the rest is just some measuring, cutting and gluing 1" pipe.
I purchased the kit (sans the actual jet insert). I also purchased the measuring tool, but thanks for offering to use your measuring tool. Which jets did you go with? Waterway has lots of choices.
Do the plaster folks cut off all of the pipes flush (i.e., do they install all of the pool return fittings/etc. inside of the pool)?
I purchased the kit (sans the actual jet insert). I also purchased the measuring tool, but thanks for offering to use your measuring tool. Which jets did you go with? Waterway has lots of choices.
I used the "standard" directional jets in gray (229-8057). I might switch it up later and try some others, but initially thought I would keep it simple. I was told that several of the jets are terrible, but didn't get details on which one's to avoid.
Yes, they will handle the fittings and they will also supply the fittings unless you buy your own. Tip: I left out a box of gray Waterway jet niche fitting that they promptly ignored. I was later told I should have put the fittings on top of the coping, argh, so be sure to leave your Waterway niche fittings out. Using the white Waterway components with gray jets looks fine to me, you can only see a small band of white between the wall and the jet...no biggie.Do the plaster folks cut off all of the pipes flush (i.e., do they install all of the pool return fittings/etc. inside of the pool)?
vermaraj
0
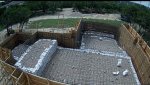
It is common to pour footings then shotcrete the shell. The benefit is the larger aggregate size in the poured concrete and the ability to increase air entraining with plasticizers or other additives. As long as the joint is clear of loose debris the shotcrete will adhere to the freshly poured concrete. Many pool builders in the NE will pour the entire floor of a rectangular pool and the shoot the walls and floor radius.
There are two things you might consider before making your decision. 1) The rebar must be kept clean to be effective. If they are pouring they can't just pour down the sides of the forms if the rebar will get coated. 2) Looking at your site you will need a concrete pump. In the NE our only option is an articulating boom pump which can place the concrete at the bottom of the footer 100' away from the concrete truck. But, this truck costs $1,200 to get on site and $20/ cuyd placed.
If you require a pump tuck then your savings might not materialize. Outside of the NE small tow behind concrete pumps are common. So cost may not be an issue in your case. But, with a small concrete pump you will need to make sure they can place concrete directly into the footer while keeping the rebar clean.
- - - Updated - - -
Electric miter saw is great for cutting PVC pipe. Perfectly square cut, smooth edges and fast.
It is common to pour footings then shotcrete the shell. The benefit is the larger aggregate size in the poured concrete and the ability to increase air entraining with plasticizers or other additives. As long as the joint is clear of loose debris the shotcrete will adhere to the freshly poured concrete. Many pool builders in the NE will pour the entire floor of a rectangular pool and the shoot the walls and floor radius.
There are two things you might consider before making your decision. 1) The rebar must be kept clean to be effective. If they are pouring they can't just pour down the sides of the forms if the rebar will get coated. 2) Looking at your site you will need a concrete pump. In the NE our only option is an articulating boom pump which can place the concrete at the bottom of the footer 100' away from the concrete truck. But, this truck costs $1,200 to get on site and $20/ cuyd placed.
If you require a pump tuck then your savings might not materialize. Outside of the NE small tow behind concrete pumps are common. So cost may not be an issue in your case. But, with a small concrete pump you will need to make sure they can place concrete directly into the footer while keeping the rebar clean.
- - - Updated - - -
Electric miter saw is great for cutting PVC pipe. Perfectly square cut, smooth edges and fast.
A line pump in Austin costs around $600 to rent. I would not need a boom pump. I have a couple more shotcrete sub contractors that will look at my project--I might see what they think. My structural engineers suggested that the entire pool be set on top of concrete; so, pouring the footers might not be a bad way to go if it saves money. I would guess that as long at the concrete footers are poured below the pool floor then concrete would work fine.
Miter saw is a great idea--I already have one; so no need to purchase another tool.
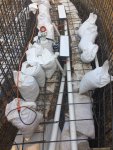
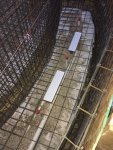
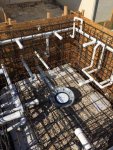
I started working on the plumbing. I started by tackling the most difficult part of the plumbing--the main drain in the pool and the two drains in the weir basin. I also installed the pipe for three lights in the weir basin.
In the weir basis, I had to dig down approximately 2 feet for the pipe for the globrites--what a pain. Luckily, the fill bags were arranged so that a space was left in the center that held loose gravel--much easier to scoop loose gravel as apposed to digging/tearing through fill bags.
The color match 360 main drain accepts 4" pipe--I used a 4" to 3" 90 degree fitting.
The two AVSC channel drains both accept 3" plumbing.
Attachments
Easier BUT not easy I bet  I bet you are feeling it today. Nice job! That is a huge job to get out of the way. What is next?
Kim
Kim
Easier BUT not easy I bet
Kim
LOL--I am definitely not used to such manual labor--sore muscles.
I still need to install the spa plumbing, skimmers, autofill, bubblers, and pool return lines.
I will not plumb everything back to the equipment pad at this time (most pipes will be stubbed out through the walls/forms. If I fully plumb the pool back to the equipment pad, it will be a nightmare for the excavator to remove the forms after shotcrete, at least without damaging the plumbing.
Smart move on not running all the way to the pad. Better to not worry about anyone/thing messing up the pipe!
sore muscles=Ebsom salt bath + in my house! LOL
Kim
sore muscles=Ebsom salt bath +
in my house! LOLKim
- Sep 8, 2013
- 606
You could have saved some pain on the weir lights by installing them in the short wall facing the weir wall. 


You could have saved some pain on the weir lights by installing them in the short wall facing the weir wall.
I considered getting regular niche type led lights and put them in the short weir wall, but decided that I wanted nicheless (i.e., globrite) lights. The problem with the nicheless lights is that they need approximately 18" of space when you factor in the 90 degree bend conduit fitting for the electrical. And, since my weir wall is so high off of the ground I would have had to either have pipes sticking through the short weir wall (i.e., exposed pipes) or put the lights at the bottom of the basin which would have them shining toward the main weir wall but under 4' of water.
I also considered putting the nicheless lights on the sides. I ended up deciding to put the lights in the bottom and shine the lights straight up--I hope that the three lights are capable of shining through 4' of water. I was told by one plumber that he normally shines the lights straight up in weir basins.
Your set up is much better for the lights being in the short weir wall since your short weir wall is closer to the ground.
BTW: I have read your pool build multiple times. Your set up is amazing.
Greg
sore muscles=Ebsom salt bath +
Kim
I tried bourbon to help with the sore muscles.
I tried bourbon to help with the sore muscles.
Well done! There is not much an adult drink will not fix LOL
- Sep 8, 2013
- 606
I considered getting regular niche type led lights and put them in the short weir wall, but decided that I wanted nicheless (i.e., globrite) lights. The problem with the nicheless lights is that they need approximately 18" of space when you factor in the 90 degree bend conduit fitting for the electrical. And, since my weir wall is so high off of the ground I would have had to either have pipes sticking through the short weir wall (i.e., exposed pipes) or put the lights at the bottom of the basin which would have them shining toward the main weir wall but under 4' of water.
I also considered putting the nicheless lights on the sides. I ended up deciding to put the lights in the bottom and shine the lights straight up--I hope that the three lights are capable of shining through 4' of water. I was told by one plumber that he normally shines the lights straight up in weir basins.
Your set up is much better for the lights being in the short weir wall since your short weir wall is closer to the ground.
BTW: I have read your pool build multiple times. Your set up is amazing.
Greg
I have the small globrite installed with out a niche. Either way, I'm sure yours will work out great. Enjoy
vermaraj
0
Chamfer your pipes before fitting or gluing. It will make them easier to put together and will keep glue from pushing joint apart.
https://www.amazon.com/Ridgid-64962-Plastic-Deburring-capacity/dp/B0019MRGLE/ref=pd_bxgy_469_2?_encoding=UTF8&psc=1&refRID=64DE6PD7GW7GXEJ9HEED
https://www.amazon.com/Ridgid-64962-Plastic-Deburring-capacity/dp/B0019MRGLE/ref=pd_bxgy_469_2?_encoding=UTF8&psc=1&refRID=64DE6PD7GW7GXEJ9HEED
I have been working on the plumbing after I get off of work and on the weekends. It is a slow process doing the plumbing by myself with limited time, but at least I am saving money.
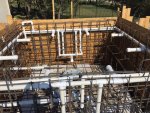
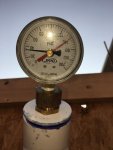
I now have the spa "finished." I am pressuring testing the spa. The first time I pressurized the spa--I had a blowout. It turns out that I missed gluing one of the joints (That was a blow to my ego see the pressure build and then at 20 psi "POP".) I was lucky that the unglued joint was easily accessible. After fixing the unglued joint, I re-pressurized the spa plumbing to around 34 PSI (I am not sure what is normal pressurization for testing.). After two hours, it was still holding at 34--I hope it continues to hold. I really do not want to tear apart a bunch of plumbing.
The most difficult part of the spa plumbing was the two jets that I installed near the calves/feet. Piping the lower jets back to the upper jets was a PITA. I used rigid pipe to do all of the plumbing. I now see why some plumbers use flexible pipe even with square spas--much easier to plumb.
I still need to install the bubblers, skimmers, lines for the water bowls, and pool returns. These items should not be overly difficult--at least I hope they are not too difficult.
I am extremely sore and cut up. The rebar is very sharp and the tie wire managed to poke a couple extra holes in me.
Attachments
Thread Status
Hello , This thread has been inactive for over 60 days. New postings here are unlikely to be seen or responded to by other members. For better visibility, consider Starting A New Thread.