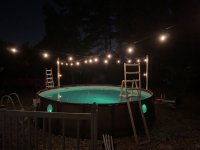
This is my first time doing an AGP and it seems I've done alot wrong, but time will tell for sure! 
1st thing that we did wrong was we built up instead of down. We built up ALOT. I brought in fill dirt and topsoil (another no-no) and we put around 1.5 tandem loads of dirt into the area. I also did not get a compactor. I used my tractor instead. We lightly watered, drove over, scraped, water, drove, scraped. We repeated this process alot, for days. I would compact it until the tractor barely left track marks. It got to a point that even when wet the tractor would barely leave an imprint.
The natural soil I have is clay with very little top soil if any, the fill dirt is clay and the topsoil had some organic matter, but not alot. It had quite a bit of sandy, silty dirt that was easy to spread, but once packed turned to concrete. It even sparkled in the sun.
Once it was all said and done with, it took a 3 pound sledge for me to pound a rebar into the dirt and good luck digging anything with a shovel more than 1/4" deep. I had to use the tractor to pull the rebar back out as it only bent when I hit it sideways with a hammer to loosen it. Water also hardly absorbs into it any longer. It's very much like concrete. I'm hoping all of this has helped with compaction enough. Time will tell and experience will probably tell me more.
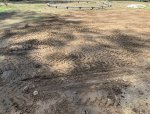
This was after we built up and begun to level the 12x12" pavers. I'm just not finding out they may crack since they're only 1" thick. Digging these was a nightmare. At this point the dirt was virtually impervious to a shovel. We had to pick axe the dirt to loosen it enough to shovel and even used the backhoe teeth to soften it.
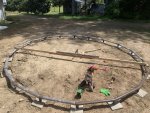
We tried several ways to level the pavers from the 14' board you see with a level, leveling block to block, string with a line level and also leveling every other block across the frame with an 8' 2x4 and level. I didn't have tubing or I'd have tried a water level.
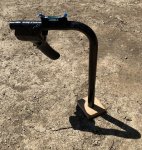
The best way we found to do it was actually using my temp gun laser taped to a piece of metal tubing, fitted over a piece of rebar with a 1x2 wooden base for it to sit on. Then we used a 48" drywall T-square on each block and "shot" the measurement. We basically made a laser transit. We also made sure we leveled the metal tube each time we shot the measurement with a line level taped to the top. We also called one block the "control" block. We knew it was 15" so any time we weren't sure about another block we would refer back to that control block. We figured out the next day that the tape relaxed and the temp gun moved around the tube. We were at 17" on a measurement of a paver we leveld the day before. Back to the control block, we were at 16". It took us a bit to figure out I had to rotate the temp gun back to the position and we used the control block to "calibrate" it any time anything was out of whack.
We were meticulous much to my wife's chagrin on this part. 1/4" wasn't good enough. We made sure every block was 15" high on all 4 corners and center of the 12x12 paver.
He we're testing fitting and taping the 1/2" foam insulation. The pavers are inset into the ground to avoid shifting and the foam is going to be above those. We used Gorilla tape. Originally we started with the silver which was about 1-1.5" wide and laid 3 overlapping strips on the seams. It was around $8/roll. The wife accidentally bought the wrong tape, Gorilla Black Tough and Wide at $14/roll. We liked it better. It seemed stronger and the wider tape gave us more holding power. It took almost 3 full rolls to tape the seams.
Gorilla Tape: https://amzn.to/2WN5TEa
2022 foam update: we noticed when opening the pool the foam insulation was a lot harder. We assume it compacted from the weight and isn’t as soft and nice feeling on the feet. The tape did create some seams and would hold or catch dirt.
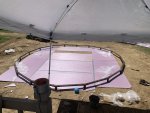
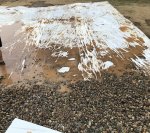
Here we have moved everything off the pavers and I put my "weed barrier" down. This is a pallet wrapping heat shrink I got, free, some time ago and put it to use here. It's very thick, 6-8 mils, and should provide long lasting weed barrier protection and help avoid washout of the dirt. I covered it with rock and unfortunately before I put it down, didn't think to wash it. So I'm washing the mud and dirt off of it, which is a mess. Eventually we did clean off the weed barrier and had a clean surface we put the insulation on top of.
2023 update: the weed barrier worked well. The only wee I have is where the barrier has torn. No weed killer used at all.
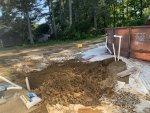
Here's the hard piping going in. I did do this after putting the pool up so I had a reference point. I'm not very imaginative and have to see it. I've stubbed it for now while I'm waiting on a few 40mm to 1.5" conversion adapters. I had to use the backhoe to dig it, which is nervewracking next to the pool. I've only partially covered it so I can "leak test" the underground joints once the parts come in.
You can see how much we built this side up to make it level by looking at my trench near the pool. The other side is only a few inches of dirt but this is about a foot or so.
Hard pipe plumbing and skimmer done! I used the GAME 40mm to 1.5" pipe adapters so I could retain the use of the flex hoses. I didn't see any reason to try to hard line all the way to the pump inlet/outlet itself. I left a stub on both sides so I can Tee off the lines if need be. I plan to build a solar heater and tee off the return line.

Rock is temporary and not touching the liner.
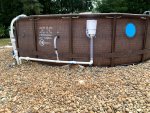
The intake side has two inlets. Both the skimmer and intake are on shut off valves so I can operate them independently if the need arises. The intlet is rated at 45 GPM so it's a little short of supply for the 3000G PH pump. I used braided vinyl hoses for the fittings so there was some flexion when the kids get a little rowdy in the pool. The smaller 1/4" intake hose is hose clamped to the inlet fitting. You will need two near at the pool and you will need to trim the rubber piece. The first clamp closes the rubber around the inlet fitting and the 2nd goes over the hose and tightens the hose to the inlet fitting. I electrical taped them so the metal doesn't rub the pool vinyl. The tubing fit snugly over the 1/4" pipe so I didn't use a fitting, just hose clamped it directly to the PVC.
On the Hayward skimmer I swapped out the hose fitting it came with for one from the parts store. I wanted to be able to tighten the tubing down and not leak and wanted something stronger than the thin fitting they had.
You can also see black foam at the base of the liner to protect from the rocks. This is insulating pipe foam. We got 6' sections and cut them in half. Not sure how well it'll hold up to the sun/moisture.
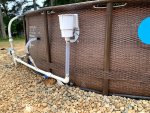
On the return side I left a vertical stub with a threaded fitting and shut off valve. Originally I was going to use this in case I wanted to add a fountain or waterfall later but figured out that it works perfectly with my Intek robot vacuum and I don't have to worry about unscrewing the plastic cover inside the pool to hook up the vacuum. No more wet arms. When I'm done with the stub I have a threaded cap that I put on it to keep debris out of the stub.
On the return I used the "factory" return and flex hose with the GAME adapter.
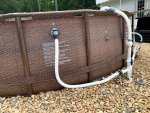
That pretty much sums up the pool setup at this point. I'm still working on the space itself.
1st thing that we did wrong was we built up instead of down. We built up ALOT. I brought in fill dirt and topsoil (another no-no) and we put around 1.5 tandem loads of dirt into the area. I also did not get a compactor. I used my tractor instead. We lightly watered, drove over, scraped, water, drove, scraped. We repeated this process alot, for days. I would compact it until the tractor barely left track marks. It got to a point that even when wet the tractor would barely leave an imprint.
The natural soil I have is clay with very little top soil if any, the fill dirt is clay and the topsoil had some organic matter, but not alot. It had quite a bit of sandy, silty dirt that was easy to spread, but once packed turned to concrete. It even sparkled in the sun.
Once it was all said and done with, it took a 3 pound sledge for me to pound a rebar into the dirt and good luck digging anything with a shovel more than 1/4" deep. I had to use the tractor to pull the rebar back out as it only bent when I hit it sideways with a hammer to loosen it. Water also hardly absorbs into it any longer. It's very much like concrete. I'm hoping all of this has helped with compaction enough. Time will tell and experience will probably tell me more.

This was after we built up and begun to level the 12x12" pavers. I'm just not finding out they may crack since they're only 1" thick. Digging these was a nightmare. At this point the dirt was virtually impervious to a shovel. We had to pick axe the dirt to loosen it enough to shovel and even used the backhoe teeth to soften it.

We tried several ways to level the pavers from the 14' board you see with a level, leveling block to block, string with a line level and also leveling every other block across the frame with an 8' 2x4 and level. I didn't have tubing or I'd have tried a water level.
The best way we found to do it was actually using my temp gun laser taped to a piece of metal tubing, fitted over a piece of rebar with a 1x2 wooden base for it to sit on. Then we used a 48" drywall T-square on each block and "shot" the measurement. We basically made a laser transit. We also made sure we leveled the metal tube each time we shot the measurement with a line level taped to the top. We also called one block the "control" block. We knew it was 15" so any time we weren't sure about another block we would refer back to that control block. We figured out the next day that the tape relaxed and the temp gun moved around the tube. We were at 17" on a measurement of a paver we leveld the day before. Back to the control block, we were at 16". It took us a bit to figure out I had to rotate the temp gun back to the position and we used the control block to "calibrate" it any time anything was out of whack.
We were meticulous much to my wife's chagrin on this part. 1/4" wasn't good enough. We made sure every block was 15" high on all 4 corners and center of the 12x12 paver.

He we're testing fitting and taping the 1/2" foam insulation. The pavers are inset into the ground to avoid shifting and the foam is going to be above those. We used Gorilla tape. Originally we started with the silver which was about 1-1.5" wide and laid 3 overlapping strips on the seams. It was around $8/roll. The wife accidentally bought the wrong tape, Gorilla Black Tough and Wide at $14/roll. We liked it better. It seemed stronger and the wider tape gave us more holding power. It took almost 3 full rolls to tape the seams.
Gorilla Tape: https://amzn.to/2WN5TEa
2022 foam update: we noticed when opening the pool the foam insulation was a lot harder. We assume it compacted from the weight and isn’t as soft and nice feeling on the feet. The tape did create some seams and would hold or catch dirt.

Here we have moved everything off the pavers and I put my "weed barrier" down. This is a pallet wrapping heat shrink I got, free, some time ago and put it to use here. It's very thick, 6-8 mils, and should provide long lasting weed barrier protection and help avoid washout of the dirt. I covered it with rock and unfortunately before I put it down, didn't think to wash it. So I'm washing the mud and dirt off of it, which is a mess. Eventually we did clean off the weed barrier and had a clean surface we put the insulation on top of.
2023 update: the weed barrier worked well. The only wee I have is where the barrier has torn. No weed killer used at all.

Here's the hard piping going in. I did do this after putting the pool up so I had a reference point. I'm not very imaginative and have to see it. I've stubbed it for now while I'm waiting on a few 40mm to 1.5" conversion adapters. I had to use the backhoe to dig it, which is nervewracking next to the pool. I've only partially covered it so I can "leak test" the underground joints once the parts come in.
You can see how much we built this side up to make it level by looking at my trench near the pool. The other side is only a few inches of dirt but this is about a foot or so.

Hard pipe plumbing and skimmer done! I used the GAME 40mm to 1.5" pipe adapters so I could retain the use of the flex hoses. I didn't see any reason to try to hard line all the way to the pump inlet/outlet itself. I left a stub on both sides so I can Tee off the lines if need be. I plan to build a solar heater and tee off the return line.

Rock is temporary and not touching the liner.

The intake side has two inlets. Both the skimmer and intake are on shut off valves so I can operate them independently if the need arises. The intlet is rated at 45 GPM so it's a little short of supply for the 3000G PH pump. I used braided vinyl hoses for the fittings so there was some flexion when the kids get a little rowdy in the pool. The smaller 1/4" intake hose is hose clamped to the inlet fitting. You will need two near at the pool and you will need to trim the rubber piece. The first clamp closes the rubber around the inlet fitting and the 2nd goes over the hose and tightens the hose to the inlet fitting. I electrical taped them so the metal doesn't rub the pool vinyl. The tubing fit snugly over the 1/4" pipe so I didn't use a fitting, just hose clamped it directly to the PVC.
On the Hayward skimmer I swapped out the hose fitting it came with for one from the parts store. I wanted to be able to tighten the tubing down and not leak and wanted something stronger than the thin fitting they had.
You can also see black foam at the base of the liner to protect from the rocks. This is insulating pipe foam. We got 6' sections and cut them in half. Not sure how well it'll hold up to the sun/moisture.

On the return side I left a vertical stub with a threaded fitting and shut off valve. Originally I was going to use this in case I wanted to add a fountain or waterfall later but figured out that it works perfectly with my Intek robot vacuum and I don't have to worry about unscrewing the plastic cover inside the pool to hook up the vacuum. No more wet arms. When I'm done with the stub I have a threaded cap that I put on it to keep debris out of the stub.
On the return I used the "factory" return and flex hose with the GAME adapter.

That pretty much sums up the pool setup at this point. I'm still working on the space itself.
Last edited:


