I am posting this in case someone may find it useful. Came home from work recently and noticed PF error code. I decided to replace the igniter since I was going to look at the PF code (I had purchased one previously to replace the old one). When I was moving the igniter wires, I noticed that there was some missing insulation to the igniter wire and it was likely contacting the chassis of the heater.
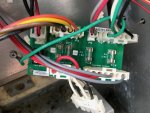
I then checked the fuses and found FC1 to be open. See picture of the power board with FC1 fuse removed already.

I replaced the fuse and put electrical tape around the missing insulation on the igniter wire.
Heater seemed OK for a couple of days with the original igniter. Then it started throwing an IO (Igniter Open) error code. It was at this time that I decided to put in the new igniter.
This did not fix the IO error code.
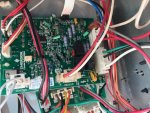
I then removed the control board and followed the PCB traces and it seems the igniter is controlled by Q1 and a relay on the control board. The electronics did not appear to be damaged but I decided to order Q1 from Digi-Key (MAC8NG Triacs Silicon Bidirectional Thyristors) which are about $1.17 (shipping costs more). See control board picture below. Q1 is near the igniter connector lower left.

Anyway, I just replaced this one component and all problems went away. The only trouble I had was the board is conformal coated and I couldn't find my desoldering braid so I just clipped out the old Q1, heated up each of the three solder pads and pushed the pins out while the old solder had not solidified. I then installed the new Q1. Messy solder job, but effective.
My thoughts on what happened.
1. Animal /rodent chewed the insulation off the wire which then made it touch ground
2. This in turn drew a lot of current through the control circuit Q1 but not enough to blow it immediately
3. The slow blow fuse FC1 finally opened
4. After running the heater with FC1 repaired and the insulation corrected, then Q1 finally gave out.
If someone is going to do something similar, take pictures like I did so you know where the connectors and wires go.
If this helps someone, then that is the intent.
I then checked the fuses and found FC1 to be open. See picture of the power board with FC1 fuse removed already.

I replaced the fuse and put electrical tape around the missing insulation on the igniter wire.
Heater seemed OK for a couple of days with the original igniter. Then it started throwing an IO (Igniter Open) error code. It was at this time that I decided to put in the new igniter.
This did not fix the IO error code.
I then removed the control board and followed the PCB traces and it seems the igniter is controlled by Q1 and a relay on the control board. The electronics did not appear to be damaged but I decided to order Q1 from Digi-Key (MAC8NG Triacs Silicon Bidirectional Thyristors) which are about $1.17 (shipping costs more). See control board picture below. Q1 is near the igniter connector lower left.

Anyway, I just replaced this one component and all problems went away. The only trouble I had was the board is conformal coated and I couldn't find my desoldering braid so I just clipped out the old Q1, heated up each of the three solder pads and pushed the pins out while the old solder had not solidified. I then installed the new Q1. Messy solder job, but effective.
My thoughts on what happened.
1. Animal /rodent chewed the insulation off the wire which then made it touch ground
2. This in turn drew a lot of current through the control circuit Q1 but not enough to blow it immediately
3. The slow blow fuse FC1 finally opened
4. After running the heater with FC1 repaired and the insulation corrected, then Q1 finally gave out.
If someone is going to do something similar, take pictures like I did so you know where the connectors and wires go.
If this helps someone, then that is the intent.

