25 May 2024 Update: Gave up and decided to convert my new pool to an underground badminton court!

So ... I'm always looking for possible problems (cuz I was trained as an engineer and there ain't no such thing as perfection ... including my grammar) and so ....

Let's hear your thoughts on those actuators driving the Jandy NeverLube valves???

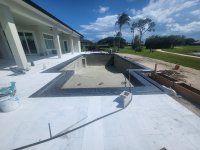
As I see it, those actuators are sitting right in the firing line of that massive infinity edges with all of the splashy-goodness happening in the cattle trough (maybe "alligator trough" in your neck of the woods). While the valve itself is sealed and pretty simple to fix, most actuators are not. The standard CVT-24's oriented in the vertical direction are going to have their ... bums ... pointing right at the splashy water. They are "weather resistant" as far as I am concerned and not "water tight" as they like to claim. The Pentair IntelliValves are even less impressive in my opinion.

All that is to say is that you might want to take a good hard look at the actuators you have and then imagine all of the ways water can get into them. Then try to think of ways to improve their water resistance ...
I had the same thoughts about the durability of the actuator in that location.
 
So ... I'm always looking for possible problems (cuz I was trained as an engineer and there ain't no such thing as perfection ... including my grammar) and so ....

Let's hear your thoughts on those actuators driving the Jandy NeverLube valves???

As I see it, those actuators are sitting right in the firing line of that massive infinity edges with all of the splashy-goodness happening in the cattle trough (maybe "alligator trough" in your neck of the woods). While the valve itself is sealed and pretty simple to fix, most actuators are not. The standard CVT-24's oriented in the vertical direction are going to have their ... bums ... pointing right at the splashy water. They are "weather resistant" as far as I am concerned and not "water tight" as they like to claim. The Pentair IntelliValves are even less impressive in my opinion.

All that is to say is that you might want to take a good hard look at the actuators you have and then imagine all of the ways water can get into them. Then try to think of ways to improve their water resistance ...
Good points you make Matt. Maybe I should let it come out horizontally at least a foot or so beyond the wall and out of the Splash Zone.

Chris
 
Uh, also how are you running a wire to that actuator?
I have buried conduit run down to both ends of the basin. Same kind they use for LED light in the wall. Still have that pigtail from the conduit to the actuator that is exposed though.
 
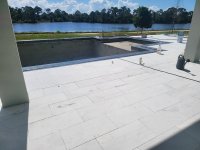
21 May, 2024 Finally, Finally Prepping for Plaster!

Folks,
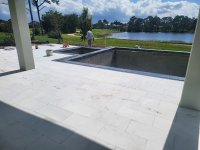
Today we have the plaster sub acid cleaning and installing bond coat plus water proofing in the gutters. Electric sub hooks up pumps tomorrow. Plumber is MIA though. I can hook up minimal plumbing to run the pool if needed. Also, found the enclosure permit was approved today via my portal. They will schedule inspection Thu and fill with concrete on Saturday.

We're getting so close I can smell it!

Chris

1716324984312.jpeg

1716325041540.jpeg

1716325071166.jpeg
 
Sigh................any idea where he went to? At least that is fairly easy to do!

OH YEAH!!!! That is a BIG step forward!

:kim:
No idea where he went, he called from a big job he was finishing in Miami and that must have been it. I find a lot of subs are optimistic about completion dates then it takes a day or two before their ready to mobilize to my job. Often it's actually caused by late changes the owner requested weeks ago and the builder never told them. It's amazing to me how little time PB's or their rep spend on site. I'll look him up today and if he doesn't show I'll run the min lines to get the main pump working and leave out the tees for spa mode etc. I can always cut the lines and remove a section because all connections to suction and discharge of pumps are with a screwed union connection. A while @AQUA~HOLICS posted a photo of his equipment piping that looked really good with this straight run into the suction. I'm trying to do similar.

Chris
 
  • Like
Reactions: kimkats
22 May 2024 Update Problem need help please Spa Jets

Folks,

We're delayed a few days to get electrical installed. The supplier delivered the wrong sub panel - so now I can't get the electric inspection required to put water in the pool 'till next week aggravating!

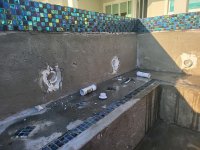
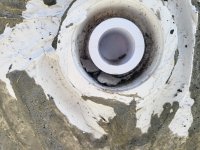
But that's not my big problem. The pool plaster sub sent a crew to seal all the wall penetrations and they were pretty sloppy. I think I can clean out the treads OK myself this weekend but it looks like I'm missing something. It looks like I have the wall bushing but something is missing please see the photos below. The plumber is MIA so it looks like I may need to finish this myself. So anybody that knows about spa jet construction can you please tell me what I'm missing? Calling @ajw22 @AQUA~HOLICS @bdavis466 @JamesW HELP!

Thanks.

Chris


I think this is actually the plug fitting that was installed for the pressure test. It appears to have a 1" threaded pipe screwed into the Hayward spa fitting that's embedded in the wall.
1716410367998.jpeg
 

Enjoying this content?

Support TFP with a donation.

Give Support
Sorry, I haven’t seen that type before.
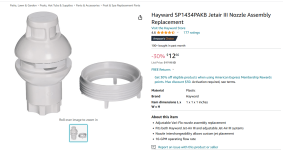
OK thanks. Judging from the lack of replies I'm guessing most spas don't use the therapeutic spa fittings. The photo below is what's inside the wall. I ordered 2 nozzles to make sure they fit. Fingers crossed and @kimkats special connection could help make sure this works. I think Waterway and several other companies make compatible nozzle's but to get the pool finished I'm trying to go with all Hayward so it's more likely everything screws together. I can play around with better nozzles for Robin's back after we start up... hopefully very soon. Electric was completed yesterday and I'll get the temporary child proof fence up for final inspection required before we can put water in the pool. There's more to the fence story that I'll fill in later.

Chris

1716556842950.png 1716557039793.png
 
Last edited:
25 May 2024 Update: Gave up and decided to convert my new pool to an underground badminton court!

Folks,

Just kidding on the title! It's really supposed to be: Managing schedule, Traversing the permitting maze and spa jet learning's


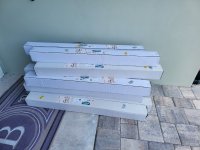
It sure would have been easier if I'd had my DIY design company do the pool design and the enclosure. But, it would have been very difficult to get exactly what we want that way. We had no idea how the back would look when we were at the pool design stage and we had no idea how personal preference decisions might affect the enclosure cost and budget is already in bad shape with "Robin's influence". It's not a cheap item, in fact even after some economizing it's one of the most expensive parts of the pool very close to the cost of the gunite! So I got the design for the pool independent of the enclosure. The enclosure supplier wanted me to do the footers most of them seem to work that way with builders. He subs them out and I saved about half the deduction by doing them myself. So I had to get the design from the enclosure permit application he filed then just formed up the footers with my paver crew while they built the retaining wall. Then the enclosure guy told me they had a permit issue and needed to reapply and this would push out his installation almost 2 months. Normally not an issue we just start without the enclosure and he installs after we have the pool well broken in. Wrong! The final inspection prior to adding water (obviously has to be done prior to plaster) is to do final electrical and child-proof barrier. Yep that's what the enclosure does normally. The only way I can get approval to add water is to install a 4' min ASTM compliant child barrier - $4K installed and about 100 5/8" holes in my beautiful marble pavers! When I have a permitting dilemma I always have found it's best to consult with one of them. This was just like all my previous dilemma's. Since it's temporary I can install in pvc pipe around the area and it will pass. That still costs me $2K if I do it with hired labor myself but I guess it's protecting neighbors grand-kids and dogs so probably worth it. So that's the plan. Fence parts were delivered yesterday.

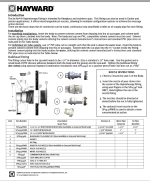
I think I've figured the spa plumbing and all the other returns. Finally got all the plugs out today. They were super tight probably to pass the pressure test then also had cement slopped into the threads. Ended up using pvc cement to the screwed in plugs and twisting it with a pipe wrench to get them loose. Should be able to blow air tomorrow. Now I can also see how they work with the different nozzles in the Hayward manual below. Finally not worried about any of this anymore. They should also be great for Robin's back. Couldn't seem to find a lot of help on these Hydrotherapy jets so I've pasted some photo's of the important manuals in case some other OB decides to use these.

We're so close I can taste it but I'm so tired of "next week" that I now tell people we're not finishing it and decided to make it into an underground badminton court.

Chris

Hayward manual for our in wall spa fittings

1716663944942.png

1716663884388.png
Finally got the **** plugs out
1716680956599.jpeg

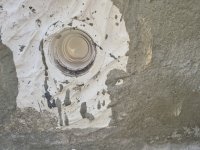
Here's the inside of the jet fitting. Inside the back is a hole at the bottom and top. Water and air enter here and pass through channels in the nozzle fitting to create the swirl. Several different types that range from pules to jet blast. Will be fun to play with these and 3rd party suppliers after the pool's done.
1716681019615.jpeg

$2K for a DIY fence that will be in place for less than 2 Months!
1716681281319.jpeg
 
$2K for a DIY fence that will be in place for less than 2 Months!

If the fence can be disassembled and packed back up when you are done I would think you can sell it on FB Market and recover some of your cost.
 
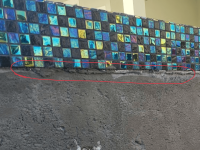
On a side note if possible,View attachment 576913
have the run off removed so it’s a clean edge at the bottom of the tile, this will allow for more plaster to be applied and have the correct thickness for strength.

On a side note if possible,View attachment 576913
have the run off removed so it’s a clean edge at the bottom of the tile, this will allow for more plaster to be applied and have the correct thickness for strength.
Another great catch Aqua. The plaster guy is coming by Tue to do final prep and waterproof the inside of the basin. He should be able to cut this off and it'll definitely look a lot better.

Chris