Pentair Easytouch Button Not working

Robbo

0
May 30, 2010
32
Just North of Toronto
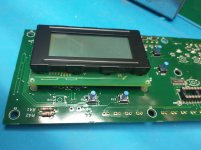
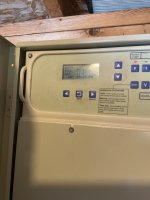
Hello everyone I have a pentair easytouch panel that is over ten years old (see pic). The down arrow button has essentially stopped working. Of course as you scroll through menus and select an option, you then use the up and down buttons to adjust the settings so this button is essential. Any ideas on what I can do if anything? Is this repairable?

thanks in advance

IMG_0818.jpeg
 
Rob,

The actual buttons are part of the main card and sure look replaceable to me. Probable could swap an unused working button for the bad one. Well... maybe not.. :mrgreen: See below

That said, let's see if Tom has any better ideas.. Calling @ogdento

Thanks,

Jim R.
 
Last edited:
I would buy new buttons rather than try to pull one off... It's too easy to damage the board and the button, and a new part is like 45 cents

buy your replacements from a reputable electronics supplier rather than using @mazon cheapo parts (I've used cheap ones, and I will never again). I got these blue buttons from Mouser last time (C&K PTS645SM95SMTR92LFS):

IMG_20230321_214618584~2.jpg

A few tips:
  • I hand soldered the replacements, which isn't what they recommend, but I don't have a reflow oven.
  • If you're using a hot air gun to remove the old one, be sure to shield the other parts so you don't melt the other button actuators (the blue "stems" in the above photo).
  • Clean off the pads with some solder wick before fixing the new button or it will be mis-aligned (think leaning tower of Pisa)
  • The actuator length you want is 9.5mm
 
  • Like
Reactions: Jimrahbe
I've never made any videos about it but there's lot of stuff on youtube about removing components. I kindof like the videos by Mr. SolderFix and Dave at eevblog. Here's a Mr SolderFix video on removing parts:
 
In case others review this inactive post, just tried today to replace the buttons on my 520657 EasyTouch8 control panel. Nope. I do have some solder skills, but apparently inadequate. Bought the buttons from DigiKey, PTS645SM95SMTR92-LFS, $0.46 each. Used very fine cutter to snip the old push button out near the switch body, then a fine, 0.05"-wide soldering iron tip to remove the foot from the board. When the new buttons were soldered in place, still the same old problem with the Menu and Select buttons -- one of the reasons for attempting repair. Fixed the Mode button at least. New problem: stupidly replaced the CR2032 backup battery at the same time. Now, time was even further off and struggled to get partial Menu function to set. Best I could do was three hours later, but better than nothing. Finally, found I could command the pool lights On using the WiFi, but not turn them off. Had to momentarily power off the control board to reset. Don't understand the interaction here; maybe something with the replaced and malfunctioning Menu button.

Replacement board on order with one-week delivery, $588. At least I learned how to remove the board without unscrewing terminals -- each screw terminal is on header pins and slides off. Need to label the Aux plugs to keep them straight. Probaby got the Intake and Return plugs swapped -- unclear labeling when I removed them.

Images show empty pads for Menu and Select Right buttons. Other shows controller with buttons replaced -- blue buttons. Guess it was worth an attempt to save $600 for the replacement board.
 

Attachments

  • EasyTouch8_Controller_Button_Replace_IMG_2696.jpg
    EasyTouch8_Controller_Button_Replace_IMG_2696.jpg
    132.2 KB · Views: 2
  • EasyTouch8_Controller_Button_Replace_IMG_2695.jpg
    EasyTouch8_Controller_Button_Replace_IMG_2695.jpg
    147.6 KB · Views: 2
agh, that stinks! Removing the buttons without damaging the board can be a pain... I can see that the top left pad for the menu button got ripped off before the through-hole. If you solder a bridge from the button to the hole, does that fix it?
1740981186038.png

usually before removing a button I'll use a pair of tweezers to temporarily jumper the top 2 pins to the bottom 2 pins - just to make sure that works. If that doesn't work, then the problem is likely a corroded trace or damage to the microcontroller (the buttons are not buffered on this board - they go straight to the microcontroller).
IMG_20250302_210755778.jpg

when I remove these I slice off these 4 little plastic tabs on top of the button...
1740980493518.png

Then I remove the silver top-plate and black plunger and flip the board to dump out the little flexible disc inside... you end up with this:
1740980671051.png

finally I put a little leaded solder on each remaining leg, then apply a bit of hot air on the center of the button and it comes right off without damaging the board. If you don't have hot-air you could solder a bit of scrap wire inside the button to bridge the two sides, add more solder to heat through to the legs, and take it off.

when resoldering these buttons you've got to work fast with low heat - they're not meant to be hand soldered but they tolerate it fine if you don't let it get too hot.
 
Last edited:
  • Like
Reactions: Jimrahbe
Ogdento, Thanks for your reply! Should have clicked on your Saturation Region blog before proceeding. Yes, noticed I lifted that pad -- that was the second attempt at fix when the Menu button and Select right button still misbehaved. When reinstalling, shifted the button slightly to bridge the foot to the via. You're right -- easy to damage with too much heat. My Hakko set to 350C was probably too high, but seemed Pentair used high-temp solder (RoHS?) so initially difficult to melt. Yes, should have just applied my 63/37 solder to reduce the melt point.

Excellent tip to disassemble the button! Wished I had thought of that. And I do have a Quick861DW hot air tool, but still learning to use. Have assembled boards with it, but I did not feel I could direct the heat to a small enough area, even with the small nozzle.

Finally, great idea to power the control board on the bench to verify connections. I have a 3-channel power supply that I could have used. That would have saved a couple dissasemble / reassemble iterations. Which of the three supply voltages actually powers the control board electronics?

As mentioned, I already ordered a replacement 520657 board, but with all your tips will be interesting to see if I can get the old board functional. Your advice to test button function on the bench with a supply will be key.