Fixing Leaks at Stairs

gmason86

Bronze Supporter
May 13, 2017
97
Ontario, Canada
Hi,

I thought it best to bin my other thread on the stair jets because it was far too long (likely why it didn't get a response - sorry!) with the back and forth on my findings and focus more specifically on current status and where I'm needing advice.

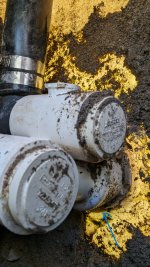
When I removed my winter plug on my stair jet, it also turned the housing it was screwed into, which caused a noticeable leak underground at the stairs. I tightened it by hand, but there's still a very minor leak (see the blue arrow in my first picture for where), especially when I use my finger to move the silicone (if that's what it is) around. See my second picture to see where I mean. Any thoughts on how to fix that, and also stop it happening in future? I'm not sure where to grip on the inside to tighten more, or if I need to somehow take it apart (is there room to do so?), add lubricant, or add more silicone, etc.?

On my third photo, you can see I had a fairly major leak where the black pipe comes from the stair jet and up to the vent (where you can allow more air in) when my winter plug was still in, even on very low pressure. When I removed the winter plug this stopped completely, even on high pressure. I'm guessing water just doesn't get up here under normal circumstances. Do I just ignore? Or try tighten the metal coupling?

If you want more photos, you can find them at: Stair Jet Leak - Google Drive

Thanks!

Graham.
 

Attachments

  • Jet Connection Leak.jpg
    Jet Connection Leak.jpg
    455.6 KB · Views: 7
  • Underneath Jet Connection Leak.jpg
    Underneath Jet Connection Leak.jpg
    229.9 KB · Views: 6
  • Vent Leak.jpg
    Vent Leak.jpg
    377.7 KB · Views: 6
If you plug the jet and turn on the pump it will pressurize the air line and send water out of the intake. This is normally under a vacuum during operation.
With access to the back it's simple. Unscrew the flange (the part that turned) and clean all surfaces of the jet and around the hole in the steps, apply 100% silicone caulk to both sides around the hole and put it back together. Wipe off excess caulk. They do make rubber gaskets that can be used instead of caulk.
Thank you @RDspaguy

Just to make sure I'm understanding correctly.

For the section that's leaking at the top of the black pipe near the air intake, I can just ignore that because it's normally under a vacuum during operation and therefore no water? Is there any way to fix it? I ask because it made the pressure test on the stair jets harder because the system couldn't full be plugged due to that.

For the other part that is leaking...
  1. Unscrew the flange (i.e. the bit that is pictured) - I managed to do that, albeit the picture doesn't show it. From behind (i.e. underground), it doesn't look any different. I guess that's some sort of holder that the flange screws inside of? Separately, I managed to damage the threading a little on the flange that came out (long story... don't ask), but I did manage to screw it back in successfully and tighten it.
  2. Clean all surfaces of the jet - What do you mean exactly? Are you talking about the bit that I just unscrewed? Or is the "jet" something else?
  3. Clean around the hole in the steps - Do you just mean the hole that is left behind after I unscrewed the flange, i.e. clean from the water side?
  4. Apply 100% silicone caulk to both sides around the hole - I'm not really following here. On the water side, flange is currently unscrewed and out. Where do I apply the caulk? And am I also applying caulk where I've dug underground? Do I just scrape off the stuff that's there just now and apply new? Any advice on applying the caulk on the underground side given it's awkward to get into? Just a usual caulking gun like we use indoors and then smooth it with my finger? Or something else?

Some other questions:
  • For the rubber gasket you mention, do you have a link so I can try find what you mean?
  • For the caulk, how does it work given I guess I need to apply some of this underwater? I heard you can get ones meant to cure underwater? Do I need to drain the water first, or is there an alternative?
  • Any advice on how to tighten the flange fully once I put it back in? Being underwater, it's slippery! The leak guy (see note below) did have a tool to tighten/loosen these, but it didn't fit the holes there. Seems it was built for a new version.

Sorry! Just want to make sure I'm doing this right rather than assuming a few things and then regretting it.

(As a side note, the leak guy did come out today and found a leak in the main returns near the pump. Thankfully pretty easy to get to. I'll post separately once I've uncovered all that for advice).

Thanks so much for your help.
 

Attachments

  • PXL_20240610_222222074.MP.jpg
    PXL_20240610_222222074.MP.jpg
    131.4 KB · Views: 2
For the section that's leaking at the top of the black pipe near the air intake, I can just ignore that because it's normally under a vacuum during operation and therefore no water? Is there any way to fix it? I ask because it made the pressure test on the stair jets harder because the system couldn't full be plugged due to that.
Not clear on what you think you can do to it. It will leak out of the intake if pressurized, the fitting is not made to hold pressure. You are correct that it screws a pressure test. Welcome to spa repair. At least you just have jet stairs, imagine a tub with 54 of those and you'll see why we don't pressure test portable spas.

guess that's some sort of holder that the flange screws inside of?
A jet of this type consists of a threaded flange (called a thru-wall), a jet back or body, and an internal or nozzle.

Clean all surfaces of the jet
And the shell (stairs) where the flange and jetback make contact. You want clean surfaces for your new caulk seal or gaskets. So, the flat flange by the threads, the front of the jetback where it touches the shell, and both sides of the shell around the hole.

Do I just scrape off the stuff that's there just now and apply new?
I usually use a wire brush or dish scrubbie. If there is anything that smears it must be wiped thoroughly.

Just a usual caulking gun like we use indoors and then smooth it with my finger? Or
Yep, don't need much. The small squeeze tubes of caulk can be useful for tight spaces.

For the caulk, how does it work given I guess I need to apply some of this underwater?
It must be dry. Drain down below the jet.

Just to be clear, it is the rear seal that seals the threads. In a pinch underwater I have sealed the threads with teflon and used a gasket on the front (lubricated on one side only). I would not warranty this repair, but it will get you by for a good while and would not require draining.
Any advice on how to tighten the flange fully once I put it back in?
If I don't have a tool I make one. For those a big pair of needle-nose pliers often works, but 2 screws through a board makes a tool. Just snug it down, you don't want to crack the flange by over-tightening. Another reason caulk is better.
 
Thanks so much @RDspaguy

I'm really sorry I'm being so dumb here and likely over complicating things. With the different terms, I'm just not sure I'm following. I've added some pictures with markup/arrows to show what I believe you mean. Hoping you can clarify a few things for me please before I go ahead and do this.

Your help is really so appreciated. I'm very new to pool repairs, so I want to be sure I'm doing it right, especially with a part as unfamiliar at these stair jets are for me.

Would you recommend doing both stair jets while I have it drained? I've not had any issues with the other side turning, but I haven't dug it out so have no idea if it's leaking.

Not clear on what you think you can do to it. It will leak out of the intake if pressurized, the fitting is not made to hold pressure. You are correct that it screws a pressure test. Welcome to spa repair. At least you just have jet stairs, imagine a tub with 54 of those and you'll see why we don't pressure test portable spas.
The leak detection guy suggested that ideally what he'd do is put a plug in the intake at the top. If the black pipe in my original pictures where it's leaking was also pressure tight, then he could do a proper pressure test on the stair lines and determine if they have a leak anywhere.

The other side didn't show any signs of water when I lifted the bricks when I had the jets plugged and pump on a little.


A jet of this type consists of a threaded flange (called a thru-wall), a jet back or body, and an internal or nozzle.
Which part is the internal/nozzle? If I feel inside the jet back, it has the threads where the flange screwed into, and then it narrows to a little hole behind that, which is presumably where the water comes through. Sorry, it was hard to get a good picture since I haven't drained it yet.

And the shell (stairs) where the flange and jetback make contact. You want clean surfaces for your new caulk seal or gaskets. So, the flat flange by the threads, the front of the jetback where it touches the shell, and both sides of the shell around the hole.
I've attached two pictures, one with the flange and one attempting to show the hole and jet back.

On the flange, I've added two yellow arrows where I think you want me to add caulk. Am I right on those?

For the second picture with the hole and jet back, I've added two arrows, on yellow and one green.

The yellow arrow is what I think you mean by "both side of the shell around the hole". Is that right? Do I caulk the pool side and then sort of inside the hole? Or is the other side you're referring to where I have the blue arrow in my last picture?

The green arrow is what I think you mean by "the front of the jetback where it touches the shell". Is that right? Would it not be round about the same place as caulking the hole?

What about on the underground side where the caulk currently is? Would you take that off and re-caulk? It's right around where the jet back touches the stair shell. I'm not sure if the caulking I've suggested above would cover that, or if I should do that side too since it has some now and that's where I see the water. When I took the flange out, I saw quite a steady stream of water where the blue arrow is on the last photo.

Am I missing anywhere?

It must be dry. Drain down below the jet.
Ah, thanks for clarifying. Was hoping to avoid that, but will do that if that's how to fix it properly. How long do I need to leave everything to set? I know these tubes of caulk often have an initial set and then full cure time on them.

From what I understand, after applying the caulk to everywhere you've suggested, I'd put it all back together and then wait for how long before filling?

Just to be clear, it is the rear seal that seals the threads. In a pinch underwater I have sealed the threads with teflon and used a gasket on the front (lubricated on one side only). I would not warranty this repair, but it will get you by for a good while and would not require draining.

When you say rear threads, are you meaning the ones closest to the water side, or the opposite end?

Based on where it's leaking from on the underground side, it is presumably around where my green arrow is. I think that makes sense because presumably the opposite end is where the water pushes through from the pipes underground.

If I did to the teflon / gasket route, presumably you mean just add teflon tape all around the threading of the flange and screw it back in? If so, what type of teflon tape would you use (I have the white one and pink one).
As for the gasket, when you say the "front", I'm guessing you mean I'd just put it on the flange and push it all the way up to the wider section (i.e. where the right hand yellow arrow is on the first pic)? If so, which side are you saying to lubricate? I have the silicone lubricant I use for the pump o rings etc - is that good enough?
For buying a gasket, does it have to be a specific pool brand, or do I just find a rubber gasket from Home Depot, etc. in the plumbing section that's the same size?

If I don't have a tool I make one. For those a big pair of needle-nose pliers often works, but 2 screws through a board makes a tool. Just snug it down, you don't want to crack the flange by over-tightening. Another reason caulk is better.
I ended up putting a pair of channel lock pliers inside the flange, opening, applying enough pressure and turning. That let me grip it. I'll try the pliers idea though.
 

Attachments

  • PXL_20240611_185444047.MP with markup.jpg
    PXL_20240611_185444047.MP with markup.jpg
    293.2 KB · Views: 1
  • PXL_20240611_185518061 with markup.jpg
    PXL_20240611_185518061 with markup.jpg
    103.6 KB · Views: 1
  • PXL_20240601_133159062 with markup.jpg
    PXL_20240601_133159062 with markup.jpg
    429.5 KB · Views: 1
Last edited:

Enjoying this content?

Support TFP with a donation.

Give Support
The thing in the ground is the jetback. Where it touches the wall is where you need to seal it with caulk, or put teflon on the flange threads to seal that part.
The screw-in part is the flange. The flat donut part of it seals to the wall with caulk or gasket. If you lube both sides of a gasket it will squeeze out. Doesn't matter which, but only lube 1 side.
Caulk takes 24 hrs to set.
Any teflon tape or thread sealant will do.
Any flat or ribbed rubber gasket will do, but I recommend white or "clear".
 
Thread Status
Hello , This thread has been inactive for over 60 days. New postings here are unlikely to be seen or responded to by other members. For better visibility, consider Starting A New Thread.