Some renovations before liner replacement

dbhyslop

Member
Jun 1, 2023
10
Madison, WI
Hi everyone,

I have an 18x36 pool, vinyl liner over concrete wall, built about 45 years ago. The current liner failed after just a few years and I want to do a few things while we wait for a replacement. Regrettably we may lose the whole summer.

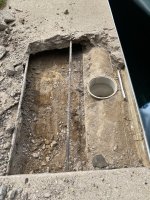
The first thing I want to do is replace the skimmer. It is very small, the Weir door is only about 5-1/2" wide. It doesn't do a great job cleaning the surface and the basket still fills quickly. My plan is to replace it with two Hayward SP10841 skimmers next to each other in the same spot, which is the downwind corner of the pool.

1. This should be a straightforward installation: chip out the concrete and recast with the face plate in the same plane as the old one?
2. Is the SP10841 the best choice for this application? The 1085 "wide mouth" has the exact same weir so I don't see how it can skim any better.
3. Right now I have a 1 HP pump that I think is moving about 60 GPM after accounting for head loss. In the future I might get a variable pump, but this liner is expensive and I'm focusing on what I need to do with it out. Is there any issue with putting in two skimmers?

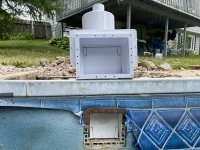
The other thing is the lighting niche, which has a leaky conduit. It looks like my two options here are to replace it with a new niche, or scrap it and put in four or five nicheless lights along the long wall facing away from the house.

1. Any general advice as to niche or nicheless? I'm kind of ready to be done having a submerged 120V light, just for peace of mind. It sounds like the niche LEDs out there, even the name brands, aren't very reliable though.
2. Is SP0607U the proper niche to use for a vinyl-over-concrete pool? Just discard the locking ring and cast in place?
3. What's the proper 1 1/2" inlet to use for a nicheless light in vinyl-over-concrete pool? It needs a gasket but can't use a locking ring to press it into the liner. Is this what SP1408 is for, the four screws press the cover and gasket to the body?

Most of this stuff seems pretty straightforward for an experienced DIYer, except for the vinyl over concrete construction. This seems uncommon and parts are designed either for vinyl or concrete, but not both, and my usual technique of searching forums doesn't bring up a lot.

I'd love to hear any other observations or tips outside of my specific questions!

Thanks!

Dan

DanIMG_1407.jpg
 
Good morning Dan and welcome to TFP! :wave: Your thread has been sitting quietly for a few days. It's time we get it going. Have you made any progress at all on some of your concerns? Do you still need help with the skimmer, shell, and LED situations?
 
If you replace the light niche with new one (most likely the nut the conduit threads into came off the niche housing, the nut is only brazed on) I would encase the back of the light niche in concrete. On mine I had a welder weld on a pipe coupler with filler rod (Stainless steel) so it won't fail in my time. Backfilling is critical so there is no settling. Settling is what breaks pipes and conduit.

If you are going to replace the skimmer, I would guess it's like you said. The Hayward skimmers seem popular and I am guessing it becuase they work. I don't envy the work it's going to take to chip out 45 year old concrete.

Went doing you demo work, make sure to keep an eye out for the bonding wires and remake any connects that may have been broken.

Xzysex782uyDm08YOR1CVmWaburJh7JPU_UpQPl7VRPQc08O6qitxESc7H1DUjTtqEgYUDA_KGb9xRgVce-fZlkYvsYLehFofULKSjnf2p5NHiBbtkGPvjMSxPc0Wtx09Pm0pbh2Rgw-qK5FjigLEAt4h5cvPWUiYoA0Eig1rK_ZhQzEfSn49oeqwYlmxcB2MHISvZLvnz9B9pPN_Lftpb7tf_xUUlA59m5MwLs-9b1-lHsHaB9QndlZSSiUVIbprEKZCFT1xPQnuVPfcMpPA10p_ZbECcsQlXOaog5tpBCs6jlgraHOtJbcRxlcmnVFy1lDpKsmXzemTOjj7cMcYCGwl6Bhkdij8JjXPSnKj83B1piT8SCBaHiS6-6y-bwcVMADHFC3Oc7GEOftNqISqNA55zCeRgRW11PLj4uQFPV5ud5nq3gtDjJGaBmX4YiC-5TEJzv250IagE2fnZxeQYXi4F-zuGwJlXW66s5QkK2kSpogmZyHr1H7ZcbB-mfclhfV6dnAd_2CL9zvqyQE0HA3hJg5rl1i9txlXXdAw1fM6J_WVxupB5li9mhyGOZc5ITiAbeJxwSVvh0fwreekUVZiJaotdqZQC8y6g-rRzCp-a7GhGMGsBT8kVCbGBmsd6V9FNXFd4UBST1RiX5V0WkmwEh2NgHs9ci-vLq0xLIkL57syViLZuFQyI-3LvRg6HWwlWPBtP9O6FznBei4YWXw75jNuFrSeGL9-cW1m5fqhhLCnJX-troUOsvsoCPmMSHeiwQPNlGB-CgX08EOLSMndh-yqu7hFJlhDGPq8a-Lf08UlpYOOFm7NFF3hKoAGDXI39h62j5T_9fU2OM9XLkV2GeNe2M77Jwjq17JeMfEB2vg7P3wD6q14KdGGoQisnNfR2obGQ-CT2Sv2K8Cbvo129jnWdaj4m9rwMglckvBE55qgQ=w510-h907-s-no
 
Thanks guys! I kind of gave up after a day or two and didn't check back again until now. Really, just the process of typing things up helps a lot because it makes me focus my questions and determine what my specific concerns are.

I've gone ahead and ordered two 10841 skimmers and one 0607U niche. I really wanted to do a bunch of nicheless lights, but it will be a lot less work to replace like with like than core drill a bunch of new holes and trench them to the house for conduit.

If anyone has any more tips I'd love to hear them, otherwise I'll post some pictures when we start working.
 
The skimmer project is well underway. I took a half day last weekend to break out part of the deck to see what I was dealing with. The existing tiny skimmer was embedded fully in the concrete wall. Today I broke out the rest of the deck, dug a big hole and chiseled out the old skimmer. I enlarged the hole and test-fit one of my new skimmers.

Tomorrow I’m going to cut out a matching hole about a foot away for the second skimmer, then cast them in place with hydraulic cement next weekend.

Some questions:

1) The old skimmer face was flush with the concrete. Is this correct or should it be slightly proud by the thickness of the foam so the liner doesn’t have to flex?

2) Is there an ideal depth below the coping? I was just going to put it at the same height as the old one but I thought I’d ask. I really don’t trust the original installers.

3) How deep should I run the plumbing? The original pipe (actually black hose) is like 42” underground which seems ridiculous. I saw a guy on YouTube make what looked like a J-trap so the run was just below the waterline in the skimmer.

Thanks!

Dan
 

Attachments

  • IMG_0044.jpeg
    IMG_0044.jpeg
    969.5 KB · Views: 19
  • IMG_0046.jpeg
    IMG_0046.jpeg
    629 KB · Views: 20
  • IMG_0142.jpeg
    IMG_0142.jpeg
    917.9 KB · Views: 20
  • IMG_0139.jpeg
    IMG_0139.jpeg
    868 KB · Views: 20
  • Like
Reactions: Lanzz
Progress continues, I got the second hole done and test fit both skimmers. After about an hour with my SDS so broke down and rented a demolition hammer for $29, and was entirely finished in another hour.

Next weekend I’ll cast them back in place. I’ll put some rebar in the bottom of the right hand hole where the old skimmer was, and also on top of both where the concrete will need to bridge. I’ll bond it all of course. My plan is to do the concrete in stages, first putting down a 1” layer and bedding the skimmer throats into it so I can level them. When that cures I’ll pack the sides and top. I plan to etch the old concrete and use a adhesion agent.


IMG_0147.jpegIMG_0148.jpegIMG_0149.jpeg
 
  • Like
Reactions: RLP
Making good progress. Not easy work. Check your lines to see what condition they are in. I have the flexible PVC lines in my pool and they were flaking off on the insides so I replaced them all with rigid PVC.

The level of the skimmer should probably be close to where the existing were unless you felt the water level in the pool was too high or low. The normal water level should be in the middle of the skimmer opening. This will give you some wiggle room up and down on water level and allow the skimmers to do their job.

I would bury them deep enough that there is no chance of someone hitting a line when anchor for a safety cover are installed.

Don't forget to maintain the bonding of the rebar and ground around the pool.
 
Thanks! I just got the call that they want to install the liner tomorrow. I talked them back two weeks, which should be enough time to get the skimmers cast in place and replace the niche.

As I understand it as long as I’ve backfilled the walls and the coping is untouched, they can do the liner and start filling even if I haven’t poured the new deck yet. I hope so, at least.
 
For backfill type 57 stone works well. Doesn't need much to fully compact it and it drains well too.

I am no pool expert, but I doubt you need to much backfilling to have the liner installed. But better safe than sorry. Also will make hanging the liner a lot easier.

Kind of surpised the conduit on the back of the niche failed if it was encsed in concrete. My experience (vinyl steel wall) was the nut brazed on to the niche that the conduit threads in to corroded and fell off. Im guessing the leak then caused the conduit to settle some too.

I patched with epoxy first, when that failed, I dug up behind the niche and redid the conduit and put a bulkhead fitting on the niche for the conduit to connect to. The last fix was still working when I was having the liner replaced but I was also planning on redoing the pavers around the pool. So I replaced the skimmers, returns, and niche. Well I did the skimmers and niche before the liner was installed. Afterwards when I was replacing all the lines I found the returned were cracked and leaking. I paid someone to pull the liner back and replace the returns. In hindsite I could have done it, but still happy I paid someone to do it and I did not mess up a 4 month old liner. I was not sure how easy hard it was going to be get he liner back in the track.
 
I don’t know exactly what failed on the niche yet because I haven’t dug it out yet, I just know there a leak and a rubber plug fixes it. If I can fix it with a bulkhead maybe I will but once I’m that far in it’s probably only an afternoon to cut it out and swap it with the new plastic one with a solid PVC connection.
 

Enjoying this content?

Support TFP with a donation.

Give Support
Got the skimmers in place today. I made a template from a spare piece of plywood, it screws to the inside of the pool and the skimmer mouths index against the wood strips. This way I can make sure they’re both level, square to each other and flush with the inside of the pool wall as I cast them in place.

The second picture shows the template in place, along with the rebar and bonding wire. The old concrete has been acid etched and is ready to go.

I had a couple false starts using quick setting concrete. I couldn’t get them to bed in place consistently with the aggregate. My dad suggested using mortar instead, which worked well. I also packed the sides with mortar but switched back to concrete for the bond beam.

Tomorrow I rent a jackhammer to break up the decking over the niche.

IMG_0153.jpegIMG_0177.jpegIMG_0179.jpegIMG_0180.jpeg
 
That was all the easy part. Today I tore up the deck above the niche. I could have cut out a smaller area but most of it was cracked because there was no reinforcement. Tomorrow I’m going to dig up the niche. I don’t know how I’m going to replace all this concrete, I think it’s more than the Ace Hardware rental mixer can do.IMG_0184.jpeg
 
Dug another big hole today, to expose the back of the niche. Pool builder decided to encase the conduit in concrete for some reason. Back to Ace to rent the demolition hammer again.
IMG_0189.jpeg

Can you spot the leak? Builder used steel conduit out of the niche.

IMG_0191.jpeg

I thought about keeping the old niche but wasn’t sure how to add new corrosion resistant conduit. There isn’t a flat hole conducive to a bulkhead fitting and I didn’t want to spend all afternoon going back and forth to the hardware store figuring out how to connect to the female threads.

IMG_0198.jpeg

So I cut the old niche out with my SDS on a rickety scaffold inches above the water. This was a lot easier than expected, the difficult part was enlarging the hole because Hayward makes the new niche significantly larger and a different shape.

IMG_0200.jpeg

With this I’m done with the backbreaking labor. No more jackhammers, demolition hammers, or SDS. All that’s left is to bed the niche in and attach the conduit and bonding/ground wires. Plumb the skimmers and refill the holes.

I paid my teen son $50 to haul 10,000 lb of broken concrete to a distant corner of the yard, and tomorrow he gets another $50 to dig my trench from the skimmers to the pad.

It’s worth noting that none of this work was required due to aging or wear-and-tear on a 40 year old pool. All of this is because of failures by the original installer who used a single hot tub skimmer on an 18x36 pool, steel conduit into a wet niche, and no rebar in a concrete deck.
 
Definitely over the hump on this project. Mortared the new niche in place and anchored the aluminum coping back in place with tapcons. Most of it came loose because the masonry nails had rusted out of the pool wall.

The trench is almost done but my son needed help from another teen so now I’m out another $50. I should be able to get the plumbing done tomorrow then it’ll be ready for the liner.

The only new complication now: on Hayward niches for vinyl pools, the faceplate screws go through the niche and thread into the backing plate behind the pool wall. I just have cement behind the holes. My plan is to drill the cement out each hole and inject some thickened epoxy inside then drill pilot holes in each one. I decided that would be faster than chipping the hole big enough to fit the backing plate.


IMG_0203.jpegIMG_0202.jpeg
 
  • Like
Reactions: Lanzz
Thread Status
Hello , This thread has been inactive for over 60 days. New postings here are unlikely to be seen or responded to by other members. For better visibility, consider Starting A New Thread.