Plumber left out the check valve on the heater bypass

Dunn08

Member
Sep 24, 2022
17
Henderson, NV
Pool Size
25000
Surface
Plaster
Chlorine
Salt Water Generator
SWG Type
Pentair Intellichlor IC-60
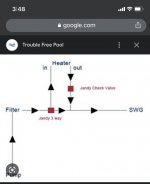
Plumber was coming today to plumb in a heater bypass for my new construction so I left him a Jandy 3 way valve and check valve. Plumbing has been done for a while so this was an addition/change I wanted.

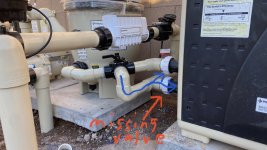
Anyway, he didn’t use the check valve. There was already a check valve before the SWG that you will see in the attached picture. Now I’m no plumber, but I assume there should be another one off the heater before the Tee fitting they put in today. The way I see it, in bypass mode, water will be able to go into the heater outlet. Unless there’s a check valve in the heater at the outlet to not allow this.

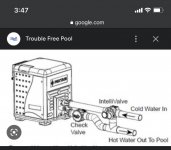
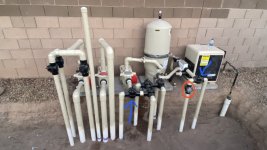
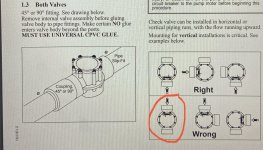
I gave my pool guy this diagram from here that also shows a check valve. Here is the plumbing.

Is this ok, or am I correct to tell them to fix it?

Thanks in advance
 

Attachments

  • AA1BCEBE-2561-4889-B468-07B37E917633.jpeg
    AA1BCEBE-2561-4889-B468-07B37E917633.jpeg
    43.5 KB · Views: 65
  • FD0F9B9C-09F5-4737-BCBE-9538F2926053.jpeg
    FD0F9B9C-09F5-4737-BCBE-9538F2926053.jpeg
    361.2 KB · Views: 65
  • FF0C3408-9686-424C-B4E4-5824F8F82638.jpeg
    FF0C3408-9686-424C-B4E4-5824F8F82638.jpeg
    351.5 KB · Views: 61
Once the heater fills with water, the water will stop flowing through it. You kinda have to picture how the water will, and won't, move relative to how the three-way valve is blocking flow. So plumbed as is, the bypass will keep water from flowing through the heater (but won't keep the water from initially filling the heater). Now, if you wanted to be able to remove or just disconnect the heater (for some reason), then your current set up won't work, and yes, you would need the check valve you're referring to.

Ironically, the check valve before the SWG is not needed. That is a throwback from when plumbers regularly installed tab feeders (perhaps there used to be one?). The slew from a feeder needs to be blocked from getting back into the heater while there is no flow. SWGs don't create that slew, because when they're off and there is no flow, they don't produce or leak anything, so that check isn't needed.

Worse still, the Pentair manual suggests having a long run of straight, uninterrupted pipe just before the SWG. So that's another reason the check shouldn't be there. It can cause turbulence that can affect the SWG's performance. Ideally, the SWG should have been located closer to the return manifold, so that the length of pipe before it could have been even longer.

Not everyone here will agree with that assessment, but as I said, the Pentair SWG installation manual is clear on that point.
 
Last edited:
08,

If your goal is to bypass the heater so that you can get more flow, or better flow at a lower pump speeds, it will work just fine as it is.

If your goal was to be able to take the heater completely out of the system and still run your pool, you will need the check valve.

Adding the check valve will be a lot more work.

Thanks,

Jim R.
 
Worse still, the Pentair manual suggests having a long run of straight, uninterrupted pipe just before the SWG. So that's another reason the check shouldn't be there. It can cause turbulence that can affect the SWG's performance. Ideally, the SWG should have been located closer to the return manifold, so that the length of pipe before it could have been even longer.

That’s very interesting. I’ll have them move it, thank you for all of that.

If your goal is to bypass the heater so that you can get more flow, or better flow at a lower pump speeds, it will work just fine as it is.

If your goal was to be able to take the heater completely out of the system and still run your pool, you will need the check valve.

Adding the check valve will be a lot more work

My goal was to achieve both of those. In Vegas we don’t need the heater much for the pool. Maybe to extend the season a couple months on both ends. Mostly for the spa. I plan to run my pump at low speeds for longer periods so better flow and efficiency was a goal.

In the situation of a leak, completely bypassing the heater to keep the pool running over the summer if I can’t get the heater squared away would also be nice.

You’re right though, moving the heater away from the filter and extending the inlet/outline lines would probably be necessary to give the room for the check valve. Not sure if it’s worth it.
 
  • Like
Reactions: Jimrahbe
Maybe I'm missing something but I'm not sure why you think you need a check valve. Water will not flow back into the heater when in bypass mode.

"In the situation of a leak, completely bypassing the heater to keep the pool running over the summer if I can’t get the heater squared away would also be nice."

This is the only reason I can see for the check valve (a leak inside the heater) but it's a pretty catastrophic one that most people wouldn't go the distance preparing for(?)
 
In the situation of a leak, completely bypassing the heater to keep the pool running over the summer if I can’t get the heater squared away would also be nice.
If necessary, you could undo both unions and the gas line union and shift the heater.

Then, unscrew the black part from the heater, screw on a 2" threaded cap and then reconnect to the union to act as a plug.

1672516855035.png
1672516979654.png
1672517285080.png
 
Maybe I'm missing something but I'm not sure why you think you need a check valve. Water will not flow back into the heater when in bypass mode.

"In the situation of a leak, completely bypassing the heater to keep the pool running over the summer if I can’t get the heater squared away would also be nice."

This is the only reason I can see for the check valve (a leak inside the heater) but it's a pretty catastrophic one that most people wouldn't go the distance preparing for(?)

Maybe it's me that missing something, but what is stopping the water from filling the heater via the outlet while in bypass mode the way it's currently plumbed?

I’ve also read it’s a good idea to bypass the heater during the start up of a new pool/plaster.

Pentair also wants you to install one of you do the “smart bypass valve” they offer

I guess it's just who I am, I try to be prepared so I don't end up with a headache later while saying "I wish I would have done this differently." However, I do see your point.
 

Attachments

  • B4B875BA-B79F-4E34-A8A6-6308D5FC14DA.jpeg
    B4B875BA-B79F-4E34-A8A6-6308D5FC14DA.jpeg
    65.8 KB · Views: 6
Last edited:
Maybe it's me that missing something, but what is stopping the water from filling the heater via the outlet while in bypass mode the way it's currently plumbed?
If the heater was empty of water, yes, some water would flow backwards through it once the bypass valve was moved to its bypass position. But follow it's path, backwards through the heater. It'll eventually comes out the inlet pipe, and runs into the three-way valve. In bypass mode, that port of the three-way is blocked, so the water coming out of the heater has no where to go, and will eventually stop flowing. An air bubble might get trapped there, or it might eventually work its way out.

In practice though, the heater is already full of water as you move the three-way valve into the bypass position. Any water that tries to go backward through the heater runs into the water that is already inside. And that water can't go anywhere because it's being blocked by the closed port of the three-way valve.

Hope that makes sense. The three-way as plumbed doesn't keep water out of the heater, but in bypass position the three-way valve stops water from flowing through the heater.
 
Maybe it's me that missing something, but what is stopping the water from filling the heater via the outlet while in bypass mode the way it's currently plumbed?

I’ve also read it’s a good idea to bypass the heater during the start up of a new pool/plaster.

Pentair also wants you to install one of you do the “smart bypass valve” they offer

I guess it's just who I am, I try to be prepared so I don't end up with a headache later while saying "I wish I would have done this differently." However, I do see your point.
Nothing is going to evacuate water from the heater short of draining it, as bypass, check, or valve all just stop the flow but can't evacuate any water from the heater. If the only goal is the off-chance you need to run system sans heater for awhile, just make an elbow with connector ends and put away somewhere for that time, if ever happens.
 
Hope that makes sense. The three-way as plumbed doesn't keep water out of the heater, but in bypass position the three-way valve stops water from flowing through the heater.

Yep, that part makes perfect sense. Thank you.

Nothing is going to evacuate water from the heater short of draining it, as bypass, check, or valve all just stop the flow but can't evacuate any water from the heater. If the only goal is the off-chance you need to run system sans heater for awhile, just make an elbow with connector ends and put away somewhere for that time, if ever happens.

The off chance of a leak and to completely bypass it for initial start up per PebbleTec start up procedures.

"Do not use heaters for the first fourteen (14) days and adjust plumbing to allow water to bypass the heater"

In the end I guess having a more efficient system with less resistance was more important to me than COMPLETELY bypassing the heater, which was achieved.
 
  • Like
Reactions: Jimrahbe

Enjoying this content?

Support TFP with a donation.

Give Support
You can completely bypass the heater as I described above.

You also have to be careful when the heater is in bypass mode because it will still trip the pressure switch even though there is no flow and the heater can run and get damaged.

A flow switch would be best.

If no flow switch, you have to make 100% sure that the heater is turned off completely so that it cannot try to run with no flow.
 
  • Like
Reactions: Dirk and wireform
You can completely bypass the heater as I described above.

You also have to be careful when the heater is in bypass mode because it will still trip the pressure switch even though there is no flow and the heater can run and get damaged.

A flow switch would be best.

If no flow switch, you have to make 100% sure that the heater is turned off completely so that it cannot try to run with no flow.
Great info James, thank you for that and the parts breakdown and idea above.

I have another check valve question for you guys if you don't mind. Clear this up for me because i'm struggling with the logic.

I have a raised spa so my plumber installed a check valve on the spa return, vertically. Looking into this, i've seen countless other check valves mounted vertically on spa returns with water flowing down. I realize they CAN be mounted viertical if the water flow is up. Functionally It doesn't make sense to me, not to mention Jandy's instructions clearly state not to do this.

What am I missing here?

Here's a pic of my pad. This is a couple months old. Pool is ready for plaster so electrical and everything else is now done. The 3 way valves with blue arrows have automation actuators on them now.

Far left is a dedicated pump for a 6ft (grotto) and (2) 2ft rain descents using its own 3" suction line.

Middle is dedicated spa jet pump with 3" suction/return line.
 

Attachments

  • 334D28DF-5CE2-4852-96B3-02AD5E309306.jpeg
    334D28DF-5CE2-4852-96B3-02AD5E309306.jpeg
    293.4 KB · Views: 18
  • EF0B4CDB-4DC8-4F98-B2D2-387061114529.jpeg
    EF0B4CDB-4DC8-4F98-B2D2-387061114529.jpeg
    644.8 KB · Views: 17
I realize they CAN be mounted vertical if the water flow is up. Functionally It doesn't make sense to me, not to mention Jandy's instructions clearly state not to do this.
The flapper has a spring to keep it closed and the water pressure also keeps it closed.

1672630164088.png

It will work, but it does not comply with Jandy instructions, so it should probably be changed.

In my opinion, the 90 degree check valve (Bottom right with red arrows) would be ok because the flapper is opening sideways even though Jandy says that it is wrong.
1672629791725.png
 
The flapper has a spring to keep it closed and the water pressure also keeps it closed.

Correct. But all springs weaken over time, especially when they’re susceptible to corrosion. I just had to ask to make sure there wasn’t something I was missing.

In my profession, I would likely kill some one if I just ignored technical data and installed something however I wanted. It will work for some time I’m sure. It will also fail sooner than it should. Between this and many other questionable and flat out wrong building techniques I’ve dealt with during this entire owner/builder experience, the frustration level is getting pretty high. Anyway..

I agree with you about the 90, if I can’t install it horizontally I’ll have it replaced with that.

Thank you.
I think you hit on it. I'm gunna guess: the check will work regardless of orientation, as long as it's working properly. The trick is to install it so that if the spring fails, the flap still has a shot at doing its job. The correct orientation would allow gravity to backup the spring. Once the water pressure exists, that would take over and do the bulk of the work. If gravity would tend to allow the springless flap to fall open, I suppose it's possible for water flow to then push the flap farther open, and then pin it open, rather than force it to close. I can't imagine why else the orientation would matter.

The comeback from a butt-crack-showin' plumber along the lines of "Nah, I've been doin' this for 30 years and I've never seen that happen," doesn't mean it couldn't. I would trust the instructions from a company that sells millions of valves over the "scientific evidence" of a plumber that has installed a few hundred.
 
  • Like
Reactions: JamesW
The correct orientation would allow gravity to backup the spring. Once the water pressure exists, that would take over and do the bulk of the work. If gravity would tend to allow the springless flap to fall open, I suppose it's possible for water flow to then push the flap farther open, and then pin it open, rather than force it to close. I can't imagine why else the orientation would matter.

The comeback from a butt-crack-showin' plumber along the lines of "Nah, I've been doin' this for 30 years and I've never seen that happen," doesn't mean it couldn't. I would trust the instructions from a company that sells millions of valves over the "scientific evidence" of a plumber that has installed a few hundred.

I think you just explained it perfect.

It's hilarious what you just said because you're absolutly right. I just told me wife a few minutes ago that when I bring it up to the plumber that's exactly what I'll hear. "Don't worry, been doing it like that for years, it's fine." Heard it from from the concrete guy when he said he doesn't use a bond breaker when he pours cantilever decking/coping, or an expansion joint when he doesn't. With all due respect to your experience, I don't care how many times you've done something incorrectly and gotten away with it. I'm paying for it to be done right.
 
Last edited:
  • Like
Reactions: JamesW
Looking into this, i've seen countless other check valves mounted vertically on spa returns with water flowing down. I realize they CAN be mounted viertical if the water flow is up. Functionally It doesn't make sense to me, not to mention Jandy's instructions clearly state not to do this.
Like with mine, a floating ball check is probably more used in that application.
 
I would likely kill some one if I just ignored technical data and installed something however I wanted.
There is also the issue of warranty and liability.

If there is ever a problem that is caused by equipment, the first thing a manufacturer will check is to see if the installation instructions were followed.
I agree with you about the 90, if I can’t install it horizontally I’ll have it replaced with that.
However, that would be ignoring the technical data...just sayin.

In a horizontal installation, the flapper can still close from gravity.

In the 90 example, gravity is neutral; it does not help or hurt.
 
  • Like
Reactions: Dirk
The only time you might have an issue is in “Spillover” mode (Pulls from pool and returns to spa) when the pump shuts off, but you have a check valve before the SWG cell, which gives you an extra check valve to prevent backflow.

You can have the system switch to “Pool” mode before the pump shuts off so that the pump is not off while the system is in “Spillover” mode configuration.

If the pool return and spa return are both open and the pump is off, you can get flow from the spa to the pool through the returns, but you should not usually have both open, although you might in some cases.

The problem with a vertical install is that it is awkward.

A horizontal install can also be awkward if you don’t have the room.

Maybe do a 90 check valve and a vertical check valve going down to give you two check valves.

With the check valve before the cell, that gives you 3 check valves.

Have a spare flapper assembly so that you can replace a bad flapper if necessary.
 
The flapper has a spring to keep it closed and the water pressure also keeps it closed.

View attachment 467340

It will work, but it does not comply with Jandy instructions, so it should probably be changed.

In my opinion, the 90 degree check valve (Bottom right with red arrows) would be ok because the flapper is opening sideways even though Jandy says that it is wrong.

It is interesting that Jandy has two different check valve Installation documents with different diagrams...


1672629791725-png.467338


1672691051016.png

The RIGHT diagrams agree but the WRONG diagrams are different.
 
  • Wow
Reactions: JamesW

Enjoying this content?

Support TFP with a donation.

Give Support
Thread Status
Hello , This thread has been inactive for over 60 days. New postings here are unlikely to be seen or responded to by other members. For better visibility, consider Starting A New Thread.