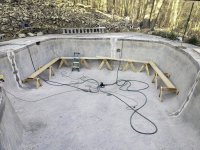
Painted IG Gunite Pool. No Plaster, tile, or coping. For better or worse, the renovation has begun...

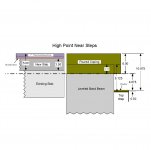
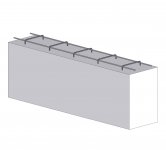
I was planning on a wet laid bluestone deck with bluestone coping, so not cantilevered. However, I can see how a poured cantilever concrete deck could work. It would require at least 5" thick coping in order to result in a 4" minimum slab thickness, and there would be a step in the slab (either up or down depending on location) around the perimeter of the pool. (The attached drawing shows what I mean.) There's a possibility that it might crack in one of those areas, but most likely not since settling shouldn't be an issue.

Unfortunately, I really don't like the look of a concrete deck, stamped or otherwise. Per the comments by @MAPR-Austin above, we're trying to maintain the natural look that we currently have. I'm sure that a stamped concrete deck can look "OK" until it cracks or discolors, but it can't hold a candle to the natural look of bluestone IMO.
Ah, I figured all the talk of leveling layers meant concrete deck. Strangely enough, I kinda dig the look of the bond beam running all the way up to be flush with the deck and not having coping on it. No way to add material to the bond beam to level it and then just set new bluestone? Or maybe that’s your plan. If so, I approve. 🤣
 
Do you think the pool has always been this far out of level, or has it settled over the years?

Just to throw out crazy ideas, nothing says you have to level the coping and deck. It might drive the tile-setter mad, but start will a full course of waterline tile that has it's top maybe 1-1/2 - 2" below the lowest point on the top of the bond-beam and set it level around the perimeter of the pool, then a second course of cut tiles to fill the gap to the top. Then plaster as normal. You could do a cast-in-place coping, or stick with the current exposed concrete look.
 
As described in some of my previous posts, I was planning to add material to the bond beam to level it. The question is - what's the best way to do that? Since the cold joint between the existing bond beam and the added concrete will run under the tile, I need the best possible bond between the layers in order to avoid problems with the waterline tile down the road. I outlined a few options/questions in my previous posts, but the thread kind of got side-tracked.

Since it’s a freeform pool in every way imaginable (nothing even close to level, or plumb) the situation is complicated and therefore difficult to summarize concisely. In order to further clarify my proposal/questions, following is a detailed summary of what I propose to do for the bond beam, tile, and coping. Hopefully some of you concrete experts out there will comment/correct/mock as appropriate:
  • Thoroughly clean and scarify the existing bond beam.
  • Epoxy anchor and tie #3 rebar around the perimeter of the pool. (See sketch below.)
  • Attach ¼” plywood forms at finished height of extended bond beam.
  • Saturate the existing bond beam with water.
  • Shoot forms full with gunite, leveling top surface.
  • Cover and keep moist for 7 days. Remove forms after 14 days.
  • Apply waterproofing/isolation membrane (e.g. MiraPrime Aqua-Blok XL) to extended bond beam covering top, back, and front sides (including tile line on front side), overlapping cold joint on both sides.
  • Attach tile ledger boards to the side of the pool.
  • Apply Laticrete Platinum 254 bond coat to tile line.
  • Apply Laticrete 3701 Fortified Mortar bed to tile line, ¼” thick.
  • Apply waterproofing/isolation membrane (e.g. Miracote Membrane C) to tile line.
  • Install porcelain waterline tile using Laticrete Platinum 254.
  • Remove ledger boards and apply Miracote Membrane C to bottom edge of tile line.
  • Grout tile using Laticrete Spectralok Pro Premium Epoxy Grout.
  • Install bluestone coping using Laticrete Platinum 254.
  • Grout coping with Type S mortar.
  • Caulk joint between coping and tile with Sonneborn TX1 polyurethane caulk.
Questions related to the above procedure: 1) Should I apply a bonding agent to the top of the existing bond beam before shooting the gunite? If so, what do you recommend? 2) Should I apply a release agent to the forms? If so, what’s recommended and how do I remove it from the gunite after the forms are removed? 3) How far apart should I place the anchored rebar “staples”? 4) Anything else to add?
 

Attachments

  • Bond Beam with Rebar.jpg
    Bond Beam with Rebar.jpg
    50.8 KB · Views: 7
As described in some of my previous posts, I was planning to add material to the bond beam to level it. The question is - what's the best way to do that? Since the cold joint between the existing bond beam and the added concrete will run under the tile, I need the best possible bond between the layers in order to avoid problems with the waterline tile down the road. I outlined a few options/questions in my previous posts, but the thread kind of got side-tracked.

Since it’s a freeform pool in every way imaginable (nothing even close to level, or plumb) the situation is complicated and therefore difficult to summarize concisely. In order to further clarify my proposal/questions, following is a detailed summary of what I propose to do for the bond beam, tile, and coping. Hopefully some of you concrete experts out there will comment/correct/mock as appropriate:
  • Thoroughly clean and scarify the existing bond beam.
  • Epoxy anchor and tie #3 rebar around the perimeter of the pool. (See sketch below.)
  • Attach ¼” plywood forms at finished height of extended bond beam.
  • Saturate the existing bond beam with water.
  • Shoot forms full with gunite, leveling top surface.
  • Cover and keep moist for 7 days. Remove forms after 14 days.
  • Apply waterproofing/isolation membrane (e.g. MiraPrime Aqua-Blok XL) to extended bond beam covering top, back, and front sides (including tile line on front side), overlapping cold joint on both sides.
  • Attach tile ledger boards to the side of the pool.
  • Apply Laticrete Platinum 254 bond coat to tile line.
  • Apply Laticrete 3701 Fortified Mortar bed to tile line, ¼” thick.
  • Apply waterproofing/isolation membrane (e.g. Miracote Membrane C) to tile line.
  • Install porcelain waterline tile using Laticrete Platinum 254.
  • Remove ledger boards and apply Miracote Membrane C to bottom edge of tile line.
  • Grout tile using Laticrete Spectralok Pro Premium Epoxy Grout.
  • Install bluestone coping using Laticrete Platinum 254.
  • Grout coping with Type S mortar.
  • Caulk joint between coping and tile with Sonneborn TX1 polyurethane caulk.
Questions related to the above procedure: 1) Should I apply a bonding agent to the top of the existing bond beam before shooting the gunite? If so, what do you recommend? 2) Should I apply a release agent to the forms? If so, what’s recommended and how do I remove it from the gunite after the forms are removed? 3) How far apart should I place the anchored rebar “staples”? 4) Anything else to add?

My question was closer to why not cut the bond beam down to level rather than trying to add to an already too tall bond beam? If you’re adding coping on top of it anyway.

I’m not sure you need all the staples (certainly won’t hurt) for that small of a rise but I’ll let experts comment on that.
 
You might have a look at this thread if you haven't seen it already. He had to repair and add to an existing bond beam. Not exactly the same situation as yours because I think he had to add more material, but he did have to add rebar and forms etc on the top of a bond beam.
 
  • Like
Reactions: kimkats
As described in some of my previous posts, I was planning to add material to the bond beam to level it. The question is - what's the best way to do that? Since the cold joint between the existing bond beam and the added concrete will run under the tile, I need the best possible bond between the layers in order to avoid problems with the waterline tile down the road. I outlined a few options/questions in my previous posts, but the thread kind of got side-tracked.

Since it’s a freeform pool in every way imaginable (nothing even close to level, or plumb) the situation is complicated and therefore difficult to summarize concisely. In order to further clarify my proposal/questions, following is a detailed summary of what I propose to do for the bond beam, tile, and coping. Hopefully some of you concrete experts out there will comment/correct/mock as appropriate:
  • Thoroughly clean and scarify the existing bond beam.
  • Epoxy anchor and tie #3 rebar around the perimeter of the pool. (See sketch below.)
  • Attach ¼” plywood forms at finished height of extended bond beam.
  • Saturate the existing bond beam with water.
  • Shoot forms full with gunite, leveling top surface.
  • Cover and keep moist for 7 days. Remove forms after 14 days.
  • Apply waterproofing/isolation membrane (e.g. MiraPrime Aqua-Blok XL) to extended bond beam covering top, back, and front sides (including tile line on front side), overlapping cold joint on both sides.
  • Attach tile ledger boards to the side of the pool.
  • Apply Laticrete Platinum 254 bond coat to tile line.
  • Apply Laticrete 3701 Fortified Mortar bed to tile line, ¼” thick.
  • Apply waterproofing/isolation membrane (e.g. Miracote Membrane C) to tile line.
  • Install porcelain waterline tile using Laticrete Platinum 254.
  • Remove ledger boards and apply Miracote Membrane C to bottom edge of tile line.
  • Grout tile using Laticrete Spectralok Pro Premium Epoxy Grout.
  • Install bluestone coping using Laticrete Platinum 254.
  • Grout coping with Type S mortar.
  • Caulk joint between coping and tile with Sonneborn TX1 polyurethane caulk.
Questions related to the above procedure: 1) Should I apply a bonding agent to the top of the existing bond beam before shooting the gunite? If so, what do you recommend? 2) Should I apply a release agent to the forms? If so, what’s recommended and how do I remove it from the gunite after the forms are removed? 3) How far apart should I place the anchored rebar “staples”? 4) Anything else to add?
The laticrete platinum 254 is a mortar. Is it ok to use as a bond coat?
 
Thanks @PCR. I haven't seen this thread yet, but I'll definitely check it out. I appreciate all your input @Bperry. There are so many interrelated issues here that it's nearly impossible for me to understand all the tradeoffs without making detailed drawings. The drawing attached below shows another option with a cut down bond beam, poured concrete coping, and a wet laid bluestone deck. Although I originally thought that cutting down the bond beam might work, as shown in this new drawing, I would end up with less than 5" between the bottom of the coping and the top step in the shallow end. Although certainly not a show stopper, it's not as desirable as building up the bond beam IMO. FYI, Laticrete recommends the use of a Platinum 254 slurry as a bond coat for submerged applications. I've also seen a number of people recommend it on this forum as well.
 

Attachments

  • Top Step Clearance with Cut Beam.jpg
    Top Step Clearance with Cut Beam.jpg
    45.7 KB · Views: 21
I was planning on a wet laid bluestone deck with bluestone coping, so not cantilevered. However, I can see how a poured cantilever concrete deck could work. It would require at least 5" thick coping in order to result in a 4" minimum slab thickness, and there would be a step in the slab (either up or down depending on location) around the perimeter of the pool. (The attached drawing shows what I mean.) There's a possibility that it might crack in one of those areas, but most likely not since settling shouldn't be an issue.

Unfortunately, I really don't like the look of a concrete deck, stamped or otherwise. Per the comments by @MAPR-Austin above, we're trying to maintain the natural look that we currently have. I'm sure that a stamped concrete deck can look "OK" until it cracks or discolors, but it can't hold a candle to the natural look of bluestone IMO.

One other thing to consider as you plan for the deck: distance from the deck to the top step. Adding a few inches or more to that distance can make it pretty treacherous.

e: should have kept reading before making my reply.
 
Thanks @PCR. I haven't seen this thread yet, but I'll definitely check it out. I appreciate all your input @Bperry. There are so many interrelated issues here that it's nearly impossible for me to understand all the tradeoffs without making detailed drawings. The drawing attached below shows another option with a cut down bond beam, poured concrete coping, and a wet laid bluestone deck. Although I originally thought that cutting down the bond beam might work, as shown in this new drawing, I would end up with less than 5" between the bottom of the coping and the top step in the shallow end. Although certainly not a show stopper, it's not as desirable as building up the bond beam IMO. FYI, Laticrete recommends the use of a Platinum 254 slurry as a bond coat for submerged applications. I've also seen a number of people recommend it on this forum as well.
Ok, I get it. Didn’t realize the bluestone needed such a thick base. Figured they were laid like pavers.
 
Thanks for following guys. You can lay bluestone like pavers, but I prefer wet laid since maintenance is essentially zero and no weeds. Since I have to level the bond beam anyway, I figured I might as well build it up enough to permit a wet-laid installation. That build thread that @PCR pointed me to was awesome! It helped to answer a lot of questions for me. Also gave me a confidence boost - after reading about that build, mine looks like a piece of cake!
 
  • Like
Reactions: kimkats

Enjoying this content?

Support TFP with a donation.

Give Support
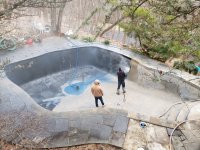
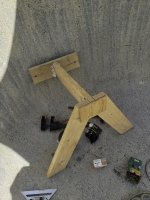
Hopefully some of you remember my postings from last year - mostly questions regarding my plans for this year's renovation. Well, the planning stage is now officially over!

Day One - 3/24/2023 - Paint being hydro-blasted off the pool. Many layers of TOUGH stuff, unfortunately no longer available.
Hydroblasting.jpg

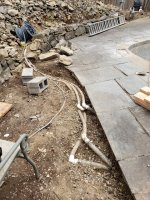
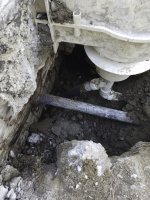
4/7/2023 - The photo on the left below shows where I dug out the existing plumbing lines from the equipment pad to the edge of the pool deck (equipment pad in upper right hand corner). Fortunately, the lines didn't run under the deck all the way from the pad, but were buried under the rock wall along the edge of the deck. Although not fun, digging out the rock wall was a lot easier that trying to cut through the existing 8" concrete deck. The lines are flexible PVC from the equipment pad the edge of the deck, transitioning to black poly before going under the deck. When we bought the house, the pool maintenance guy told me that the pad had been relocated further from the house to reduce the noise from the equipment, so I assume it must have previously been located in the area where the cinder blocks are in the photo.
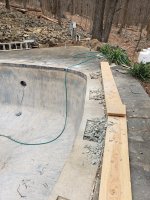
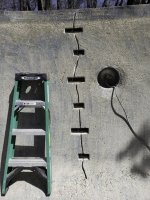
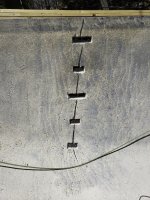
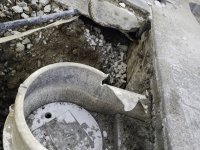
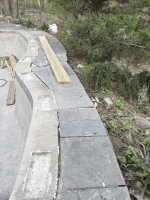
The photo on the right shows where I chipped out the bluestone inlays around the edge of the pool. A small Bosch SDS-plus hammer drill with a pointed bit worked pretty well for this - took about 6 hours to hammer out all 25 of them. The empty holes will make great key-ways for the new raised bond beam, so I've got that going for me. :)
20230407_130345.jpg20230407_130316.jpg

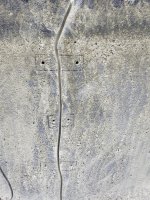
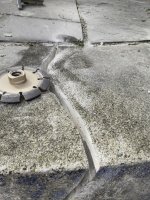
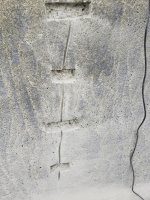
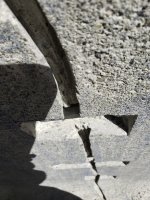
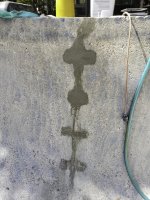
4/8/2023 to 4/11/2023 - After the pool was hydro-blasted and had dried sufficiently, I found 4 long cracks extending from the top of the bond beam (and through it on top) all the way to the bottom of the pool. I'm not sure if they qualify as "structural cracks" since they really hadn't opened up much, but I decided to repair them using lock-ties since I wanted to be better safe than sorry. The photos below show a summary of that process. I marked the outlines and hole locations first using the templates provided, then drilled the holes. Next I dug out the cracks using a 3/8" "crack chaser" blade which you can see in one of the photos. (I chased the cracks all the way through the top of the bond beam since my bond beam is already exposed.) I then cut the outlines using a 4-1/2" diamond cutting wheel and chipped them out using the Bosch hammer drill. Before installing the lock-ties, I beveled the insides of the cut out cracks using the cutting wheel to leave an inverted V-shape in order to provide a key-way for the hydraulic cement. The final step was the hydraulic cement. Overall, the whole process (4 cracks and 20 lock-ties) took me the better part of 4 days to finish. The hardest part was chipping out the concrete - it took some time to get the depressions flat enough so that the lock-ties would sit flat against the back of the cut outs. I got pretty good with the chipping hammer by the time I had all 20 cut-outs finished! The hydraulic cement took a lot longer than I initially thought too, mainly because I under-estimated how much would be needed - I used about 45 pounds for all 4 cracks, which took awhile at 1 to 2 pounds per batch.
20230408_160554.jpg20230408_160558.jpg20230408_163850.jpg20230411_131411.jpg20230411_131403.jpg20230411_131426.jpg20230411_131432.jpg

It appears that I've reached my limit of 10 photos, so that's all for now. Next up is scaffolding construction and skimmer demo, so stay tuned. And there's a lot more to come after that, so check out my previous posts for a preview if you're interested. Thanks for looking!
 
Hopefully some of you remember my postings from last year - mostly questions regarding my plans for this year's renovation. Well, the planning stage is now officially over!
If you're interested, my previous postings can be found here: Painted IG Gunite Pool. No Plaster, tile, or coping. Renovation options?

Day One - 3/24/2023 - Paint being hydro-blasted off the pool. Many layers of TOUGH stuff, unfortunately no longer available.
View attachment 483867

4/7/2023 - The photo on the left below shows where I dug out the existing plumbing lines from the equipment pad to the edge of the pool deck (equipment pad in upper right hand corner). Fortunately, the lines didn't run under the deck all the way from the pad, but were buried under the rock wall along the edge of the deck. Although not fun, digging out the rock wall was a lot easier that trying to cut through the existing 8" concrete deck. The lines are flexible PVC from the equipment pad the edge of the deck, transitioning to black poly before going under the deck. When we bought the house, the pool maintenance guy told me that the pad had been relocated further from the house to reduce the noise from the equipment, so I assume it must have previously been located in the area where the cinder blocks are in the photo.
The photo on the right shows where I chipped out the bluestone inlays around the edge of the pool. A small Bosch SDS-plus hammer drill with a pointed bit worked pretty well for this - took about 6 hours to hammer out all 25 of them. The empty holes will make great key-ways for the new raised bond beam, so I've got that going for me. :)
View attachment 483868View attachment 483875

4/8/2023 to 4/11/2023 - After the pool was hydro-blasted and had dried sufficiently, I found 4 long cracks extending from the top of the bond beam (and through it on top) all the way to the bottom of the pool. I'm not sure if they qualify as "structural cracks" since they really hadn't opened up much, but I decided to repair them using lock-ties since I wanted to be better safe than sorry. The photos below show a summary of that process. I marked the outlines and hole locations first using the templates provided, then drilled the holes. Next I dug out the cracks using a 3/8" "crack chaser" blade which you can see in one of the photos. (I chased the cracks all the way through the top of the bond beam since my bond beam is already exposed.) I then cut the outlines using a 4-1/2" diamond cutting wheel and chipped them out using the Bosch hammer drill. Before installing the lock-ties, I beveled the insides of the cut out cracks using the cutting wheel to leave an inverted V-shape in order to provide a key-way for the hydraulic cement. The final step was the hydraulic cement. Overall, the whole process (4 cracks and 20 lock-ties) took me the better part of 4 days to finish. The hardest part was chipping out the concrete - it took some time to get the depressions flat enough so that the lock-ties would sit flat against the back of the cut outs. I got pretty good with the chipping hammer by the time I had all 20 cut-outs finished! The hydraulic cement took a lot longer than I initially thought too, mainly because I under-estimated how much would be needed - I used about 45 pounds for all 4 cracks, which took awhile at 1 to 2 pounds per batch.
View attachment 483888View attachment 483889View attachment 483904View attachment 483897View attachment 483893View attachment 483898View attachment 483903

It appears that I've reached my limit of 10 photos, so that's all for now. Next up is scaffolding construction and skimmer demo, so stay tuned. And there's a lot more to come after that, so check out my previous posts for a preview if you're interested. Thanks for looking!
Interested to see this as I’m doing the exact same thing now.
 
Another thing I learned when installing the torque locks is to take care when drilling your holes. You want them to to be spaced correctly AND you want them to be parallel. If the holes aren't parallel you end up opening them up to get the staple to lie flat, which can potentially reduce the spacing between the holes. If the holes end up too close you won't be able to torque them sufficiently. I found that I needed about a 1/4 turn to get the proper torque in some cases, so if the cam ends up more than 90 degrees out of perfect starting alignment (i.e. perfect hole placement) you may not be able get them torqued right. I had 2 out of 20 end up with the holes spaced too close together. In the process, I figured out why they them make in two different sizes - so that you can re-drill with either a larger or smaller one if you mess up. I had one large and one small one with the holes too close, so I swapped them and was good to go after a bit more drilling, grinding, and hammering. I also found it better to cover the staples themselves using two separate batches of hydraulic cement. Use the first batch to jamb into all the nooks and crannies and then feather it out around the edges with a trowel so you end up with a recessed layer of cement over the staple. Use the second batch to complete filling in the hole. Doing it this way allows you to get a good flush finish without the concrete slumping too much.
 
  • Like
Reactions: kimkats
Hopefully some of you remember my postings from last year - mostly questions regarding my plans for this year's renovation. Well, the planning stage is now officially over!
If you're interested, my previous postings can be found here: Painted IG Gunite Pool. No Plaster, tile, or coping. Renovation options?

Day One - 3/24/2023 - Paint being hydro-blasted off the pool. Many layers of TOUGH stuff, unfortunately no longer available.
View attachment 483867

4/7/2023 - The photo on the left below shows where I dug out the existing plumbing lines from the equipment pad to the edge of the pool deck (equipment pad in upper right hand corner). Fortunately, the lines didn't run under the deck all the way from the pad, but were buried under the rock wall along the edge of the deck. Although not fun, digging out the rock wall was a lot easier that trying to cut through the existing 8" concrete deck. The lines are flexible PVC from the equipment pad the edge of the deck, transitioning to black poly before going under the deck. When we bought the house, the pool maintenance guy told me that the pad had been relocated further from the house to reduce the noise from the equipment, so I assume it must have previously been located in the area where the cinder blocks are in the photo.
The photo on the right shows where I chipped out the bluestone inlays around the edge of the pool. A small Bosch SDS-plus hammer drill with a pointed bit worked pretty well for this - took about 6 hours to hammer out all 25 of them. The empty holes will make great key-ways for the new raised bond beam, so I've got that going for me. :)
View attachment 483868View attachment 483875

4/8/2023 to 4/11/2023 - After the pool was hydro-blasted and had dried sufficiently, I found 4 long cracks extending from the top of the bond beam (and through it on top) all the way to the bottom of the pool. I'm not sure if they qualify as "structural cracks" since they really hadn't opened up much, but I decided to repair them using lock-ties since I wanted to be better safe than sorry. The photos below show a summary of that process. I marked the outlines and hole locations first using the templates provided, then drilled the holes. Next I dug out the cracks using a 3/8" "crack chaser" blade which you can see in one of the photos. (I chased the cracks all the way through the top of the bond beam since my bond beam is already exposed.) I then cut the outlines using a 4-1/2" diamond cutting wheel and chipped them out using the Bosch hammer drill. Before installing the lock-ties, I beveled the insides of the cut out cracks using the cutting wheel to leave an inverted V-shape in order to provide a key-way for the hydraulic cement. The final step was the hydraulic cement. Overall, the whole process (4 cracks and 20 lock-ties) took me the better part of 4 days to finish. The hardest part was chipping out the concrete - it took some time to get the depressions flat enough so that the lock-ties would sit flat against the back of the cut outs. I got pretty good with the chipping hammer by the time I had all 20 cut-outs finished! The hydraulic cement took a lot longer than I initially thought too, mainly because I under-estimated how much would be needed - I used about 45 pounds for all 4 cracks, which took awhile at 1 to 2 pounds per batch.
View attachment 483888View attachment 483889View attachment 483904View attachment 483897View attachment 483893View attachment 483898View attachment 483903

It appears that I've reached my limit of 10 photos, so that's all for now. Next up is scaffolding construction and skimmer demo, so stay tuned. And there's a lot more to come after that, so check out my previous posts for a preview if you're interested. Thanks for looking!
Great update. You did a wonderful job on the crack repair. I am no expert but it looks very profession. A lot of pride in workmanship.
 
4/13/2023 - Put up the scaffolding today. It's a pretty simple design using 2x6's with joist hangers and framing angles, attached to the pool walls with Tapcon screws. Nine supports in all with 2x12's on top. It may be a bit overkill for what I need, but I designed it to go up quick. I budgeted 3 days to install it and it only took me one, so I'm pretty happy with it. Next up is the skimmer demo...

20230413_183457.jpg20230413_135423.jpg
 
  • Love
  • Like
Reactions: kimkats and Newdude
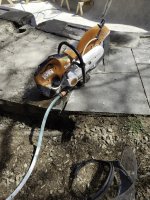
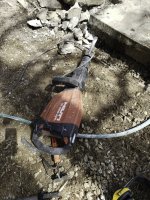
4/14/2023 - Skimmer demo day. I stopped by the rental center in the morning and picked up a couple of big guns to help with the demo.

20230414_130515.jpg20230414_130518.jpg

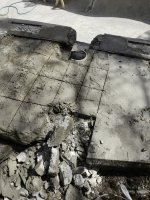
First I saw cut through a 3 foot section of the pool deck and then diced it up into bite-sized pieces with the wet saw before jack-hammering the pieces out. Don't forget to wear your muck boots when using the wet saw! (I learned that the hard way on this skimmer.)

20230414_130508.jpg

Two hours later and the deck is toast. The large jack-hammer made the process ALMOST enjoyable...
20230414_141958.jpg

Now on to the other skimmer: Two hours later, no more deck. Definitely not as enjoyable this time...
20230414_150107.jpg20230414_170649.jpg

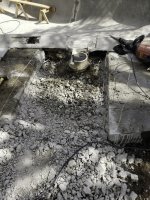
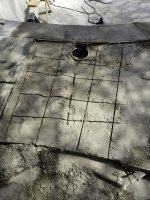
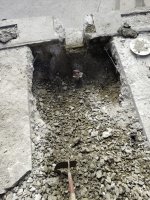
Another hour of hammering revealed the skimmer and associated plumbing in all it's glory. Lucky for me, the concrete surrounding the skimmer didn't extend much below the bottom of the skimmer mouth, so as I dug down deeper the concrete just fell away to reveal a rather large void below the skimmer. The long black poly pipe is the return line and the black poly pipe going to the main drain can be seen attached to the wye fitting below the skimmer. The original PB clearly did a poor job on the backfill in this area. In the third photo you can see an approximate 1 foot void below the deck where it meets up with the pool. Looks like they just filled the hole up with rocks and a small amount of 3/4" stone before pouring the deck. Even though the fill settled a lot, the deck thankfully held up well for 45+ years with no signs of cracks or sagging.

20230418_185444.jpg20230414_181922.jpg20230418_185457.jpg

You can also see a piece of rebar sticking out of the pool in the third photo. It's about 3 feet long and was bent over under the deck slab when I dug it up. (I bent it up out of the way later). So it looks like they did the old "bend the pool rebar over and attach it to the deck" trick when they built the pool. There was also some welded-wire mesh "embedded" in the deck slab itself, which you can see in a couple of the photos. Although it appears that the deck is attached to the pool shell by means of this rebar, the rebar wasn't actually embedded in the concrete - it was laying in the gravel just below it. There is also a 6" wide piece of asphaltic material used as an isolation joint between the pool shell and the deck slab with deck-o-seal used to fill the gap between the deck and the pool shell on top. So although the pool shell "appears' to be attached to the deck by means of the bent-over rebar, they did take the time to install a proper isolation joint between the deck and the pool. I can also see a similar piece of bent over rebar where I dug through the deck near the other skimmer - under the slab but not embedded.

This reminds me of a rather heated debate on this forum regarding the "bend the rebar over" method. One guy was arguing (against everyone else, it seemed) that the bent over rebar was only intended to support the deck, not to connect the deck to the pool. Although I'm not sure which side of that debate I might end have ended up on, I can kind of see what that guy was talking about now that I see what they did on my pool. Of course it could be that the rebar ended up at the bottom of the slab the same way that the "embedded" welded wire mesh ended up near the bottom of the slab (lazy masons "hooking" the welded wire mesh rather than using chairs), but I thought it was interesting that they took the time to put an isolation joint between the deck and the pool shell even though there is bent over rebar that appears to connect the pool to the deck. In my case, it is what it is for the purposes of this renovation since I have no plans to dig up the existing deck slab to change it.

Although it's hard to see in the photo below, which shows the side of the pool opposite the skimmers where the deck is only 2 to 3 feet wide, there is a very steep drop off just beyond the edge of the deck (30 to 45 degree slope?) to an area about 20 feet below. In this case, I would argue that it would be best if the rebar WAS embedded in the deck such that the deck is essentially attached to the pool on this side. Expansion and contraction of this narrow section of deck would hardly be enough to place much pressure on the pool wall. I actually believe that the deck would move with the pool if that were the case, rather than the other way around. I also believe that this section of the deck would be at the bottom of the hill after 45 years if it were NOT attached to the pool. Instead, it appears to be in relatively good shape with no visible signs of cracking or sagging. This is another reason why I'm not interesting in digging up the old deck slab, particularly in this area, since I may end up with a serious landslide and half my deck at the bottom of the hill.
So to finally get to my point, there may be some times when it DOES make sense to attach the deck to the pool...

20230418_185716.png
 
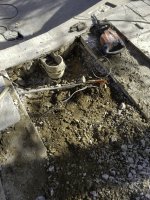
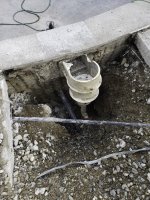
4/15/2023 - This morning I finished digging out the other skimmer before returning the jackhammer and wet saw. This skimmer was definitely installed better, no signs of big voids here, just super-hard concrete surrounding the entire skimmer and all of the lines. Since this skimmer is at the shallow end, less fill was needed, so less settling. You can see what's left of the bottom of the skimmer below (with the rag stuffed in it). You can also see the black poly return line just below that. Although this dig was a lot harder (definitely NOT enjoyable), I won't have to dig any further than this because my plan is to plug the existing skimmer ports and use the existing suction lines for the main drains only. Since I'm raising the bond beam to level the pool, the new skimmers will sit above the level of the old skimmers (3" higher in this case, and over 4" higher in the other). This will give me enough clearance to install the new skimmers above the old abandoned skimmer ports with new dedicated 2" lines running back to the equipment pad. I also plan to reuse the existing returns, at least up to the point where they attach to the flexible PVC lines at the edge of the deck. At least that's the plan for now...
20230415_094403.jpg
 
  • Like
Reactions: HermanTX
4/15/2023 - This morning I finished digging out the other skimmer before returning the jackhammer and wet saw. This skimmer was definitely installed better, no signs of big voids here, just super-hard concrete surrounding the entire skimmer and all of the lines. Since this skimmer is at the shallow end, less fill was needed, so less settling. You can see what's left of the bottom of the skimmer below (with the rag stuffed in it). You can also see the black poly return line just below that. Although this dig was a lot harder (definitely NOT enjoyable), I won't have to dig any further than this because my plan is to plug the existing skimmer ports and use the existing suction lines for the main drains only. Since I'm raising the bond beam to level the pool, the new skimmers will sit above the level of the old skimmers (3" higher in this case, and over 4" higher in the other). This will give me enough clearance to install the new skimmers above the old abandoned skimmer ports with new dedicated 2" lines running back to the equipment pad. I also plan to reuse the existing returns, at least up to the point where they attach to the flexible PVC lines at the edge of the deck. At least that's the plan for now...
View attachment 484768
I don’t feel as tired doing my renovation when I look at this one. 😉
 
  • Like
Reactions: Newdude

Enjoying this content?

Support TFP with a donation.

Give Support
Thread Status
Hello , This thread has been inactive for over 60 days. New postings here are unlikely to be seen or responded to by other members. For better visibility, consider Starting A New Thread.