the nurse on her school has me on speed dial!!Same. Her Kindergarten teacher affectionately called her Mrs Bleeds because she needed to see the nurse every 12 minutes.
INEXPERIENCED OB Steel wall vinyl liner inground pool under construction in north texas
- Thread starter Caro325
- Start date
You are using an out of date browser. It may not display this or other websites correctly.
You should upgrade or use an alternative browser.
You should upgrade or use an alternative browser.
- Jul 18, 2019
- 616
- Pool Size
- 33780
- Surface
- Vinyl
- Chlorine
- Salt Water Generator
- SWG Type
- Pentair Intellichlor IC-60
. but I think it is hilarious that I have to dig for hours through shear rock to create 2-18" deep holes that I then have to turn around and fill with 14" of rocks

alrighty then lets keep her AWAY from the tools and sharp rocks!!my child is a "Boo-boo girl" so up to now I have kept her away from the construction
How exciting! The house is going to be mighty quiet but you will get a LOT done while she is gone!she goes to sleep away camp!
LOL body said HELP, brain said Google!after 2 days working with a small pick axe, I used my brain and google "demolition" and discover the magic of "rotary hammers"
No kidding!!!!! 4 hours of my life to dig this 2 holes…….. just to fill them back up
Attachments
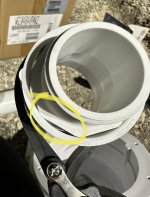
Does anyone know by any chance what is the best way to get this 2 things together in a way that won’t leak???? Plumbers putty and the glue???? Do I need a different connector??? My drains did not bring a plug so I bought a male threaded connector that goes from 1 1/2 to 2, but it has this line things on themNo kidding!!!!! 4 hours of my life to dig this 2 holes…….. just to fill them back up


Last edited:
- Jul 18, 2019
- 616
- Pool Size
- 33780
- Surface
- Vinyl
- Chlorine
- Salt Water Generator
- SWG Type
- Pentair Intellichlor IC-60
Not 100% sure what pieces you're trying to fit together, but you should be able to find the right size reducer/increaser couplings whether they're slip x slip, threaded x slip, etc. to get done what you need. Maybe it just takes a couple of couplings. It definitely does not go in that way though with plumbers putty. You want to use the proper slip or threaded fittings and primer/glue as needed. I went to supplyhouse.com for any fittings I couldn't find at my local stores.Does anyone know by any chance what is the best way to get this 2 things together in a way that won’t leak???? Plumbers putty and the glue???? Do I need a different connector??? My drains did not bring a plug so I bought a male threaded connector that goes from 1 1/2 to 2, but it has this line things on them. The threaded connector needs to go to a regular connector so I can add the pipe that goes into the t connector that joins the 2 drains…….TIAView attachment 499288View attachment 499289
Can we get pics from different/ better angles ? And of the separated parts that need to be put together ?
As usual, after I get a few hours of sleep my brain works a bit betterNot 100% sure what pieces you're trying to fit together, but you should be able to find the right size reducer/increaser couplings whether they're slip x slip, threaded x slip, etc. to get done what you need. Maybe it just takes a couple of couplings. It definitely does not go in that way though with plumbers putty. You want to use the proper slip or threaded fittings and primer/glue as needed. I went to supplyhouse.com for any fittings I couldn't find at my local stores.
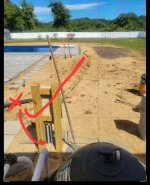
I am hoping someone can help me answer a question about the electrical conduit (NO, I am NOT crazy enough to try to do the electric work myself!!! I am going to bring an electrician in to connect…. I just want to try to get the trenching and maybe the conduit set up). I am only putting 1 light in the deep end, and I know that I have to run a conduit to a junction box by the pool………. My question is whether I can run the conduit from the junction box to the pool panel (which will be located in the side of the house by the pool equipment pad) in the existing trench for the plumbing, OR do I have to make a completely separate/new one for it………..TIA
Attachments
Mine is in the same trench with the junction right next to the pool pad panel. Code says I needed a junction box, so I got one, eventhough the light cord would have reached the panel. The path to the pool is also the plumbing trench.My question is whether I can run the conduit from the junction box to the pool panel (which will be located in the side of the house by the pool equipment pad) in the existing trench for the plumbing, OR do I have to make a completely separate/new one for it………..TIA


Last edited:
- Jul 18, 2019
- 616
- Pool Size
- 33780
- Surface
- Vinyl
- Chlorine
- Salt Water Generator
- SWG Type
- Pentair Intellichlor IC-60
x2Mine is in the same trench with the junction right next to the pool pad panel. Code says I needed a junction box, so I got one, eventhough the light cord would have reached the panel. The path to the pool is also the plumbing trench.
View attachment 499440
View attachment 499441
View attachment 499442
View attachment 499446
Two additional things to consider if you don't already have planned: running an empty conduit to the junction box in case you want to expand electrical capacity out there at some point, and also adding a convenience GFCI receptacle to your junction box
Great!!!’ One less thing to dig outMine is in the same trench with the junction right next to the pool pad panel. Code says I needed a junction box, so I got one, eventhough the light cord would have reached the panel. The path to the pool is also the plumbing trench.
View attachment 499440
View attachment 499441
View attachment 499442
View attachment 499446
Cool. Thanks for the tip!!!…. On my side, I decided to it my fears aside and went ahead and started the plumbing parts….. not too shabby if I say so myselfx2
Two additional things to consider if you don't already have planned: running an empty conduit to the junction box in case you want to expand electrical capacity out there at some point, and also adding a convenience GFCI receptacle to your junction box

Last edited by a moderator:
I am SOOOOO excited!!! I just received my pool panel and my SWG 

I was wondering if you guys could give me an opinion on when would be the best time to backfill the walls............ from what I have read, some people do it right after the pour the collar, and other do it after they put the liner and they start filling the pool............ what is the best way???


I was wondering if you guys could give me an opinion on when would be the best time to backfill the walls............ from what I have read, some people do it right after the pour the collar, and other do it after they put the liner and they start filling the pool............ what is the best way???
Attachments
- Jul 18, 2019
- 616
- Pool Size
- 33780
- Surface
- Vinyl
- Chlorine
- Salt Water Generator
- SWG Type
- Pentair Intellichlor IC-60
IMO, as long as your collar is set, it doesn't particularly matter the order. Ideally, I think you'd backfill as you filled the pool keeping the water and backfill approximately even. In my case, the pool was entirely filled before we backfilled anything. IMO, I'd think this is preferred as to the opposite (backfill before water) as on the off chance you do have wall movement I'd imagine it's easier to drain water and push walls in than it is to remove the backfill and push walls back out.I was wondering if you guys could give me an opinion on when would be the best time to backfill the walls............ from what I have read, some people do it right after the pour the collar, and other do it after they put the liner and they start filling the pool............ what is the best way???
Hey guys, me again!!! I have been sidetracked with my pool/hole due to several days of rain and shipping my kid off to Summer Camp for a couple of weeks…plus I had a concrete truck for the collar cancel on me because I am not able to do it myself. (I am a women???)IMO, as long as your collar is set, it doesn't particularly matter the order. Ideally, I think you'd backfill as you filled the pool keeping the water and backfill approximately even. In my case, the pool was entirely filled before we backfilled anything. IMO, I'd think this is preferred as to the opposite (backfill before water) as on the off chance you do have wall movement I'd imagine it's easier to drain water and push walls in than it is to remove the backfill and push walls back out.
No, don't use rebar if it's vermiculite. It will do zero and maybe rear it's ugly face at some point. Leave well enough alone and do as masses do.
What he ^^^^ said. The vermiculite is NOT solid like concrete. As such the rebar may push through it over time as people walk on it.
I see you flexing over there building your pool! I always wanted to build but never did.
Thread Status
Hello , This thread has been inactive for over 60 days. New postings here are unlikely to be seen or responded to by other members. For better visibility, consider Starting A New Thread.


