VinnyinNJ
Bronze Supporter
- Jul 20, 2022
- 1,052
- Pool Size
- 13500
- Surface
- Vinyl
- Chlorine
- Salt Water Generator
- SWG Type
- Hayward Turbo Cell (T-CELL-5)

Thank you. I hope it all stays together and level. I am sure it will though, I am just the type who plans on everything going wrong that way if it does I expected it and if nothing goes wrong then it is perfect.That's one of the most thorough site prep processes I've seen yet! Very nice work there.
I've got the same pool, but added the salt water chlorinator and just dump in four bags of salt each year. Zero chemicals needed otherwise....which makes the pool super simple to take care of. I only needed chemicals one year as the city was messing with PH on tap water to reduce lead issues. They stopped this after folks (including us) developed pin hole leaks in copper plumbing. Now it's just four bags of salt (same pool)...that's it. I run the salt water chlorinator 2 hours a day to keep the levels correct.
") Also, if the pavers just make up the difference after you added foam board under the pool..also ignore my comments!
Also, if the pavers just make up the difference after you added foam board under the pool..also ignore my comments!The pavers are dug down level with the foam board, and I had seen on YouTube that method for placing the pavers by setting up the top frameIt's hard to tell in your final pic, but I'd suggest taking the pavers (that the feet sit on) down to ground level as that is the way the liner/supports are designed to work. You may end up with issues if you elevate them. I take down my pool each year for winter (about 5-6 of them now) and find that the pool and liner are happiest with the feet/base at ground level. The way you set up on those pavers with the frame (and no vertical supports installed) btw was excellent thinking. It's a challenge to get the feet all vertical with a full pool, so you want to have about 8-12" to play with once you place the pads.
If you are following an install method that is already proven by other users, ignore my comments
Perfect..you should be all good thenThe pavers are dug down level with the foam board, and I had seen on YouTube that method for placing the pavers by setting up the top frame
I had the haywood one on and it had a leak so threw the one on that came with the pool to test and it actualy had better flow then the heywood one.Don't sweat the skimmer...easy job. It may feel a bit weird to cut the pool, but it's a non issue. The skimmer is pretty awesome for collecting the mass of organics that end up in our pool...ha. You may want to think about replacing the aerator return on your pool with the (Hayward?) one that came in your kit as it is a fair bit less restrictive.
When installing the heywood skimmer are you all leaving one of the intakes connected with the skimmer aswell or just the skimmer?

Good idea I like how that is set up, what filter are you using?I have both plumbed in using the game 1.5" to 50mm adapters. It's a Y setup with PVC valves on both...so basically I can take 100% from the skimmer, 100% from the Intex returns, or combination. It's handy to have the skimmer valved separately from the Intex supply bits if/when you want to use a pool vacuum via the skimmer insert. I open up the Intex supply valve to improve solar efficiency (by taking cooler water from the mid section of pool).
The dual pump setup with chlorinator running only uses 4 amps @ 120 V...a lot less than the dual speed pump I was using previously (13 amps)..and is moving 1800 GPH through the system with solar on.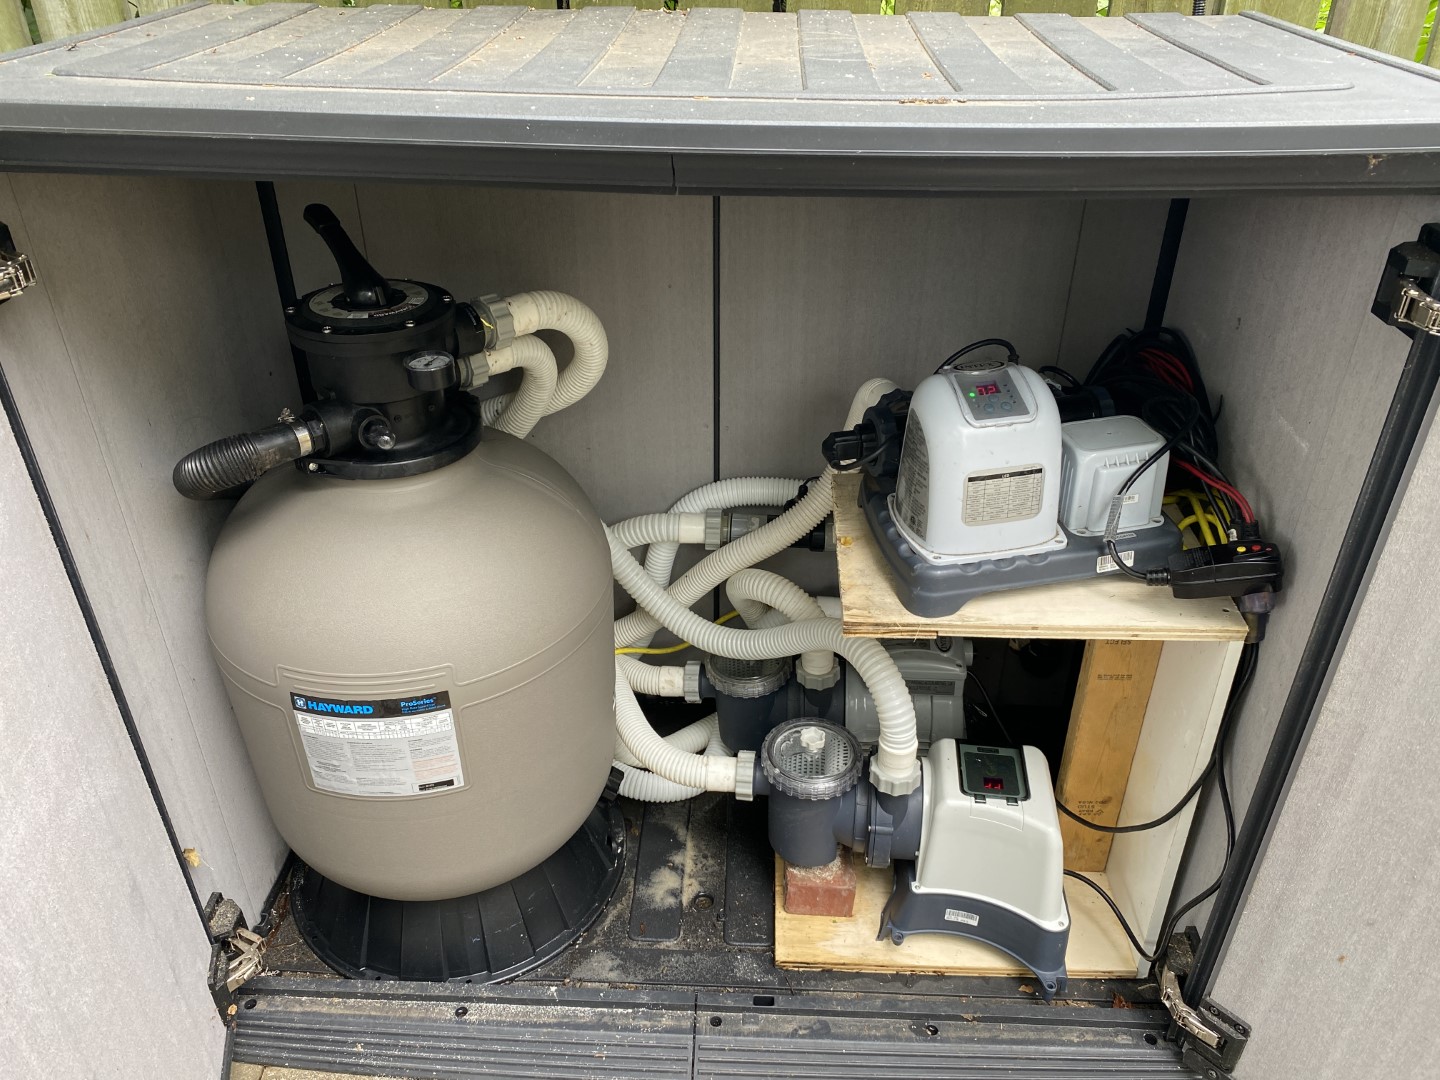
Do the solar panels actualy extend your swim season? I had thought of using them next season but am on the fence if they would actualy do enough to justify the extra work ill give myselfI recently added in the 21" Hayward filter...it's a bit overkill honestly. It doesn't flow dramatically better than the Intex 12" filter, likely as the head/valve setup is very similar. The pump setup is two pumps, Intex SF80110-1 and Intex SF80110-2 (.24 HP), in series as I need to pump through two stories/8 panels of solar. I have fun with the science/data part of this project
This is more or less an account of the mods etc. from 2018 onwards: Solar Swimming Pool Heat DIY with SmartThings Automation
I dont have the skimmer installed yet though just the intakes and outputs that the pool came withIt will drain (overflow) via the skimmer lid...
Nothing. It will just fill up.I dont have the skimmer installed yet though just the intakes and outputs that the pool came with