Nashvillejoe

Gold Supporter
Apr 14, 2013
119
Nashville
Pool Size
20000
Surface
Vinyl
Chlorine
Salt Water Generator
SWG Type
Hayward Aqua Rite (T-15)
I wanted to share my photos and my process pics…..

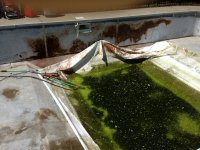
in 2013 i did a refubish on this pool….. no knowing anything about pools and there is no way i get through that without TFP- you guys saved my bacon many times!!! So flash forward 10 years and its time for replacement and of course to correct all the dumb errors the first time out…..this is the recap for the first time out….. you can see there were all kinds of problems and it was in rough shape…. Not unusual for a house in foreclosure…….


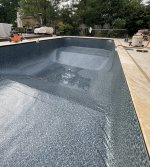
this time out…. I started making calls for a new liner in Nov last year…. It didn’t make much sense to put a new liner in just to shut the pool down for the winter, and we thought- why spend $1600 on a liner just to set it in our garage for 6 months…. So we decided to wait until march/April……. Hahahahahahahah!!!

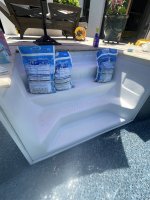
that same line was now $2500…. I also decided to replace the light- the fitting gaskets- do foam on the sides and bottom…

we decided to go with a black bottom liner 30Mil with no banding at the top…..61C24C4B-3996-4D75-989C-F486B50EFEBD.jpeg
 

Attachments

  • 642D270A-4D7A-47F7-BC0A-3E90C8B2C884.jpeg
    642D270A-4D7A-47F7-BC0A-3E90C8B2C884.jpeg
    619.1 KB · Views: 76
  • DAD1D96D-31A9-4B01-9B1D-0E51A2F199B0.jpeg
    DAD1D96D-31A9-4B01-9B1D-0E51A2F199B0.jpeg
    487.3 KB · Views: 69
  • 5DD5A843-14D1-4E32-A4FA-F8155170E011.jpeg
    5DD5A843-14D1-4E32-A4FA-F8155170E011.jpeg
    516.3 KB · Views: 62
  • DB3F231F-881E-4FF2-8342-6BDAED6D2E76.jpeg
    DB3F231F-881E-4FF2-8342-6BDAED6D2E76.jpeg
    745.7 KB · Views: 61
  • C0CD4C2A-9F28-40B0-8573-185B42E40D15.jpeg
    C0CD4C2A-9F28-40B0-8573-185B42E40D15.jpeg
    932.6 KB · Views: 58
  • FF1A49B6-0BD9-46F1-8DEC-A9949B32A9A6.jpeg
    FF1A49B6-0BD9-46F1-8DEC-A9949B32A9A6.jpeg
    496.2 KB · Views: 58
  • C0C050A9-72AD-4FE5-BD85-301837F8DB9A.jpeg
    C0C050A9-72AD-4FE5-BD85-301837F8DB9A.jpeg
    640.3 KB · Views: 58
  • DA09B6F8-156F-413B-A773-548FB5B30BCF.jpeg
    DA09B6F8-156F-413B-A773-548FB5B30BCF.jpeg
    506.4 KB · Views: 58
  • B932522B-65F6-4F29-95AA-F5D27B2E1F4B.jpeg
    B932522B-65F6-4F29-95AA-F5D27B2E1F4B.jpeg
    570.9 KB · Views: 63
Last edited:
  • Wow
  • Like
Reactions: dfwnoob and Newdude
So first was the prep, you can see from the pics the gaskets were shot and the salt water was leaking into and corroding the sides….. i had painted the walls with rust inhibiting auto primer….. so that provided some measure of protection but it was still badly pitted…. So we spent a day with angle grinders and took as much off as possible to smooth the sides….. hard work- 2 guys with grinders - about 4 hours of time- and lots of metal pads….. the only time over the last few years i actually wore a mask- a ton of dust1B3034DA-B771-4A4A-AD05-983EB8EFA98F.jpeg
 

Attachments

  • 867FEADE-E4B2-421B-87A5-3127F7B9C698.jpeg
    867FEADE-E4B2-421B-87A5-3127F7B9C698.jpeg
    747.4 KB · Views: 26
  • 325C32E3-2BF4-4CE0-88CC-96F72D798CFF.jpeg
    325C32E3-2BF4-4CE0-88CC-96F72D798CFF.jpeg
    633.8 KB · Views: 22
  • 01792DCD-FAA2-490B-B9A0-87FFA05A3663.jpeg
    01792DCD-FAA2-490B-B9A0-87FFA05A3663.jpeg
    560.6 KB · Views: 25
  • 1F3EA036-E22D-47B3-A421-EF86C5089C15.jpeg
    1F3EA036-E22D-47B3-A421-EF86C5089C15.jpeg
    628.1 KB · Views: 24
  • A77D5F01-071F-4914-A20E-DA0F603C54F7.jpeg
    A77D5F01-071F-4914-A20E-DA0F603C54F7.jpeg
    668.5 KB · Views: 26
Last edited:
the next step was dealing with the sides…… after doing a bit of research i decided on a product called, Liquid Rubber- Foundation Sealant
its a thick gummy product and it goes on pretty thin so you want 2-3 coats of it….. it filled in all of the pitting from the saltwater and by the time i put the 3rd coat on…… it was pretty cool …… i purchased a 5 gal….. and 3 coats about a gallon each… first coat was more… the last coat was less…. Now i was ready for the foam liner….52E6643C-D567-4AF5-92C4-714615D2F01A.jpeg
 

Attachments

  • 0468EA23-25DE-48AA-B9DA-DCAC16C186C1.jpeg
    0468EA23-25DE-48AA-B9DA-DCAC16C186C1.jpeg
    604.8 KB · Views: 22
  • 7B5112FD-0695-4C07-9569-0BA6450B2D01.jpeg
    7B5112FD-0695-4C07-9569-0BA6450B2D01.jpeg
    674.4 KB · Views: 22
  • 12BEAB30-926D-428D-B4C5-788392552CEE.jpeg
    12BEAB30-926D-428D-B4C5-788392552CEE.jpeg
    550.7 KB · Views: 22
  • 87324709-E7F6-4989-93DD-5ACFACC6FFD3.jpeg
    87324709-E7F6-4989-93DD-5ACFACC6FFD3.jpeg
    612.6 KB · Views: 23
Last edited:
This was strangly the most challenging part of the entire process…. i am sure the pros have tricks but i didn’t and it was really REALLY hard!!!

I ended up spending about 6 hours doing some floor prep on some divits with fast setting water proof cement and then used a mortar premix to smooth over the top- but it definitely needed the foam- after the foam went in ….. we laid out the liner and set it in……. I was exhausted…. This is really hard work i salute the guys who do this for a job….. whatever your getting paid ….. its not enough!!!13BC437C-0834-4167-9305-4B2031BC5A02.jpeg
 

Attachments

  • 413628AA-5599-4D59-A28A-B5EF843DAF40.jpeg
    413628AA-5599-4D59-A28A-B5EF843DAF40.jpeg
    716.9 KB · Views: 36
Last edited:
The next part was getting the vacuum on it…… i realized that the whole liner needed to be adjusted ….. this really worried me…. But with my wife and 9 year old daughter we dropped the entire liner and put it back in…… much easer the next day after the liner had a few hours in the sun…… i used two shop vac 5hp guys and dropped them down the a few inches above the hopper.- i then took 3 pieces of ply that i had laying around- laid them out taping the seams and covered the stairs and taped it all up to get a good seal…. When i had about 10” of water in i cut in the drains…. There was some wrinkling in the ends and corners….. but the vacs did a great job of evening them out……. I wanted to keep the vacuums on until i have about 6 inches on the shallow parts….. this meant turning them off so they weren’t running all night….. i then turned them back on at 5am and they did their work…… there were very few wrinkles….. i dropped 3 bags of salt in front of the bottom step to hold the liner in placeD0ADA040-CA71-481F-9582-308EC00539BE.jpeg
 

Attachments

  • C39C11AA-6896-4452-BC7F-2257DC529D22.jpeg
    C39C11AA-6896-4452-BC7F-2257DC529D22.jpeg
    700 KB · Views: 26
  • 5B3C22F6-EA7D-4BF1-8B6E-CA97AF21B9A8.jpeg
    5B3C22F6-EA7D-4BF1-8B6E-CA97AF21B9A8.jpeg
    1.2 MB · Views: 25
  • B5CDE896-932B-4A53-8CE1-F0723CC6A0C7.jpeg
    B5CDE896-932B-4A53-8CE1-F0723CC6A0C7.jpeg
    766.6 KB · Views: 26
  • Like
Reactions: dfwnoob and Newdude
The last step was cutting in and cleaning the stairs…. I bought a new stair kit but decided to just clean and reinstall the original and its pretty solid ….. i will keep the new one in the even i have to revisit……. I am almost full…… probably tomorrow….. i used two hoses from different parts of the house to make sure i got as much in as possible……. I Priced a water truck but in my area of Nashville- $600/per truck….. 3 trucks….. we called the water company- they said there was a $150 charge call them and let them know and they would note it on the bill… we opted that route….. and a big reason why was…..slow fill allows you to correct mistakes….. and i made a few….. it also lets you really pay attention to the seams…… but i will tell you…. Those shop vacs really worked their tails off…. I am surprised they didn’t blow up …

my final post will be after i get the deck cleaned up - but i am very VERY happy with the result ….. cheers ….. and again thanks for the help and confidence….. this is my go to resource…..

F6595F63-5758-46F2-8536-B9CF3A10709A.jpeg
 

Attachments

  • 27FFC818-005C-43A6-860D-0319DE8D0F6D.jpeg
    27FFC818-005C-43A6-860D-0319DE8D0F6D.jpeg
    759 KB · Views: 38
  • 8A6A80D0-0B77-442A-B3B1-B3C7B6448437.jpeg
    8A6A80D0-0B77-442A-B3B1-B3C7B6448437.jpeg
    544.8 KB · Views: 39
  • C13E26DC-E38C-4125-B785-777C6B2F2E0B.jpeg
    C13E26DC-E38C-4125-B785-777C6B2F2E0B.jpeg
    766.2 KB · Views: 40
This is such fantastic information!! Thank you!! I will be sure to "document" our adventures as well... because this has been a huge confidence boost.

For the foam liner, you said you did the walls and the floor... how is the "corner" where the wall meets up with the floor? Was it easy to line them up? How do you like the foam floor?? We don't have any foam at all (not even on the sides) right now, and I think it'd be fantastic. LOL.

Would having a foam liner on the bottom cover/hide any minor poolcrete "heel craters"? We haven't been able to find any poolcrete locally... and getting a bag shipped is a little insane right now. I mean, of course we'll do it if we really have to, but sheesh!!

This is our edge... I'm assuming getting the liner into the channel will be pretty self explanatory once we get in there. I think (at the moment) we're most concerned about getting the right replacement gaskets & faceplates. We're going to have to just take the cover off so we can get to things & figure out the correct part numbers, aren't we. LOL
 

Attachments

  • 20220512_192036.jpg
    20220512_192036.jpg
    358.9 KB · Views: 15
  • 20220512_192100.jpg
    20220512_192100.jpg
    577.6 KB · Views: 16
This is such fantastic information!! Thank you!! I will be sure to "document" our adventures as well... because this has been a huge confidence boost.

For the foam liner, you said you did the walls and the floor... how is the "corner" where the wall meets up with the floor? Was it easy to line them up? How do you like the foam floor?? We don't have any foam at all (not even on the sides) right now, and I think it'd be fantastic. LOL.

Would having a foam liner on the bottom cover/hide any minor poolcrete "heel craters"? We haven't been able to find any poolcrete locally... and getting a bag shipped is a little insane right now. I mean, of course we'll do it if we really have to, but sheesh!!

This is our edge... I'm assuming getting the liner into the channel will be pretty self explanatory once we get in there. I think (at the moment) we're most concerned about getting the right replacement gaskets & faceplates. We're going to have to just take the cover off so we can get to things & figure out the correct part numbers, aren't we. LOL
So question one….. if you get your liner dropped in and its hot out….. my was 90 degrees……. I did it with 2 19 year olds… the more people you have the better….. the liners come from the factory with a line drawn on the part facing the wall - its like a 3” pen notation….. and on the pool side of the corner they put a sticker….. thats usually pretty close to the center of the radius….. so we put it in on a sat….. and set up the vacuums….. on sun afternoon coming back from church…. You could see it was a little janky off maybe 6-8” so my wife and my 9 year old daughter pulled the liner out of the wall…… started in one corner and went around the whole pool - took the 3 of us about 30 min to get it back in….. by that time its been baking in the sun a bit so it’s really stretchy and easy to manipulate…. But a bit toasty on your fingers…. So there is that….. when you get the fans on…… it will pull those corners pretty dang tight ….. and by the time the water is filled…. The liner will be right up againest the wall…. 5lbs per gal 20,000 gal is 100,000 lbs of pressure….. pretty cool huh!!

foam….. i used a quick set wet cement mixed up 3 gal and slathered on on my divets…. making it as smooth as possible then came back an hour later with a smooth Mor tar… got it as smooth as necessary- knowing that the pool foam would soften all the rough edges….you cannot see any imperfection with the eye…. But if you walk around you can feel seams etc….. but the foam is rockin on your feet my daughter loves it !!!

finally on the gaskets- flex seal white- its a flexible rubber product- if you have say a drain gasket… they lose their viscosity after a few years like any gasket…… some pool installer like to use one under the liner and above….. what i did was take flex seal and spread a bead all around the installed drain plate and then squeeze the old gasket against it (my new order only included 2 gaskets)….. that gives you a complete seal around the drain face, pop your two screws on their and then you are good to go….. with the weight pushing on the liner AND the flex seal product - you will get an excellent water tight seal on both your drains…. i would say….. jump in and take it on…. It make take you 2-3 weeks…… but you will do a wonderful job….. because you care and are really paying attention…..

trust me…… if you can figure out how to fill out a Tax Return;……. You will do fine….. especially with this forum …… some of the guys here will walk you through any questions you might have- they are smart and giving with their time….

ps …… you have the same track we have - i think its called a JTrack…. Or something like that- its the most common one sold….. everyone has that one!

PSS…. The guys who make the pool liners….. most of them you can call them up - and chat….. Tara or GLI most of the companies….. those guys will also help you tremendously
Do you think something like this would work??

 
So question one….. if you get your liner dropped in and its hot out….. my was 90 degrees……. I did it with 2 19 year olds… the more people you have the better….. the liners come from the factory with a line drawn on the part facing the wall - its like a 3” pen notation….. and on the pool side of the corner they put a sticker….. thats usually pretty close to the center of the radius….. so we put it in on a sat….. and set up the vacuums….. on sun afternoon coming back from church…. You could see it was a little janky off maybe 6-8” so my wife and my 9 year old daughter pulled the liner out of the wall…… started in one corner and went around the whole pool - took the 3 of us about 30 min to get it back in….. by that time its been baking in the sun a bit so it’s really stretchy and easy to manipulate…. But a bit toasty on your fingers…. So there is that….. when you get the fans on…… it will pull those corners pretty dang tight ….. and by the time the water is filled…. The liner will be right up againest the wall…. 5lbs per gal 20,000 gal is 100,000 lbs of pressure….. pretty cool huh!!

foam….. i used a quick set wet cement mixed up 3 gal and slathered on on my divets…. making it as smooth as possible then came back an hour later with a smooth Mor tar… got it as smooth as necessary- knowing that the pool foam would soften all the rough edges….you cannot see any imperfection with the eye…. But if you walk around you can feel seams etc….. but the foam is rockin on your feet my daughter loves it !!!

finally on the gaskets- flex seal white- its a flexible rubber product- if you have say a drain gasket… they lose their viscosity after a few years like any gasket…… some pool installer like to use one under the liner and above….. what i did was take flex seal and spread a bead all around the installed drain plate and then squeeze the old gasket against it (my new order only included 2 gaskets)….. that gives you a complete seal around the drain face, pop your two screws on their and then you are good to go….. with the weight pushing on the liner AND the flex seal product - you will get an excellent water tight seal on both your drains…. i would say….. jump in and take it on…. It make take you 2-3 weeks…… but you will do a wonderful job….. because you care and are really paying attention…..

trust me…… if you can figure out how to fill out a Tax Return;……. You will do fine….. especially with this forum …… some of the guys here will walk you through any questions you might have- they are smart and giving with their time
Do you think something like this would work??

Rapid set water stop for the deep divets

Mortar repair pre mixed - for the skim top
Watch a couple of YouTube videos try and get the patch as smooth as possible
 

Enjoying this content?

Support TFP with a donation.

Give Support
Rapid set water stop for the deep divets

Mortar repair pre mixed - for the skim top
Watch a couple of YouTube videos try and get the patch as smooth as possible
I'm going to start a new thread so as to not confuse or muddle up your post, but we just cut our liner out this AM, and ugh... not what we hoped to find. :( I'm sure it's not as "tragic" as we're moaning about, but ugh... without a single iota of knowledge, I tend to always fear the worst. LOL
 
I'm going to start a new thread so as to not confuse or muddle up your post, but we just cut our liner out this AM, and ugh... not what we hoped to find. :( I'm sure it's not as "tragic" as we're moaning about, but ugh... without a single iota of knowledge, I tend to always fear the worst. LOL
don’t borrow trouble from tomorrow…… there is plenty to deal with today……

the reality is that you know a whole lot more about your pool today than you did yesterday……. When i tore out my liner in 2012- i had never owned a pool in my life….. sometimes you just have to jump in with both feet…….. pun intended!!
 
  • Like
Reactions: Newdude
Thread Status
Hello , This thread has been inactive for over 60 days. New postings here are unlikely to be seen or responded to by other members. For better visibility, consider Starting A New Thread.